Create an Access Review Certification - Video
IDHub allows Administrators to quickly create certifications, to review access a User has.
These certifications are based on either User Access or by Resource Assignment. In this short video, learn how to create a new certification, run that certification, and certify or revoke access to Users accordingly.
User Access Certification – Video Transcript
Hello, welcome to IDHub. In this video, I’ll show you how to create a new certification, how to run that certification, and certify or revoke access to a user.
To begin, let’s log in with our organization name, and then I’m logging in as Jerome, who is an Access Manager. Only Access Managers and System Administrators have permissions to create a new certification. From the dashboard, we’ll go ahead and click on review certifications, which will bring us to the page where we can view all of our active, drafted, and archived certifications.
Certification is the process of reviewing and auditing access to users or resources, to either certify or revoke user access accordingly. Certifications can be based on a “User Access” or “Resource Assignment”. If we wanted to create a “User Access Certification”, then we would look at a particular user or a group of users, and run a certification for access, against a specific resource or a number of resources. And on the flip side, if we wanted to create a “Resource Assignment Certification”, then we look at a specific resource or a group of resources, and certify who has access to that particular resource or group of resources, and that could be for a single user, or a group of users. So I will create today, a certification for a single user.
I’m closing this “Wizard Tour”, which is a great tool to help navigate through this, “Creating a Certification”, and we do have these tours available for all of our System Administrator functions as well. So that’s really helpful.
So our first page here is where we enter our basic details. We’re going to create a new certification called “Access Review for David”.
“Run this certification when you need to review access for David”.
This is going to be a “User Access Based Certification”. And “Certification Request Approval”, is who or what Role is going to approve this certification to be run. So if anyone goes into IDHub and says, “I want to run this certification for access review for David”, that initial task is generated and sent to in this case, we’ll select the user “Jerome”. You could select a Role like “Marketing Manager”, or let’s say “Sales Lead”, but in this case, I’ll select this user. This will be for the certification workflow.
So moving on “Select Users” is where we will select the user that we want to review access for. And we could do that by entering their name or by query. So if this was a new certification to review access for the Marketing Department, for every user in the Marketing Department, I could create a query like the “department equals marketing”, and then that would generate a certification task to review access for all the people who are in the Marketing Department. In this case, I’m going to solely select David.
Now moving on, this is where we select our resources. Now I could manually add any number of individual applications, entitlements, or roles, and then we’d be looking at only those particular resources that David might have access to. In this case, I want to look at all of our active resources within IDHub right now. So I’ll just run a query. Something like “disabled equals false”, meaning all active resources.
And the next page is “Certifier and Scheduler”, and this is where we’ll go ahead and select who is going to certify the access for David. I’m going to select “Jerome”, and I’m selecting Jerome for everything here, because it’s going to make this video a lot quicker and easier to follow, because I won’t have to log in and out. But anyway, my certifier is going to be Jerome.
I could select a Role like “Marketing Manager” or “IT Lead”. I could select the certifier to be the “Beneficiary’s Manager”, which would be David’s direct manager, or I could select the “Resource Owner”, which would be the person that’s responsible for that particular resource. So every time we add a new application, or a new entitlement, or a role, we have to assign that to a specific person. Who’s going to be managing that? So if we selected ”Resource Owner”, then the resource owner would get that task. So if there are multiple resources that we’re looking at, and multiple resource owners, then the resource owner would get a task for their particular resource. Which is really neat. So in this case, we’re selecting Jerome as a user.
Now we’re at the settings page, and this is where we can choose some configurations that are out of the box, like “requiring comments on all certified operations”, or “preventing a self-certification”. These are not required, but can be chosen.
We could also choose to have another certifier, and we could choose a user or a role.
The “Trigger Settings” is something that is going to be a future release feature. And this is something our developers are working hard at. A trigger setting is something like if someone changes a department, then an automatic certification would be triggered to review access, which is really neat.
The “Certification Duration”, this is the duration of the task. How many days, months, or years will you allow that task to be active before it expires? And the task, meaning Jerome is the certifier. So he’s going to have one day to complete the certification task and review access for David.
This is our “Summary” page and it shows everything that is included with this new certification. And I’m pretty confident with all my choices, so I’m just going to scroll down and click submit. And now our certification has been successfully created. I can open up the certification here, and look at all the details within it. I could edit the certification or run it right here, a quick way to run it would be from the main page here, clicking on this ellipsis and clicking on the run now, which I’m going to do.
So I’ll show you how to run this new certification and IDHub will ask me if I want to do this. Yes, I do. And before it can actually be certified by the certifier, that initial task has been generated. So Jerome should now have a task to approve this certification to be run. And so if we open this up, saying that someone meaning Jerome, Jerome wants to review access for David, and now Jerome is going to say approved.
So he’s going to approve that this certification be run again. If I had assigned this to someone else, I would have had to log out and log back in. So for the sake of keeping the video shorter, I decided to choose Jerome.
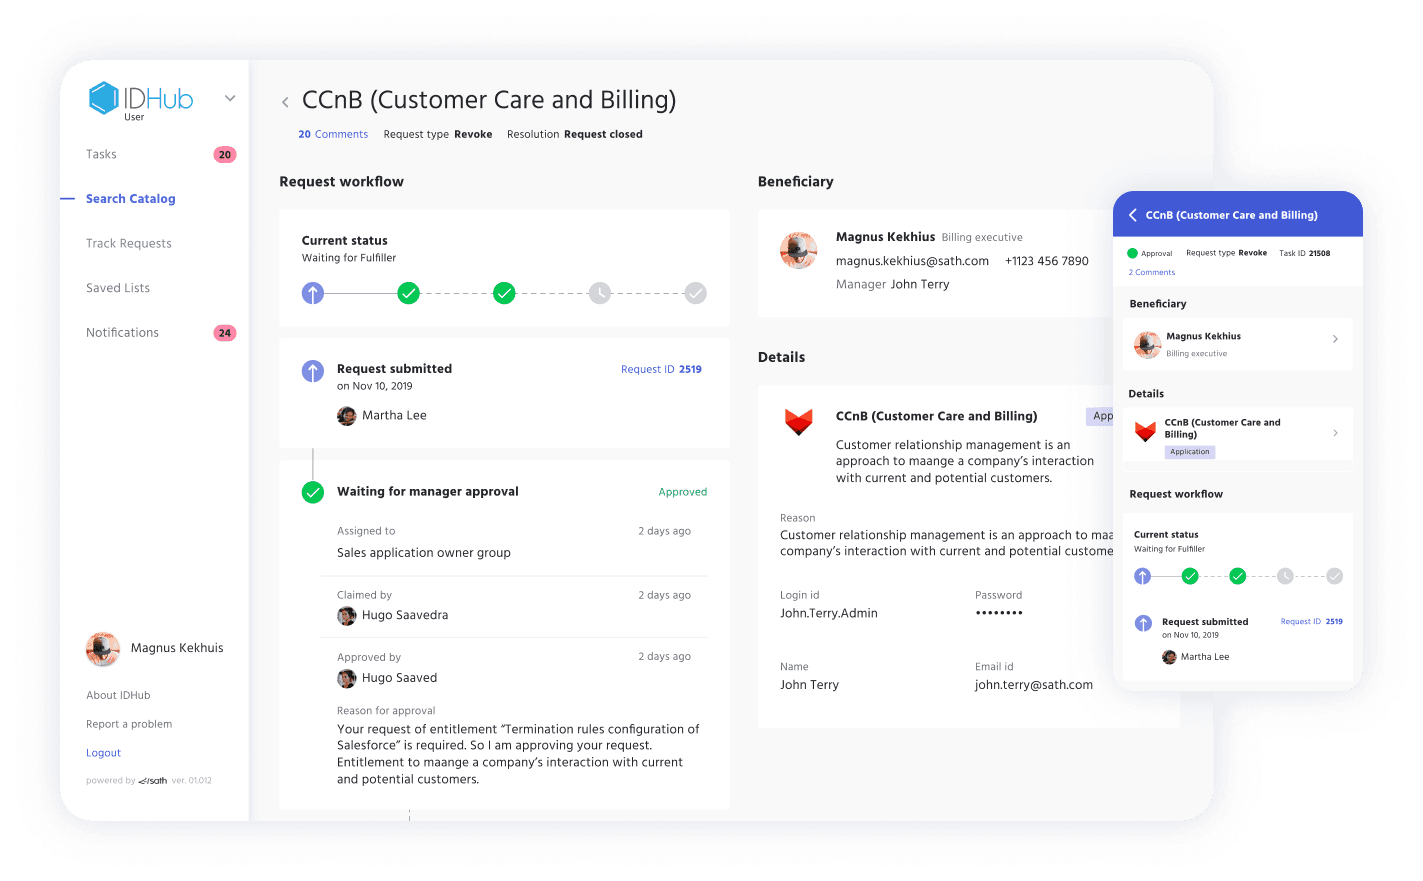
So a second task now should be generated for Jerome, which would be to actually certify access. And so I’ll just click off of that tasks page, and then click back in, and that should have refreshed the new task. And it has, so here is our task to certify access for David. And as you can see, that expiration date is right here. There’s one day left to process the certification. I’ll go ahead and open it up. And we could see here all of the resources that David has access to. I’m going to certify access for Zoom. I’m going to certify access for Slack, and I’m going to revoke access to GSuite, because I want to show you what it looks like to revoke, and what that de-provisioning looks like. So they’re going to revoke, and once I click on the last command, IDHub will ask if I want to complete, and yes, I do want to complete the certification. So in a couple seconds here, the certification will have been completed. And that’s it, that’s how easy it is to certify.
So what happens now, our tasks are starting to generate for the de-provisioning of that resource that I revoked. And so I’ll start by logging into David’s account and we can see that there’s a request on his end that was generated. And that request is not because he requested GSuite, but because it’s being taken away from him.
So everything has a workflow, and the workflow that has been assigned to that application onboarding or resource onboarding, is what the de-provisioning is going to look like. So that the provisioning is the same as the de-provisioning, as far as the approvals go. If we open up this request, we can see that right now, it’s “Waiting for Manager Approval”. It’s been assigned to Marc, who is David’s direct manager. So Marc is going to have to approve the de-provisioning of this resource here.
So let’s go ahead and logout of David’s account, and login to Marc’s account, and we’ll go ahead and approve the task to revoke access for GSuite to David. And so, from his dashboard, he’ll go ahead to his “Tasks” page, where he can see this task, and see that this is to revoke access to David. And so he’s going to approve it, and once he approves it, we’ll go ahead and log back into David’s account to see where it is in the process.
So we’ll first navigate to his “My Profile” page, and we can look to see what that resource looks like from his profile page. It’s still showing “Provisioned”. So if we go to requests, we can see the status is currently, it’s been assigned to an “Approval Group”. So now it’s, we have to find out who is “Approver Group 1” , log out of David’s account, and log into their account. And to do that, we’ll just go ahead and search the catalog for a Role, and we’ll search for “Approver Group 1”. We’ll open that Role up, and view the members. And we can see that Kevin and Melinda are members.
So, we’ll logout of David’s account, and login to Kevin’s account, who is part of “Approver Group 1”. And once we do that, I believe the next step is “Manual Fulfillment”, which is the actual de-provisioning of that source. And so once we approve this task, I believe David will be able to see the de-provisioning. “David Green” is who we want. So we’re gonna claim this task, and claiming is because Kevin is part of a group of people, with the Role “Approver Group 1”, he’s going to have to “Claim” the task before he can approve it. So that way it is removed from that rolling task list. So all the approvers won’t see this anymore, once it’s claimed by one of the members of that Role.
Okay, so Kevin approved to revoke this resource, and now that that’s done, we’ll log back into David’s account, and I believe we should see the de-provisioning has begun, which would mean he no longer has access to GSuite.
And go ahead and look at his profile now, and we could see that it’s de-provisioning here. If we look at his requests, I bet the next step here is a “Manual Fulfillment”. Yes, “Manual Fulfiller Group”. Let’s go ahead and search that group to determine who is part of it, our members.
Let’s go ahead and login as Frank, and now from Frank’s dashboard, we’ll go ahead and get to his tasks page, and we should see that task, which it’s right here. So again, he needs to “Claim” this because he’s part of a group. And once it’s claimed, the other group members will not see this on their tasks page anymore. And so we’re going to say revoking access, and now we should be able to see that GSuite is completely revoked, and David no longer has access to that resource. So let’s look at his profile one last time, and we can see here that access to GSuite has been revoked. So in order for him to obtain access, he’d have to go through the request process, which we do have videos on about the lifecycle of the request process.
That’s all, that’s the end of this video. Thank you so much for watching, and I encourage you to check out some of our other IDHub videos. I hope you have a wonderful day.
Thank you so much.
Automate tasks and save IT time.