Installing IDHub
Install IDHub
Before installing IDHub, please review the IDHub Installation Planning Guide.
The following sections elaborate the steps for installing IDHub in your Cluster.
Step 1: Clone IDHub App Repo
Run the following command in your terminal to Clone IDHub App Repo.
git clone https://bitbucket.org/sath-inc/app.git && cd app
Step 2: CA certificate
A Certificate Authority (CA) certificate is a digital certificate issued by a Certificate Authority that an organization controls or trusts. CA certificates are crucial for establishing secure communications in a network by verifying the identity of certificates issued under it. In the context of IDHub, a CA certificate allows you to extend your organization's trust chain, ensuring that only authorized entities can communicate securely with your IDHub instance.
You can either use a public CA certificate or generate your own custom CA certificate. The following section elaborates how you can publish your custom CA certificate and configure IDHub to use it.
- Configuration File:
Below is a sample configuration for generating CA certificates. Please change the configuration as per your organization needs.
[ req ]
default_bits        = 2048
default_md          = sha256
default_keyfile     = tls.key
distinguished_name  = req_distinguished_name
x509_extensions     = v3_ca
prompt              = no

[ req_distinguished_name ]
C  = US
ST = IL
L  = Shaumburg
O  = Sath Inc
OU = www.sath.com
CN = sath.com

[ v3_ca ]
subjectKeyIdentifier=hash
authorityKeyIdentifier=keyid:always,issuer
basicConstraints = critical,CA:true, pathlen:0
keyUsage = critical, digitalSignature, keyCertSign, cRLSign
extendedKeyUsage = serverAuth, clientAuth
subjectAltName = @alt_names

[ alt_names ]
DNS.1 = sath.com
DNS.2 = *.sath.com
- Generate a Self-Signed TLS Certificate Along with Private Key:
Run the following command to generate a self-signed TLS certificate along with private key.
openssl req -newkey rsa:2048 -nodes -keyout tls.key -x509 -days 3650 -sha256 -out tls.crt -config openssl.conf
- Configure IDHub to Use Custom CA Certificate
Configure IDHub to use the custom CA certificate by adding the tls.crt in the following path.
scripts/certs/trusted
Step 3: Install the Required Data Stores
Data stores are specialized databases or storage systems that help manage and organize different types of data required by the application. These systems store and retrieve information efficiently, ensuring smooth operation.
In this step, you will install the necessary data stores, which include:
- MongoDB: A NoSQL database that stores data in a flexible, JSON-like format.
- PostgreSQL: A powerful, open-source relational database used for handling structured data.
- Kafka: A distributed event streaming platform that helps process and transfer data in real time.
- Elasticsearch: A search and analytics engine designed for fast querying and indexing of large datasets.
- MinIO (Recommended): An object storage system compatible with Amazon S3, used for storing large amounts of unstructured data. If MinIO is not used, any other S3-compatible storage system can be substituted.
Installation Command
To install these data stores, run the following shell script:
./scripts/idhub/install/installDataStores.sh <DATASTORE_NAMESPACE_PREFIX> <--single-node|--multi-node|--managed-cloud>
Namespace Prefix Requirement
<DATASTORE_NAMESPACE_PREFIX>: Prefix for naming data store namespaces.- Allowed Characters: Alphanumeric (letters and numbers only).
- Length Requirement: Exactly 3 characters.
- Disallowed Characters: No special characters (e.g., @, #, -, _, etc.).
- Examples of Valid Values: abc, sds, sd1.
Deployment Modes
The installation script supports the following deployment modes:
--single-node: Applicable for MicroK8s. Installs all data stores in a single-node setup.--multi-node: Applicable for MicroK8s. Installs data stores in a multi-node setup.--managed-cloud: Assumes the use of managed cloud services where applicable (e.g., GKE, AKS, EKS, etc.).
- The script uses a namespace prefix as an argument and runs the installation scripts for each data store.
- Run this script only once.
- This shell script can be executed on any Linux OS within your cluster.
- The installation script has been tested on GKE, MicroK8s and Kind and should also be compatible with Amazon EKS and Azure Kubernetes Service (AKS).
- There is one shared data store for multiple IDHub installations, meaning a single deployment of each data store (Elasticsearch, MongoDB, PostgreSQL, Kafka, and S3-compatible storage) serves all IDHub instances.
Step 4: Initialize and Configure Data Stores for IDHub Instance
Ensure that you have installed kubectl, helm and jq before executing the below command. Refer to Install Required Applications for detailed instructions for installing this in your cluster.
Let’s clarify what it means to initialize and configure data stores.
- Initialization: This refers to the process of setting up the data stores so they are ready to be used by the system. This includes creating necessary databases, setting permissions, or enabling essential features.
- Configuration: This ensures that each data store is correctly set up to communicate with the IDHub instance, following predefined settings for performance, security, and connectivity.
In this step, you will run a script that:
- Verifies the readiness of each data store, ensuring they are running and accessible.
- Generates the necessary configuration files to enable IDHub to interact with the databases and storage systems.
To complete this process, execute the following script within your Kubernetes namespace (a logical grouping of resources in Kubernetes).
./scripts/idhub/install/initDataStores.sh <DATASTORE_NAMESPACE_PREFIX> <IDHUB_INSTANCE> [-y]
<DATASTORE_NAMESPACE_PREFIX>: Prefix for naming data store namespaces.- Allowed Characters: Alphanumeric (letters and numbers only).
- Length Requirement: Exactly 3 characters.
- Disallowed Characters: No special characters (e.g., @, #, -, _, etc.).
- Examples of Valid Values: abc, sds, sd1.
<IDHUB_INSTANCE>: The IDHub instance to configure the data store for.- Allowed Characters: Lowercase letters (a-z), Numbers (0-9).
- Length Requirement: Must adhere to K8s namespace character limit.
- Disallowed Characters: No Uppercase letters, No Special characters (e.g., _, @, /, .).
- Examples of Valid Values: abccorp, xyzcompany2.
-y: Optional flag to skip confirmation prompts.
Step 5: Load the Data Store Configuration
A data store configuration is a set of instructions that tells the system how to connect and interact with different databases and storage services. This configuration ensures that IDHub can store, retrieve, and manage data efficiently across various components.
Once you have successfully configured the IDHub instance and installed the required data stores (such as MongoDB, PostgreSQL, and others), the next step is to apply the configuration settings. These settings are typically defined in a YAML file, a structured text format used to specify configuration details.
To apply the data store configuration, execute the following command. This will deploy the configuration settings to your Kubernetes namespace, ensuring that IDHub can properly communicate with the installed datastores.
kubectl create namespace <IDHUB_INSTANCE>
kubectl -n <IDHUB_INSTANCE> apply -f ./build/k8s/<IDHUB_INSTANCE>_config.yaml
<IDHUB_INSTANCE>: The IDHub instance to configure the data store for.- Allowed Characters: Lowercase letters (a-z), Numbers (0-9).
- Length Requirement: Must adhere to K8s namespace character limit.
- Disallowed Characters: No Uppercase letters, No Special characters (e.g., _, @, /, .).
- Examples of Valid Values: abccorp, xyzcompany2.
- Replace
<IDHUB_INSTANCE>with the namespace corresponding to your IDHub instance where the data store configurations should be applied.
Step 6: Installation Command
Important: Before executing the command below, ensure the following prerequisites are met:
- FQDN Configuration: You must configure the Fully Qualified Domain Name (FQDN) in your environment. Refer to the Configure FQDN Guide for detailed instructions.
- Ingress Controller Setup:
- If you are using MicroK8s, ensure the ingress add-on is enabled. Follow the steps in the MicroK8s Cluster Preparation Guide.
- If you are using a managed Kubernetes service (e.g., GKE, EKS, AKS), install the NGINX ingress controller by running the following script:
./scripts/nginx/installIngressController.sh nginx nginx
To deploy IDHub using Helm, run the following command:
helm repo add sath https://repo.sath.com/repository/sath/
helm repo update
helm upgrade --install idhub sath/idhub --version 25.3.1 \
  --set global.IDHUB_INSTANCE=<IDHUB_INSTANCE> \
  --set global.IDHUB_FQDN=<IDHUB_FQDN> \
  --set global.OTLP_ENDPOINT="http://otel-collector:4317" \
  -n <NAMESPACE> --create-namespace
<IDHUB_INSTANCE>: The name of your IDHub instance.- Allowed Characters: Lowercase letters (a-z), Numbers (0-9).
- Length Requirement: Must adhere to Kubernetes namespace character limits.
- Disallowed Characters: No uppercase letters, No special characters (e.g., _, @, /, .).
- Examples of Valid Values: abccorp, xyzcompany2.
<IDHUB_FQDN>: The fully qualified domain name (FQDN) for your IDHub instance.- Note: Please click here for detailed instructions on how to configure FQDN.
- Example:
idhub.sath.com
<NAMESPACE>: The IDHub namespace; same as<IDHUB_INSTANCE>.<INGRESS_CLASS_NAME>- Usage:
--set ingress.className=publicif MicroK8s Ingress is used. Else leave it blank.
- Usage:
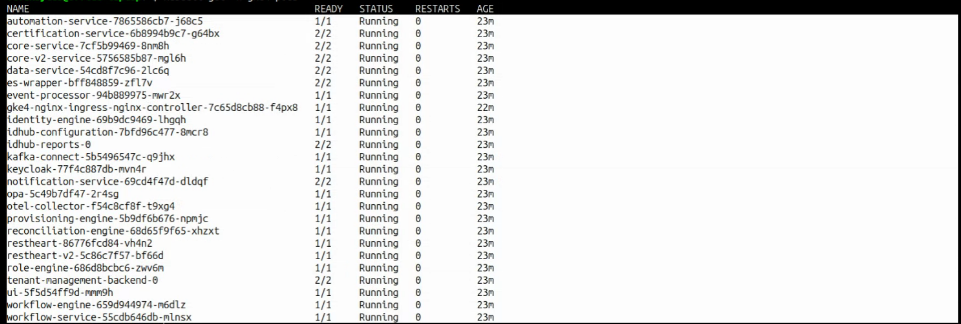
Post Install Verification
Run the following command on your K8 cluster, to verify the successful installation of IDHub.
kubectl get -n <IDHUB_INSTANCE> pods
<IDHUB_INSTANCE>: Namespace of IDHub (See from above).
The status for all the pods must be in running state, which means that IDHub has been installed successfully on your k8 cluster.
Log in to IDHub
Now you can access IDHub using the <IDHUB_FQDN>. Example: https://idhub.sath.com. In order to log in to IDHub, you will need to create a tenant. Please refer to Create New Tenant Guide for detailed instructions.