Adding Bulk Applications For Upload - Video

Learn how to quickly upload multiple Applications into IDHub, in a few simple steps, in this short video.
Bulk Applications For Upload – Video Transcript
Hello, and welcome to IDHub. In this video, I’ll demonstrate how to add a “Bulk Application Upload”.
To begin, let’s assume an organization has already purchased and installed IDHub on-premise or in the cloud.
The first User has already registered himself and activated his IDHub license. In this scenario, I’ll show you how an IDHub Administrator adds a “Bulk Application Upload”, and what that approval process looks like.
Let’s login with our organization name, and then we’ll go ahead and login as Charles. Charles is an Administrator within IDHub, and from his dashboard, he will have access to the Admin App, as well as the User App.
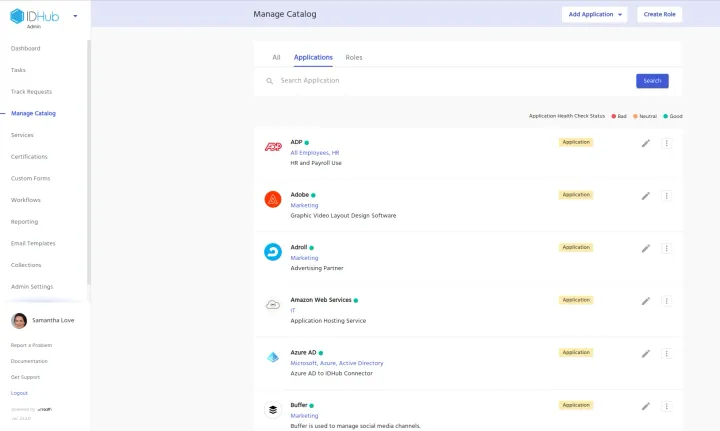
To add a “Bulk Application Upload”, we will go to the Administrator Application.
In order to do that, we’ll go ahead and click on the “Manage Catalog” button from the dashboard. Only Access Managers and Administrators can add Bulk Applications.
Only Access Managers can approve those Application uploads. So to begin, we’ll go ahead and click on this “Add Application” tab, and we can do a “Single Application” or a “Bulk Application”.
In another video, I demonstrate how to do a “Single Application Upload”. This video we’ll do the “Bulk Application Upload”. We’ll start with the “Basic Details”, and it defaults with “Application”, so we’ll do that.
In other videos, I show you how to add “Single Roles” and “Bulk Role Uploads” as well.
So, in order to upload correctly, you’ll need to follow a spreadsheet template, which you can find in our “IDHub Documentation”, which is on our website, sath.com, for specific instructions for formatting.
The spreadsheet is available within those documents, or right here, you can click on this “Download Application Template” or the “Role Template”, if you’re doing Roles, and it’ll bring up a spreadsheet, and you can plug in all the data from there.
Moving on, I have a file that is ready for uploading.
So I’ll go ahead and click on the upload button, and I’ll grab my file. It’s going to move all of the information into IDHub.
Go ahead and hit next, and then we can see here that our four Applications have successfully uploaded. There are no errors.
If there were, we would see them here. You can see any Entitlements that are within these Applications, and that’s also part of the spreadsheet formatting, which you can plug in as you please.
So we’re going to submit this request. “Total Number of Records for New Applications”, no warnings, which is great, so we’re going to hit “Yes”.
We can see here that our submission is completed, and four Applications are added successfully. And when we click on our “Requests” page, we can see right here that all four of our Applications are “Waiting for Approval”.
If we click on them, we can see the current status, and it looks like this has been assigned to an Access Manager, and they all have been assigned to an Access Manager because Access Managers are the only IDHub Users who can approve new Applications.
That being said, we’ll go ahead and logout of Charles’ account, and we’ll login to Jerome’s account.
Jerome is an Access Manager, and he can go ahead and claim and approve these tasks. What’s great about IDHub is that there’s a claiming process for tasks.
What that does is, it allows other Access Managers or Administrators, whoever the request has been sent to, to claim, and what the Approval Workflow looks like.
But in this case, it allows other Access Managers to have to look at these tasks, and to pull them off of the task list and claim it; claim it and approve it at a different time.
So that’s great, because if you had 42 requests in a day, it doesn’t fall on one person’s plate.
It goes into a pool, and different managers can grab those tasks as they please, and then work on them today or tomorrow, or however they feel fit.
So in any case, we’ll go ahead and navigate to Jerome’s tasks, and we should find those four tasks right here; one, two, three, four, for these new Applications.
So we can go ahead and claim them right here. I’ll show you a couple ways to do this. So we can claim this task and approve it, or we can go into the task.
If we wanted to look at this request in greater detail, we can look at all the “Basic Details”, any “Attributes” here, any “Entitlements” here, and from here, we can also claim and approve, or we can do all of them at the same time by selecting all, claiming, and then approving as well.
So, if you had several, and this Access Manager already knew that Charles was going to send an onboard Application request, you could select all of them, claim them, select all, approve them.
So now the tasks have been removed from Jerome’s list, we’ll go ahead into the User App and we’ll validate that these applications have been successfully onboarded.
We’ll go to our “Applications” tab here, to search the catalog for the new Applications. And if we scroll down, we can find them, or we can simply type them in here.
So we’ll look for “Office 365”, and there it is. And we’ll look for “GSuite”; there it is. And we’ll also look for “Zenefits”; there it is. And we’ll also look for our final one, which is “JIRA Manager”.
And here it is, “JIRA Manager”, “JIRA Service Manager”.
So that concludes the video on how to add a “Bulk Application Upload”. I encourage you to check out some of our other videos, especially “Adding a Single Application” or “Adding a Single Role” or a “Bulk Role Upload”.
Thank you so much for watching, and have a beautiful day.
Tune into more videos like this on our blog page.
Meet compliance and eliminate costly audit fines.