Microsoft Entra ID
The purpose of this guide is to provide detailed information regarding the Entra ID connector. There are a number of things you can learn about this connector here, including information about its configuration and deployment.
About Entra ID Connector
The Microsoft Entra IDconnector will let you create and onboard Microsoft Entra ID applications in IDHub.
Connector Version
Entra ID connector is currently at Version 1.0. More Entra ID operations and other capabilities will be supported in upcoming updates and releases of the Entra ID connector.
| Component | Version |
|---|---|
| Entra ID Connector | Ver 1.0 |
| Target System | Entra ID |
| Target API version | Microsoft Entra ID(AD) Microsoft graph API v1.0 and Authentication API version v2.0 |
Entra ID Connector Offerings Compared to Office 365
IDHub provides for Entra ID connector. There are some points that you should note about the Entra ID connector which are as follows:
- Entra ID connection leverages the most recent Microsoft graph API.
- Entra ID connector provides Out Of the Box functionality that aids in differentiating between Office 365 groups and security groups.
- The Entra ID connector outperforms the Office 365 connector in terms of reconciliation performance.
Connector Operations
| Operation | Supported |
|---|---|
| User Management | |
| Create user | Yes |
| Update user | Yes |
| Enable user | Yes |
| Disable user | Yes |
| Delete user | Yes |
| Reset Password | Yes |
| Role Grant Management | |
| Assign and Revoke Roles | Yes |
| License Grant Management | |
| Grant and Revoke Licences | Yes |
| Security Group Management | |
| Add, Update, and Remove Groups | Yes |
| Office Group Management | |
| Add, Update, and Remove Groups | Yes |
| MS Teams Management | |
| Create groups to the user | No |
| Delete groups from the user | No |
| Reconcile groups to the user | No |
| Teams Group Assignment | |
| Add Teams Group to the user | No |
| Remove Teams Group from the user | No |
Connector Components
The components of the connector include Connector Application, Connector Application Configuration, Connector Service Provider Interface, Splice, and Splice configuration.
These connection components contain precise connectivity and setup information for your target system. The connector takes information from these files to allow you to quickly and efficiently onboard your applications using a single, streamlined UI.
Connector Architecture
The connector's architecture is constructed in accordance with the diagram below:
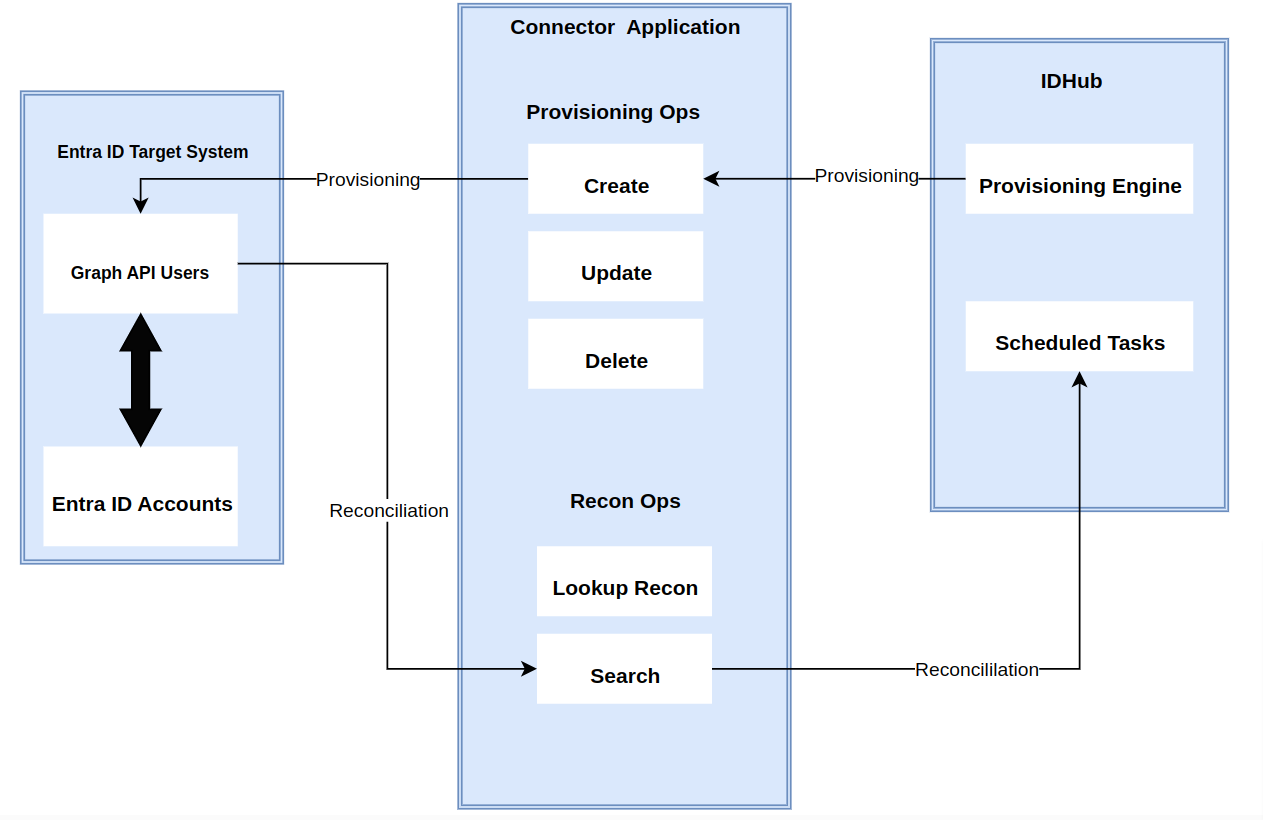 The connector architecture primarily consists of a connector application and a target system component, as seen in the screenshot up above. The native communication with the target system is handled by the target system by leveraging the SPI implementation of the Entra ID Specific connection. This architecture is implemented because it allows for rapid and straightforward connector deployment as well as precise versioning capabilities.
The connector is configured to run in one of the following modes:
Identity reconciliation
- If you use the Entra ID application as the trusted source then in this case users are directly created and modified on IDHub. The MS graph API extracts user records that match the reconciliation criteria, which brings the records to IDHub. Each user record fetched from the target system is compared with existing IDHub Users. If a match is found between the target system record and the IDHub User, then the User attributes are updated with changes made to the target system record. If no match is found, then the target system record is used to create an IDHub User.
Account management
- In this case, the target system is used as a target resource and the connector enables the operations. This involves creating, updating, or deleting users on the target system through IDHub. During provisioning, the connector calls the target system API (Microsoft Microsoft Entra ID(AD) Graph API) for provisioning operations. The API on the target system accepts provisioning data, carries out the required operation on the target system, and returns the response from the target system back to IDHub.The Entra ID connector communicates with the Microsoft Graph API using the HTTPS protocol. The Microsoft Graph API provides programmatic access to Microsoft Entra IDthrough REST API endpoints. Apps can use the Microsoft Graph API to perform create, read, update, and delete (CRUD) operations on directory data and directory objects, such as users, groups and others.
In developing the connector, we adhere to this fundamental architecture. The IDHub team will handle the connector modification section appropriately based on your unique business requirements if there are any improvements, extra specifications, or variations.
Use cases for the connector
Entra ID User Management
Microsoft Entra ID is currently being used by your company, and you want to connect it to IDHub. You may want to generate and reconcile accounts from and to Microsoft Entra ID and IDHub. In such a scenario, you would need to create an Microsoft Entra ID connector and use the connector URL to onboard an Microsoft Entra ID-connected application in IDHub. You will be able to provide accounts in the target system after successfully deploying the Microsoft Entra ID connector and creating the Microsoft Entra ID application. Similarly, you can perform further activities such as de-provisioning and updating accounts. IDHub offers a reconciliation feature that allows you to reconcile user identification information to and from Microsoft Entra ID.
Entra ID Group Management
Your company may employ Microsoft Entra ID user groups, which enable group members/administrators to manage group membership and delete groups. You might now want to go through the list of groups that have been inactive for a time or have fully inactive members. In this particular instance, you can take advantage of the Microsoft Entra ID connector to retrieve all the groups in IDHub. The Microsoft Entra ID group is seen as an entitlement by IDHub. When you reconcile data from Microsoft Entra ID to IDHub, you will be able to simply trace any operations/changes performed in the entitlements (or groups) of Microsoft Entra ID utilizing IDHub's packed reporting tools.
Entra ID Admin Role Management
Your organization might create and set administrator roles for your employees in Entra ID. By using the Entra ID connector, you would be easily able to assign or revoke the Entra ID admin role. As the Entra ID admin role would be an entitlement in IDHub, therefore you can easily request access to or revoke access to the Entra ID admin entitlement. This would enable you to manage the admin role management of Entra ID directly from IDHub.
Connector Features
Full Reconciliation and Incremental Reconciliation
Full reconciliation can be performed to bring all existing user data from the target system to IDHub. If the target system has an attribute that stores the timestamp at which an item is created or modified, you can configure your connector for incremental reconciliation once the first full reconciliation operation has been completed.
The connector's future release version will incorporate incremental recon, which is not supported by the present version of the connector.
Limited Reconciliation
Records from the target system can be reconciled depending on a defined filter condition. You can define the subset of newly added or updated target system records that must be reconciled in order to restrict or filter the records that are fetched into IDHub during a reconciliation process. You can specify the conditions in which the reconciliation will take place.
Support for the Connector Server
Connector Server is one of the features provided by IDHub. By using one or more connector servers, the connector architecture permits your application to communicate with externally deployed bundles. Therefore if you do not want to execute IDH/ub java connector bundle in the same VM as the application, in that case you have the ability to run the connector on a different host for better performance.
Pre-requisites
Register the client application
The o365 Splice application will need to be registered with Entra ID to grant it permission to call the Microsoft Graph API. Follow the steps below for registration.
- Login as admin to your Entra ID instance and click on Microsoft Entra ID
- Go to App Registrations
- Click on New Registration

- Provide a name for the application and for supported account types, pick “Accounts in this Organizational Directory Only” and hit on “Register”
- Copy the values for Client ID, Tenant ID.

- Click on Certificates & secrets
- Click on New client secret
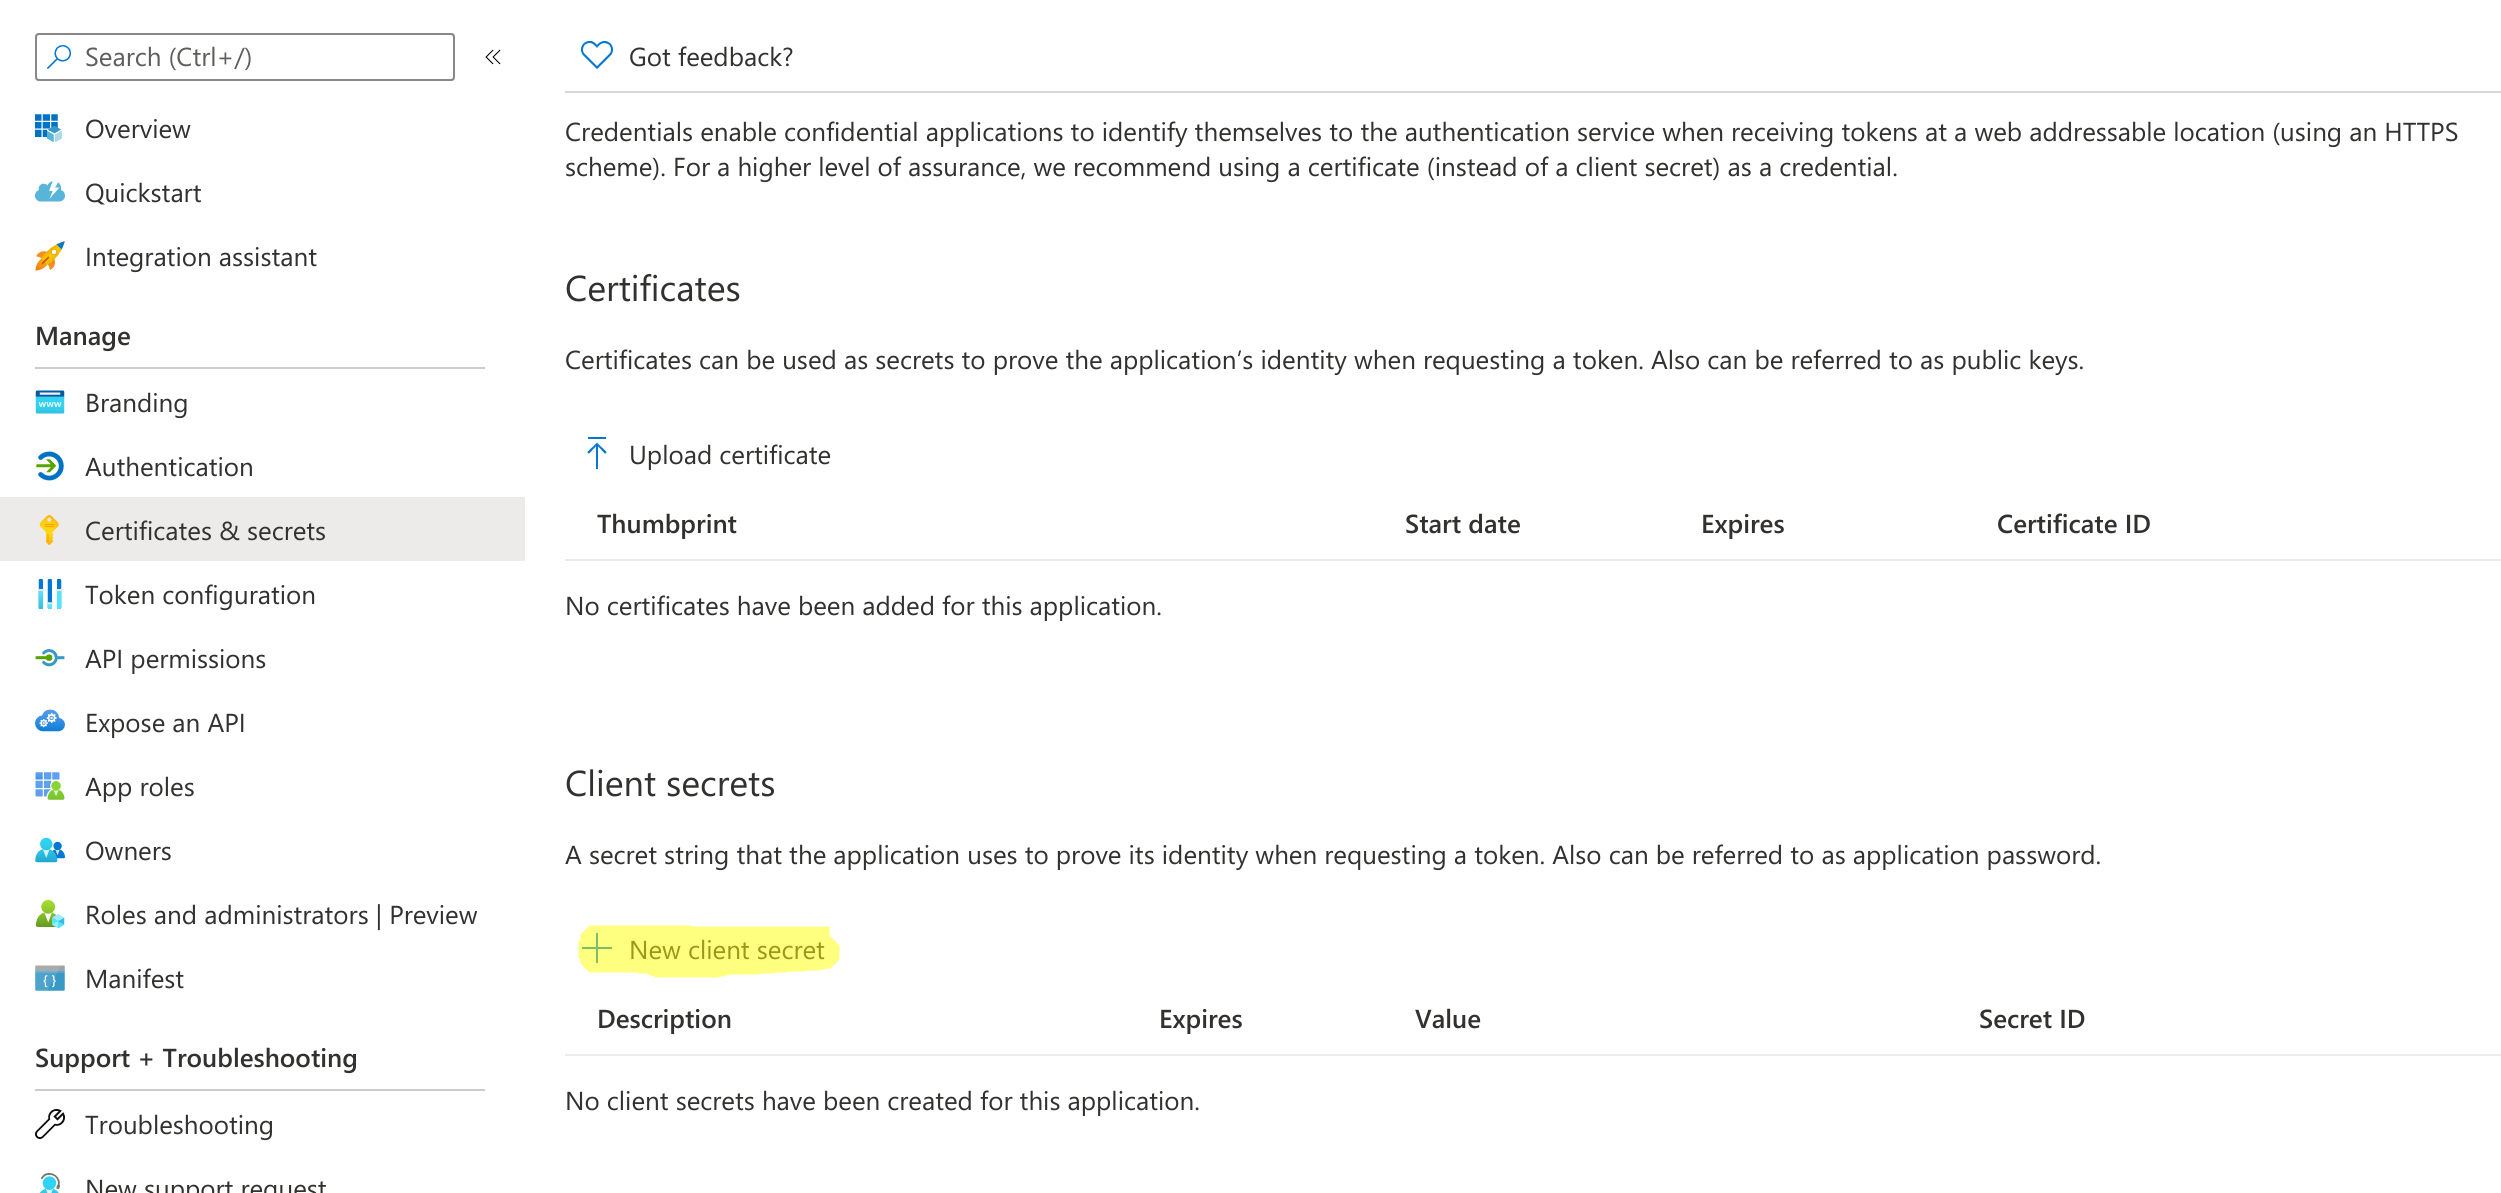
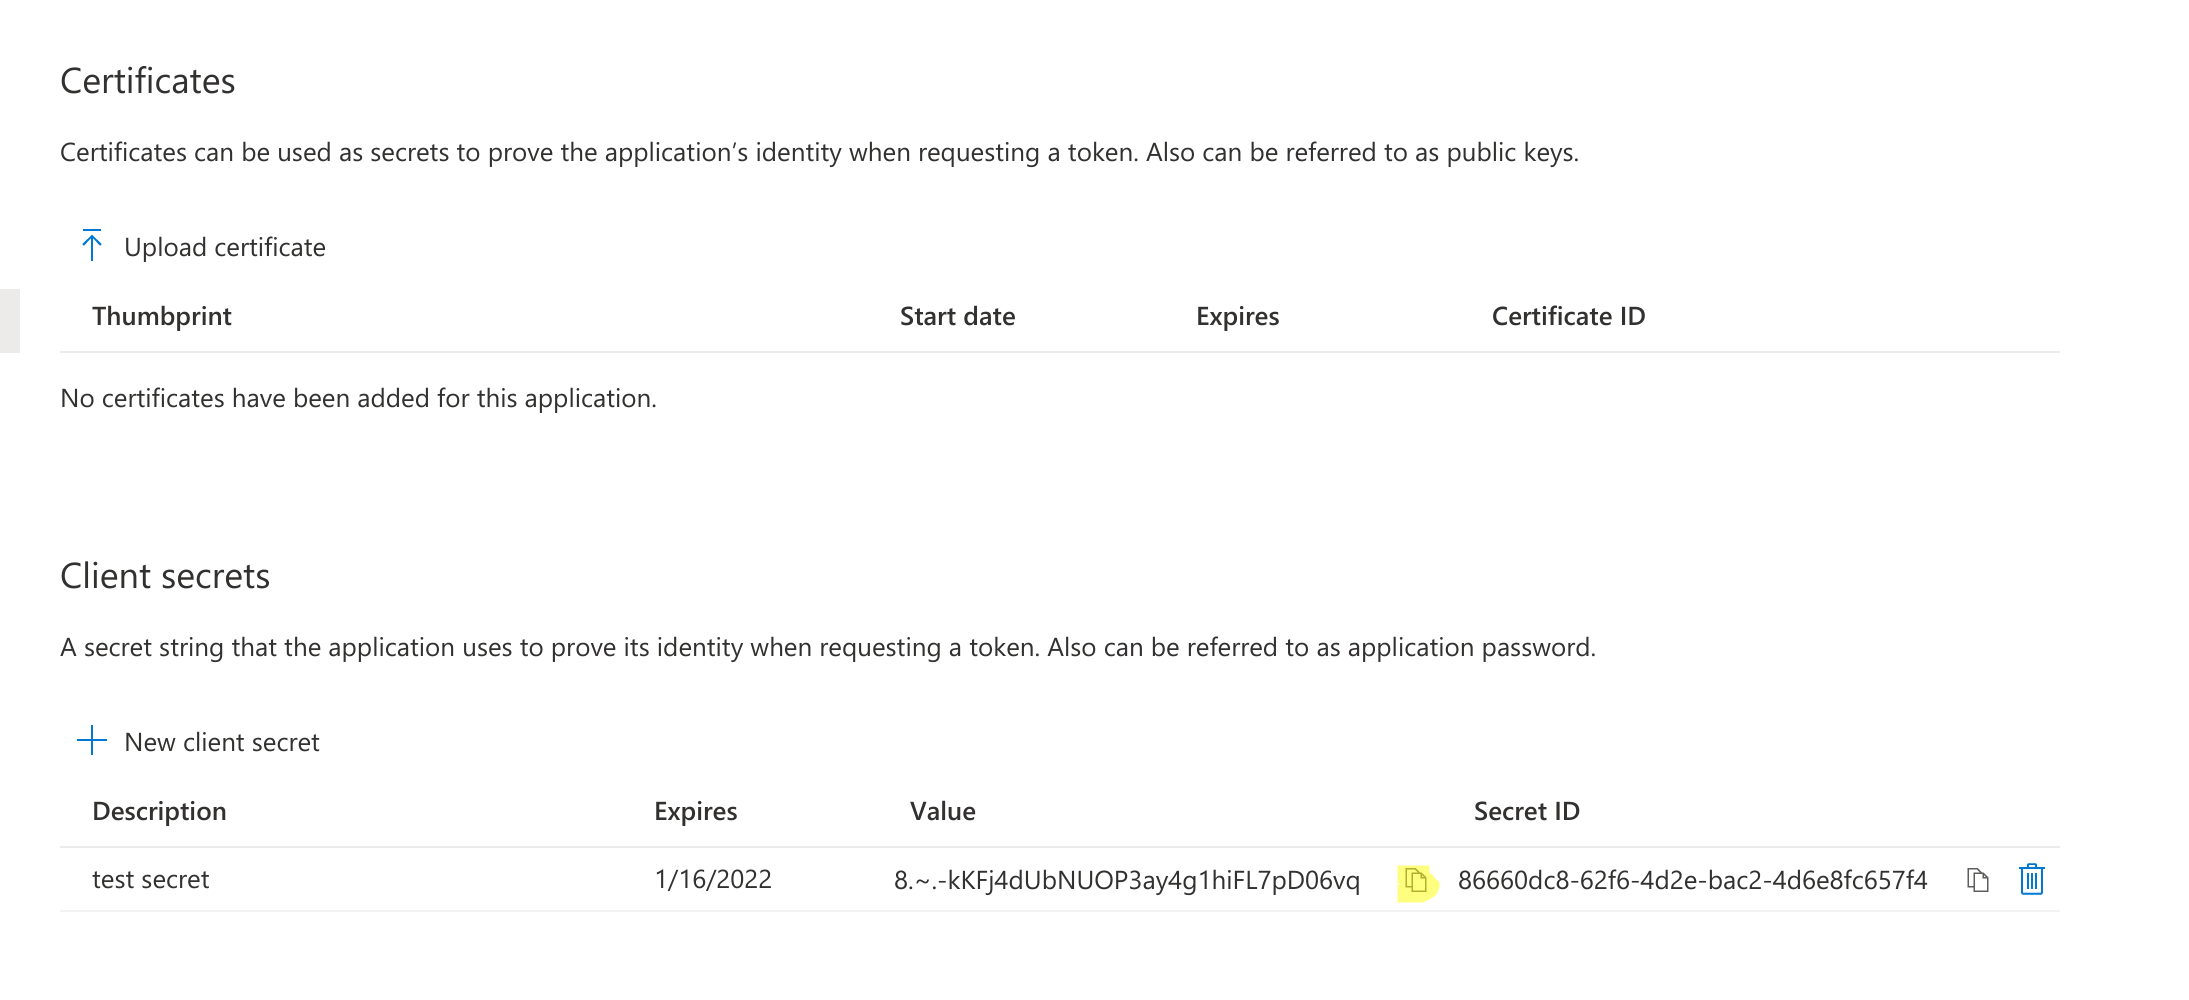
- Add a description and click on Add

- Copy the Client Secret value by clicking on the copy icon.
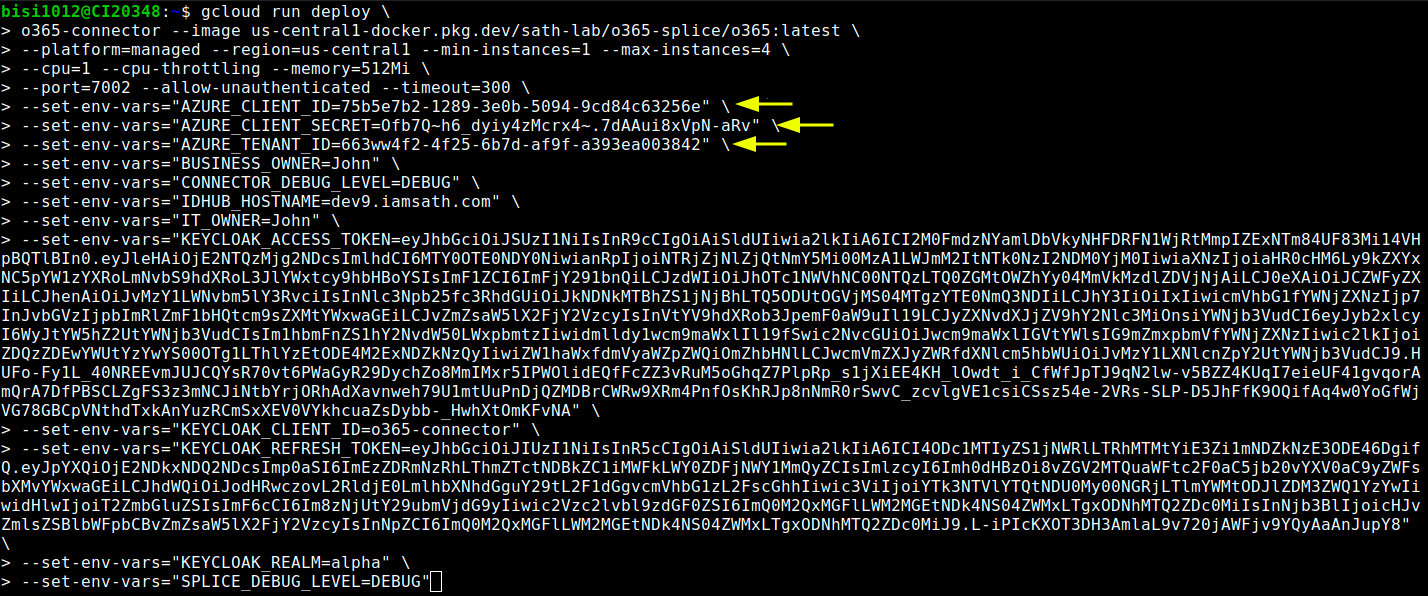
- Cloud Run Deploy command with values for Client ID, Client Secret and Tenant ID.
- Go to the registered application and click on API Permissions and then on Add a permission.
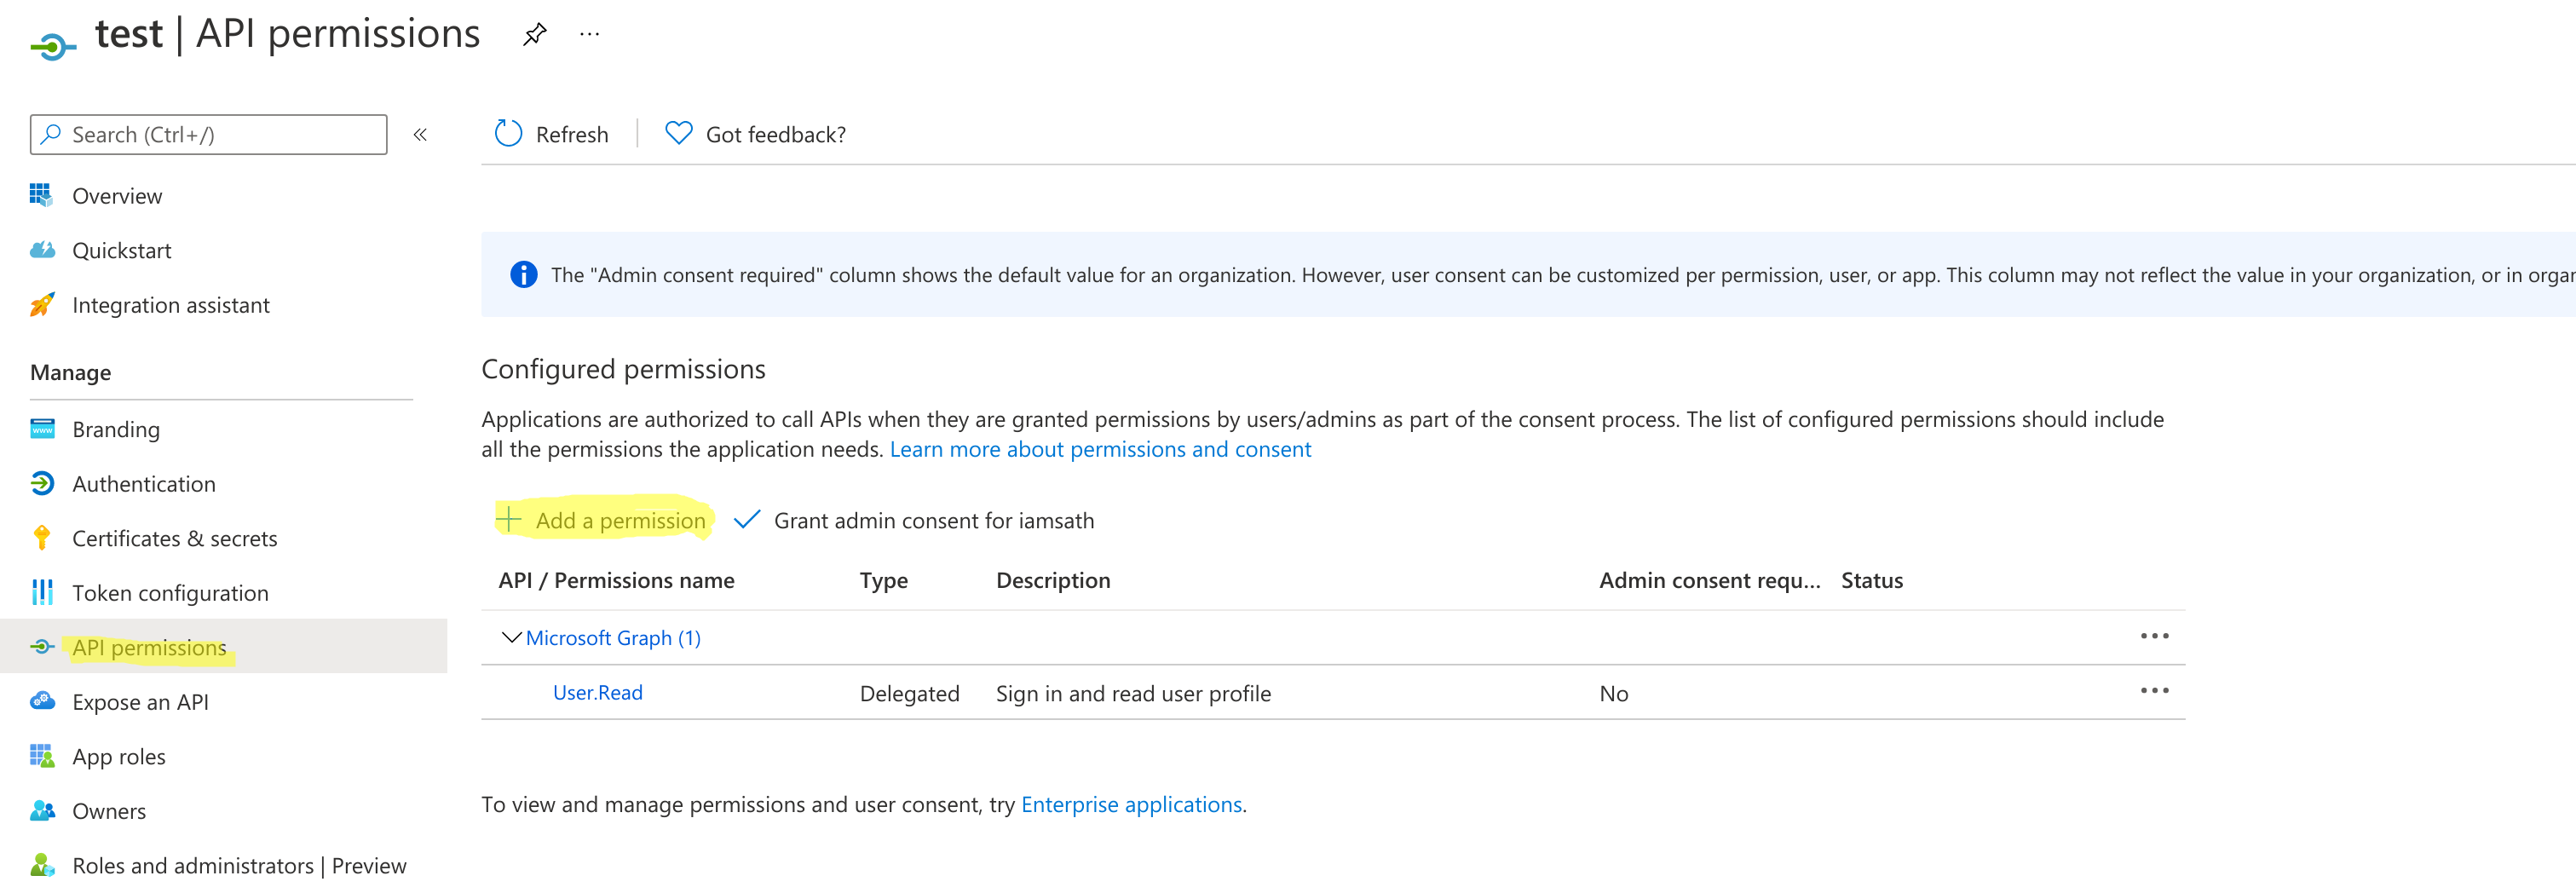
a. In the window that pops up, click on Microsoft Graph
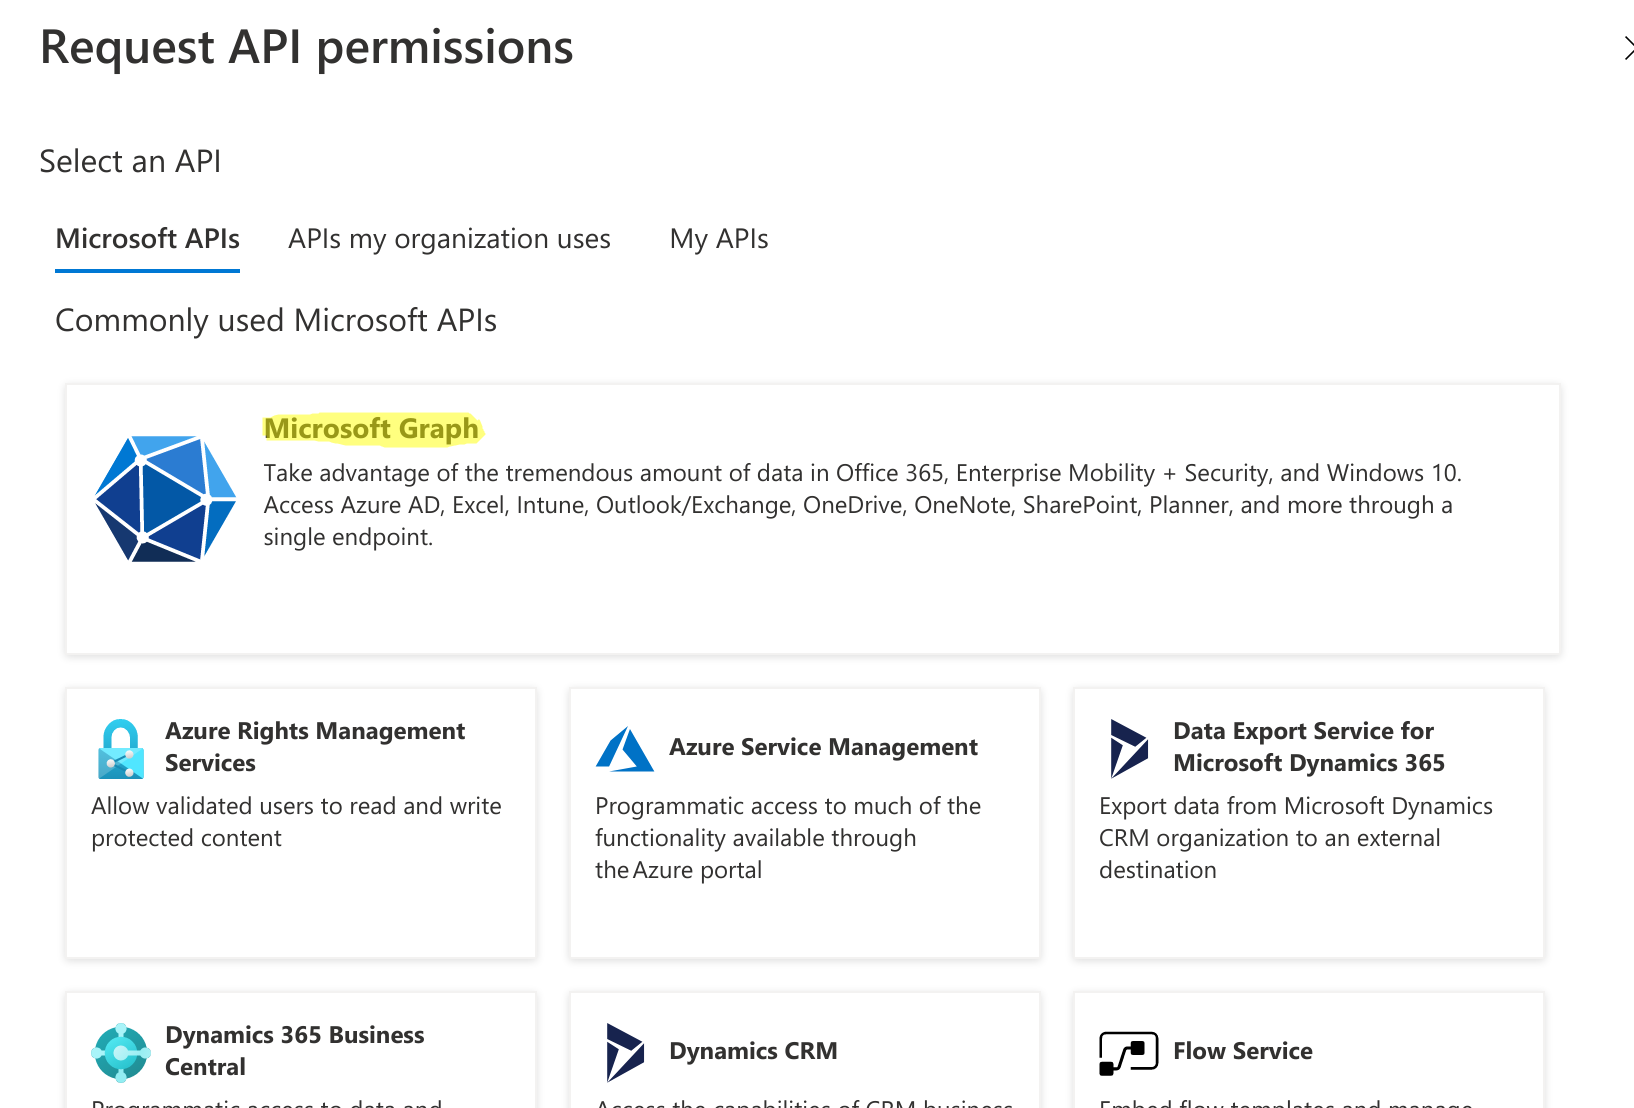
b. Click on Application permissions

c. Search and add the following Application permissions
- Directory.ReadWrite.All
- User.ManageIdentities.All
- User.ReadWrite.All
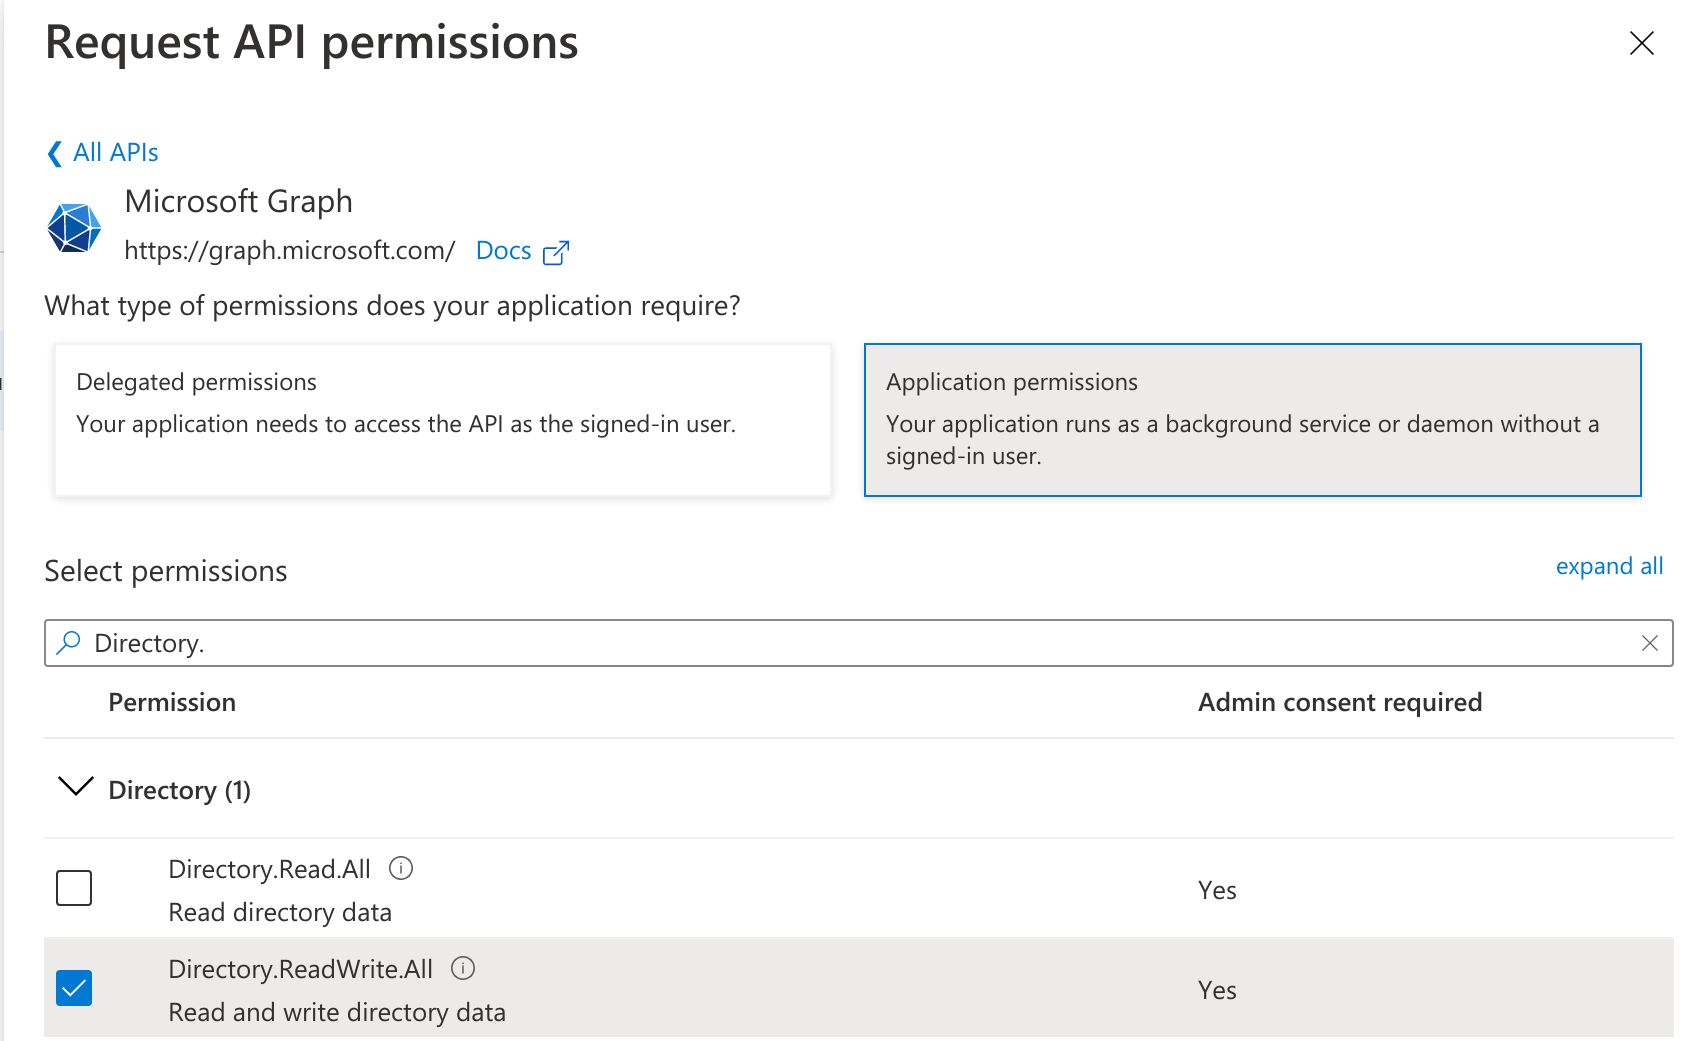
d. After adding all the permissions, the Status initially shows as Not granted. Click on “Grant admin consent for..”

e.After granting the permissions, a green tick mark should be seen under the status column for each of the permissions

Run the connector either from the command line or as a service.
Prerequisites
- JRE 16 OR JDK 16 installed
- O365 Connector
To run from the command line. For example, to run the o365 connector jar in the background and redirect the output to nohup.out.
cd /apps/o365_connector nohup java -jar o365-splice-1.0.0-with-connector-application-2.1.5.jar & > nohup.out
Creating an Application by using the Connector
Onboard the Application in IDHub
Click here for the detailed steps for onboarding the application to IDHub
Configuring the Connector
Connectors use connection-related parameters to connect to IDhub with your target system and perform connector operations when creating a connected application. IDHub requires the following connection-related parameters in order to connect to an Microsoft Entra ID application.
Basic Configuration of the Connector
| Parameter | Mandatory | Description |
|---|---|---|
| authenticationType | Yes | This is the type of authentication used by your target system. For this connector, the target system OAuth2.0 client credentials. This is a mandatory attribute while creating an application. Do not modify the value of the parameter.Default value: client_credentials |
| host | Yes | Enter the host name of the machine hosting your target system. This is a mandatory attribute while creating an application.Sample value: graph.microsoft.com |
| authenticationServerUrl | Yes | Enter the URL of the authentication server that validates the client ID and client secret for your target system.Sample value: https://login.microsoftonline.com/idmconnector.onmicrosoft.com/oauth2/v2.0/token |
| clientId | Yes | Enter the client identifier (a unique string) issued by the authorization server to your client application during the registration process. You obtained the client ID while performing the procedure described in Configuring the Newly Added Application. |
| clientSecret | Yes | Enter the secret key used to authenticate the identity of your client application. You obtained the secret key while performing the procedure described in Configuring the Newly Added Application. |
| uriPlaceHolder | Yes | Enter the key-value pair for replacing place holders in the relURIs. The URI place holder consists of values which are repeated in every relative URL. Values must be comma separated.For example, tenant ID and API version values are a part of every request URL. Therefore, we replace it with a key-value pair.Sample value:"api_version;v1.0" |
| port | No | Enter the port number at which the target system is listening.Sample value: 443 |
| sslEnabled | No | If the target system requires SSL connectivity, then set the value of this parameter to true. Otherwise set the value to false.Default value: true |
| Scope | Yes | Enter the scope of your client application.Default value: https://graph.microsoft.com/.default |
| proxyHost | No | Enter the name of the proxy host used to connect to an external target. |
| proxyPassword | No | Enter the password of the proxy user ID of the target system user account that IDHub uses to connect to the target system. |
| proxyPort | No | Enter the proxy port number. |
| proxyUser | No | Enter the proxy user name of the target system user account that IDHub uses to connect to the target system.Sample value: 80 |
Advanced Settings Parameters
There are some advanced settings that you can configure in the connector. note In the current version of the connector, these advanced settings cannot be configured; however, they will be available in future releases. :::
| Parameter | Description |
|---|---|
| granularLicenses | This parameter enables the support for granular licenses.Default value: FalseNote:granularLicenses parameter is supported from 12.2.1.3.0A |
| relURIs | This entry holds the relative URL of every object class supported by this connector and the connector operations that can be performed on these object classes. This is a mandatory attribute while creating an application.Default value: __ACCOUNT__.CREATEOP=/$(api_version)$/users,"__ACCOUNT__.UPDATEOP=/$(api_version)$/users/$(__UID__)$","__ACCOUNT__.SEARCHOP=/$(api_version)$/users?$(Filter Suffix)$&$select=assignedLicenses,userType,displayName,givenName,userPrincipalName,id,city,usageLocation,accountEnabled,mailNickname,surname,country&$top=$(PAGE_SIZE)$&$skiptoken=$(PAGE_TOKEN)$","__ACCOUNT__=/$(api_version)$/users/$(__UID__)$?$select=assignedLicenses,displayName,givenName,userPrincipalName,id,city,usageLocation,accountEnabled,mailNickname,country,surname,userType","__ACCOUNT__.manager.SEARCHOP=/$(api_version)$/users/$(__UID__)$/manager","__ACCOUNT__.manager=/$(api_version)$/users/$(__UID__)$/manager/$ref","__ACCOUNT__.__GROUP__.SEARCHOP=/$(api_version)$/users/$(__UID__)$/memberOf?&$top=$(PAGE_SIZE)$&$skiptoken=$(PAGE_TOKEN)$","__ACCOUNT__.__GROUP__.DELETEOP=/$(api_version)$/groups/$(__GROUP__.id)$/members/$(__UID__)$/$ref","__ACCOUNT__.__GROUP__=/$(api_version)$/groups/$(__GROUP__.id)$/members/$ref","__GROUP__.CREATEOP=/$(api_version)$/groups","__GROUP__.UPDATEOP=/$(api_version)$/groups/$(__UID__)$","__GROUP__.SEARCHOP=/$(api_version)$/groups?&$filter=securityEnabled+eq+true&$top=$(PAGE_SIZE)$&$skiptoken=$(PAGE_TOKEN)$","__OFFICEGROUP__.SEARCHOP=/$(api_version)$/groups?&$filter=securityEnabled+eq+false&$top=$(PAGE_SIZE)$&$skiptoken=$(PAGE_TOKEN)$","__GROUP__=/$(api_version)$/groups/$(__UID__)$","__GROUP__.member=/$(api_version)$/groups/$(__UID__)$/members/$ref?","__ROLE__.SEARCHOP=/$(api_version)$/directoryRoles?/$(Filter Suffix)$","__ACCOUNT__.__ROLE__=/$(api_version)$/directoryRoles/$(__ROLE__.id)$/members/$ref","__ACCOUNT__.__ROLE__.DELETEOP=/$(api_version)$/directoryRoles/$(__ROLE__.id)$/members/$(__UID__)$/$ref","__ROLE__.member=/$(api_version)$/directoryRoles/$(__UID__)$/members/$ref","__ACCOUNT__.__ROLE__.SEARCHOP=/$(api_version)$/users/$(__UID__)$/memberOf?&$top=$(PAGE_SIZE)$&$skiptoken=$(PAGE_TOKEN)$","assignedLicenses.SEARCHOP=/$(api_version)$/subscribedSkus?/$(Filter Suffix)$","__ACCOUNT__.assignedLicenses.ADDATTRIBUTE=/$(api_version)$/users/$(__UID__)$/assignLicense","__ACCOUNT__.assignedLicenses.REMOVEATTRIBUTE=/$(api_version)$/users/$(__UID__)$/assignLicense","__ACCOUNT__.__OFFICEGROUP__=/$(api_version)$/groups/$(__OFFICEGROUP__.id)$/members/$ref","__ACCOUNT__.__OFFICEGROUP__.DELETEOP=/$(api_version)$/groups/$(__OFFICEGROUP__.id)$/members/$(__UID__)$/$ref","__ACCOUNT__.__OFFICEGROUP__.SEARCHOP=/$(api_version)$/users/$(__UID__)$/memberOf?&$top=$(PAGE_SIZE)$&$skiptoken=$(PAGE_TOKEN)$"Note:granularLicenses parameter is supported from 12.2.1.3.0AIf you are enabling the granular license replace the relURIs provided below."__ACCOUNT__.CREATEOP=/$(api_version)$/users","__ACCOUNT__.UPDATEOP=/$(api_version)$/users/$(__UID__)$","__ACCOUNT__.SEARCHOP=/$(api_version)$/users?$(Filter Suffix)$&$select=assignedLicenses,userType,displayName,givenName,userPrincipalName,id,city,usageLocation,accountEnabled,mailNickname,surname,country&$top=$(PAGE_SIZE)$&$skiptoken=$(PAGE_TOKEN)$","__ACCOUNT__=/$(api_version)$/users/$(__UID__)$?$select=assignedLicenses,displayName,givenName,userPrincipalName,id,city,usageLocation,accountEnabled,mailNickname,country,surname,userType","__ACCOUNT__.manager.SEARCHOP=/$(api_version)$/users/$(__UID__)$/manager","__ACCOUNT__.manager=/$(api_version)$/users/$(__UID__)$/manager/$ref","__ACCOUNT__.__GROUP__.SEARCHOP=/$(api_version)$/users/$(__UID__)$/memberOf?&$top=$(PAGE_SIZE)$&$skiptoken=$(PAGE_TOKEN)$","__ACCOUNT__.__GROUP__.DELETEOP=/$(api_version)$/groups/$(__GROUP__.id)$/members/$(__UID__)$/$ref","__ACCOUNT__.__GROUP__=/$(api_version)$/groups/$(__GROUP__.id)$/members/$ref","__GROUP__.CREATEOP=/$(api_version)$/groups","__GROUP__.UPDATEOP=/$(api_version)$/groups/$(__UID__)$","__GROUP__.SEARCHOP=/$(api_version)$/groups?&$filter=securityEnabled%20eq%20true&$top=$(PAGE_SIZE)$&$skiptoken=$(PAGE_TOKEN)$","__OFFICEGROUP__.SEARCHOP=/$(api_version)$/groups?&$filter=securityEnabled%20eq%20false&$top=$(PAGE_SIZE)$&$skiptoken=$(PAGE_TOKEN)$","__GROUP__=/$(api_version)$/groups/$(__UID__)$","__GROUP__.member=/$(api_version)$/groups/$(__UID__)$/members/$ref?","__ROLE__.SEARCHOP=/$(api_version)$/directoryRoles?/$(Filter Suffix)$","__ACCOUNT__.__ROLE__=/$(api_version)$/directoryRoles/$(__ROLE__.id)$/members/$ref","__ACCOUNT__.__ROLE__.DELETEOP=/$(api_version)$/directoryRoles/$(__ROLE__.id)$/members/$(__UID__)$/$ref","__ROLE__.member=/$(api_version)$/directoryRoles/$(__UID__)$/members/$ref","__ACCOUNT__.__ROLE__.SEARCHOP=/$(api_version)$/users/$(__UID__)$/memberOf?&$top=$(PAGE_SIZE)$&$skiptoken=$(PAGE_TOKEN)$","assignedLicenses.SEARCHOP=/$(api_version)$/subscribedSkus?/$(Filter Suffix)$","__ACCOUNT__.assignedLicenses.ADDATTRIBUTE=/$(api_version)$/users/$(__UID__)$/assignLicense","__ACCOUNT__.assignedLicenses.REMOVEATTRIBUTE=/$(api_version)$/users/$(__UID__)$/assignLicense","__ACCOUNT__.__OFFICEGROUP__=/$(api_version)$/groups/$(__OFFICEGROUP__.id)$/members/$ref","__ACCOUNT__.__OFFICEGROUP__.DELETEOP=/$(api_version)$/groups/$(__OFFICEGROUP__.id)$/members/$(__UID__)$/$ref","__ACCOUNT__.__OFFICEGROUP__.SEARCHOP=/$(api_version)$/users/$(__UID__)$/memberOf?&$top=$(PAGE_SIZE)$&$skiptoken=$(PAGE_TOKEN)$","__ACCOUNT__.assignedLicenses.SEARCHOP=/$(api_version)$/users/$(__UID__)$/licenseDetails?&$top=$(PAGE_SIZE)$&$skiptoken=$(PAGE_TOKEN)$"Note:If you are disabling the granular license kindly use the default RelURIs |
| nameAttributes | This entry holds the name attribute for all the objects that are handled by this connector.For example, for the __ACCOUNT__ object class that it used for User accounts, the name attribute is userPrincipalName.Default value: __ACCOUNT__.userPrincipalName,"__GROUP__.displayName","__ROLE__.displayName","assignedLicenses.skuPartNumber","__OFFICEGROUP__.displayName" |
| uidAttributes | This entry holds the uid attribute for all the objects that are handled by this connector.For example, for User accounts, the uid attribute is objectId.In other words, the value __ACCOUNT__.objectId in decode implies that the __UID__ attribute (that is, GUID) of the connector for__ACCOUNT__object class is mapped to objectId which is the corresponding uid attribute for user accounts in the target system.Default value:__ACCOUNT__.id,"__GROUP__.id","__ROLE__.id","assignedLicenses.skuId","__OFFICEGROUP__.id" |
| opTypes | This entry specifies the HTTP operation type for each object class supported by the connector. Values are comma separated and are in the following format: OBJ_CLASS.OP=HTTP_OPIn this format, OBJ_CLASS is the connector object class, OP is the connector operation (for example, CreateOp, UpdateOp, SearchOp), and HTTP_OP is the HTTP operation (GET, PUT, or POST).Default value: __ACCOUNT__.CREATEOP=POST,"__ACCOUNT__.UPDATEOP=PATCH","__ACCOUNT__.SEARCHOP=GET","__ACCOUNT__.TESTOP=GET","__ACCOUNT__.__GROUP__.UPDATEOP=POST","__ACCOUNT__.manager.CREATEOP=PUT","__ACCOUNT__.manager.UPDATEOP=PUT","__ACCOUNT__.__ROLE__.UPDATEOP=POST","__ACCOUNT__.assignedLicenses.ADDATTRIBUTE=POST","__ACCOUNT__.assignedLicenses.REMOVEATTRIBUTE=POST","__ACCOUNT__.__OFFICEGROUP__.ADDATTRIBUTE=POST" |
| pageSize | The number of resources/users that appears on a page for a search operation.Default value: 100 |
| pageTokenAttribute | The attribute in response payload that denotes the next page token.Default value: odata.nextLink |
| pageTokenRegex | This attribute is used in the URL while reconciliation to support pagination.Default value: (?<=skiptoken=).* |
| Any Incremental Recon Attribute Type | By default, during incremental reconciliation, IDHub accepts timestamp information sent from the target system only in Long datatype format. Setting the value of this parameter to True indicates that IDHub will accept timestamp information in any datatype format.Default value: True |
| jsonResourcesTag | This entry holds the json tag value that is used during reconciliation for parsing multiple entries in a single payload.Default value: __ACCOUNT__=value,"__GROUP__=value","__ROLE__=value","assignedLicenses=value","__OFFICEGROUP__=value" |
| httpHeaderContentType | This entry holds the content type expected by the target system in the header.Default value: application/json |
| httpHeaderAccept | This entry holds the accept type expected from the target system in the header.Default value: application/json |
| specialAttributeTargetFormat | This entry lists the format in which an attribute is present in the target system endpoint.For example, the alias attribute will be present as aliases.alias in the target system endpoint. Values are comma separated and are presented in the following format: OBJ_CLASS.ATTR_NAME= *TARGET_FORMAT*Default value__ACCOUNT__.manager=id,"__GROUP__.member=url","__ROLE__.member=url","__ACCOUNT__.__GROUP__=value","__ACCOUNT__.__ROLE__=value","__ROLE__.member=value","__GROUP__.member=value","__ACCOUNT__.assignedLicenses=value","__ACCOUNT__.__OFFICEGROUP__=value" |
| specialAttributeHandling | This entry lists the special attributes whose values should be sent to the target system one by one ("SINGLE"). Values are comma separated and are in the following format:OBJ_CLASS.ATTR_NAME.PROV_OP=SINGLEFor example, the __ACCOUNT__.manager.UPDATEOP=SINGLE value in decode implies that during an update provisioning operation, the manager attribute of the __ACCOUNT__ object class must be sent to the target system one-by-one.Default value__ACCOUNT__.__GROUP__.CREATEOP=SINGLE,"__ACCOUNT__.__GROUP__.UPDATEOP=SINGLE","__ACCOUNT__.manager.CREATEOP=SINGLE","__ACCOUNT__.manager.UPDATEOP=SINGLE","__ACCOUNT__.__ROLE__.CREATEOP=SINGLE","__ACCOUNT__.__ROLE__.UPDATEOP=SINGLE","__ACCOUNT__.assignedLicenses.ADDATTRIBUTE=SINGLE","__ACCOUNT__.assignedLicenses.REMOVEATTRIBUTE=SINGLE","__ACCOUNT__.__OFFICEGROUP__.ADDATTRIBUTE=SINGLE","__ACCOUNT__.__OFFICEGROUP__.REMOVEATTRIBUTE=SINGLE" |
| customPayload | This entry lists the payloads for all operations that are not in the standard format.Default value:__ACCOUNT__.__GROUP__.UPDATEOP={\@odata.id\":\"https://graph.microsoft.com/v1.0/directoryObjects/$(__UID__)$\"}","__ACCOUNT__.__GROUP__.CREATEOP={\"@odata.id\":\"https://graph.microsoft.com/v1.0/directoryObjects/$(__UID__)$\"}","__ACCOUNT__.manager.CREATEOP={\"@odata.id\":\"https://graph.microsoft.com/v1.0/directoryObjects/$(manager)$\"}","__ACCOUNT__.manager.UPDATEOP={\"@odata.id\":\"https://graph.microsoft.com/v1.0/directoryObjects/$(manager)$\"}","__ACCOUNT__.__ROLE__.UPDATEOP={\"@odata.id\":\"https://graph.microsoft.com/v1.0/directoryObjects/$(__UID__)$\"}","__ACCOUNT__.__ROLE__.CREATEOP={\"@odata.id\":\"https://graph.microsoft.com/v1.0/directoryObjects/$(__UID__)$\"}","__ACCOUNT__.assignedLicenses.ADDATTRIBUTE={\"addLicenses\": [{\"skuId\": \"$(skuId)$\"}],\"removeLicenses\": []}","__ACCOUNT__.assignedLicenses.REMOVEATTRIBUTE={\"addLicenses\": [],\"removeLicenses\": [\"$(skuId)$\"]}","__ACCOUNT__.__OFFICEGROUP__.UPDATEOP={\"@odata.id\":\"https://graph.microsoft.com/v1.0/directoryObjects/$(__UID__)$\"}" |
| statusAttributes | This entry lists the name of the target system attribute that holds the status of an account. For example, for the __ACCOUNT__ object class that it used for User accounts, the status attribute is accountEnabled.Default value:"__ACCOUNT__.accountEnabled" |
| passwordAttribute | This entry holds the name of the target system attribute that is mapped to the PASSWORD attribute of the connector in OIM.Default value: passwordProfile.password |
| targetObjectIdentifier | This entry specifies the key-value pair for replacing place holders in the relURIs. Values are comma separated and in the KEY;VALUE format.Default value: __ACCOUNT__.__GROUP__=securityEnabled;true,"__ACCOUNT__.__OFFICEGROUP__=securityEnabled;false","__ACCOUNT__.__ROLE__=@odata.type;#microsoft.graph.directoryRole" |
| childFieldsWithSingleEnd | This entry specifies special attributes data coming in from a single end point response.Default value: __GROUP__,"__ROLE__","__OFFICEGROUP__" |
Attribute Mappings for the Connector
| Entra ID Schema | User Schema in IDHub | Sync Direction | IsVisible | IsDisable | Recon Key | Unique | IsRequired |
|---|---|---|---|---|---|---|---|
| city | officeAddressCity | Bi-Directional | Visible | ||||
| companyName | organizationName | Bi-Directional | Visible | ||||
| country | officeAddressCountry | Bi-Directional | Visible | ||||
| userPrincipalName | Bi-Directional | Visible | Yes | Yes | Yes | ||
| displayName | displayName | Bi-Directional | Visible | Yes | |||
| employeeId | employeeNumber | Bi-Directional | Visible | ||||
| employeeType | employeeType | Bi-Directional | Visible | ||||
| givenName | firstName | Bi-Directional | Visible | ||||
| id | - | Bi-Directional | Hidden | Yes | |||
| jobTitle | jobTitle | Bi-Directional | Visible | ||||
| surname | lastName | Bi-Directional | Visible | ||||
| Bi-Directional | Visible | ||||||
| mailNickName | login | Bi-Directional | Visible | Yes | |||
| mobilePhone | phoneNumber | Bi-Directional | Visible | ||||
| department | department | Bi-Directional | Visible | ||||
| usageLocation | Location | No-Sync | Hidden | ||||
| streetAddress | officeAddressLine1 | Bi-Directional | Visible | ||||
| state | officeAddressState | Bi-Directional | Visible | ||||
| postalCode | officeAddressPostal | Bi-Directional | Visible | ||||
| employeeHireDate | - | app-to-idhub | Visible | ||||
| managerDisplayName | managerDisplayName | app-to-idhub | Visible | ||||
| managerLogin | managerLogin | app-to-idhub | Visible | ||||
| officeLocation | officeAddressLine | Bi-Directional | Hidden | ||||
| externalId | - | Bi-Directional | Visible | Yes | |||
| externalUserState | - | app-to-idhub | Visible | Yes | |||
| faxNumber | - | Bi-Directional | Visible | ||||
| meta | - | app-to-idhub | Visible | Yes | |||
| schemas | - | app-to-idhub | Visible | Yes |
- Sync Direction of the Attributes depends on whether you regard Entra ID as your Trusted Source. For most organizations Entra ID is a Trusted system.
- You should only synchronize from IDHub to Microsoft Entra ID and not the reverse if Microsoft Entra ID is not a trusted system in your case.
Possible Recon Keys and Values
| Possible Recon Key | Possible Recon Key Values |
|---|---|
| userPrincipalName | aaron@82xn35.onmicrosoft.com |
| aaron@iamsath.com | |
| EmployeeID | IAMSATHE008 |
Connector Application Configuration
Connector application is designed such that it works as the wrapper application to the different scim adapters. This majorly consists of the following:
Authentication
- Basic Authentication is required
- The encrypted values of username and password will be stored in the properties file
Resource Type
These are the two resource types available for the IDHUB connector. The "resourceName" attribute value in rest api calls will have one of these values.
- Account - user account in the target system - this will include entitlement membership
- Entitlement -available entitlements in the target system
Entra ID Connector Splice configuration
In order to provision, modify, and revoke two main resources, Accounts and Entitlements, the Microsoft Entra ID Connector Splice integrates with the IDHub Connector Application. IDHub's Account translates into a User in SCIM and Microsoft Entra ID, whereas IDHub's Entitlements translate into a Groups or policies in Microsoft Entra ID. Microsoft Entra ID provides SDK for Java to access data on Microsoft Entra ID.
Account
An Entra ID Account in IDHub maps to a User in Entra ID. The following properties must be specified in order to create a User in Entra ID.
| Property | Description |
|---|---|
| displayName | The name to display in the address book for the user. |
| userPrincipalName | Email address of the user |
Entitlement
An Entitlement in IDHub maps to Groups and Licences in Entra ID. A Group in Entra ID can be a Microsoft 365 Group or a Security Group. A Team in Teams also maps to a Group in Entra ID. A license provides a user access to Office 365 service plans such as Word, Excel, Outlook, Teams etc. The type of license that a user can be assigned completely depends on the type of product subscription that the organization has. A license can only be assigned to or removed from a user. Licences and Subscriptions cannot be purchased or updated via the O365 connector.
The following table shows the properties of the group resource to specify when you create a group.
| Property | Description |
|---|---|
| displayName | The name to display in the address book for the group. Maximum length: 256 characters. Required. |
Connector Splice Design
Account Schema
The Account Schema configuration of the Entra ID connector Splice is as follows:
{
  "schemas" : [
    "urn:ietf:params:scim:schemas:core:2.0:Schema"
  ],
  "id" : "urn:sath:params:scim:api:o365:1.0:Account"
  "name" : "Account"
  "description" : "Office 365 account"
  "attributes": [
    {
      "name" : "id",
      "description" : "Id of the user.",
      "required" : true
      "returned" : "always",
      "multiValued" : false,
    },
    {
      "name" : "accountEnabled"
      "description" : "True if account is enabled"
      "required" : true
      "returned" : "always",
      "multivalued" : false
    },
    {
      "name" : "displayName"
      "description" : "The name to display in the address book for the user."
      "required" : true
      "returned" : "always",
      "multivalued" : false
    },
    {
        "name" : "mailNickname"
        "description" : "The mail alias for the user."
        "required" : true
        "returned" : "always",
        "multivalued" : false
    },
    {
        "name" : "password"
        "description" : "Account password"
        "required" : true
        "returned" : "never",
        "multivalued" : false
    },
    {
        "name" : "userPrincipalName"
        "description" : "The mail alias for the user."
        "required" : true
        "returned" : "always",
        "multivalued" : false
    },
    {
        "name" : "membership"
        "description" : "Licenses assigned to the user and group membership of user"
        "required" : false
        "multivalued" : true
    },
    {
      "name" : "meta",
      "multiValued" : false,
      "description" : "A complex attribute containing resource metadata.",
      "mutability" : "readOnly",
      "subAttributes" : [
        {
          "name" : "resourceType",
          "multiValued" : false,
          "description" : "The name of the resource type of the resource.",
          "mutability" : "readOnly",
          "caseExact" : true
        },
        {
          "name" : "created",
          "multiValued" : false,
          "type" : "dateTime",
          "description" : "The \"DateTime\" that the resource was added to the service provider."
        },
        {
          "name" : "lastModified",
          "multiValued" : false,
          "type" : "dateTime",
          "description" : "The most recent DateTime that the details of this resource were updated at the service provider.  If this resource has never been modified since its initial creation, the value MUST be the same as the value of \"created\"."
        },
        {
          "name" : "location",
          "multiValued" : false,
          "description" : "The URI where the resource is available",
          "mutability" : "readOnly",
          "caseExact" : true
        },
        {
          "name" : "version",
          "multiValued" : false,
          "description" : "The version of the resource being returned.  This value must be the same as the entity-tag (ETag) HTTP response header (see Sections 2.1 and 2.3 of [RFC7232]).  This attribute has \"caseExact\" as \"true\".  Service provider support for this attribute is optional and subject to the service provider's support for versioning (see Section 3.14 of [RFC7644]).  If a service provider provides \"version\" (entity-tag) for a representation and the generation of that entity-tag does not satisfy all of the characteristics of a strong validator (see Section 2.1 of [RFC7232]), then the origin server MUST mark the \"version\" (entity-tag) as weak by prefixing its opaque value with \"W/\" (case sensitive).",
          "mutability" : "readOnly",
          "caseExact" : true
        }
      ]
    },
     {
      "name" : "schemas",
      "multiValued" : true,
      "description" : "The \"schemas\" attribute is a REQUIRED attribute and is an array of Strings containing URIs that are used to indicate the namespaces of the SCIM schemas that define the attributes present in the current JSON structure.  This attribute may be used by parsers to define the attributes present in the JSON structure that is the body to an HTTP request or response.  Each String value must be a unique URI.  All representations of SCIM schemas MUST include a non-empty array with value(s) of the URIs supported by that representation.  The \"schemas\" attribute for a resource MUST only contain values defined as \"schema\" and \"schemaExtensions\" for the resource's defined \"resourceType\".  Duplicate values MUST NOT be included.  Value order is not specified and MUST NOT impact behavior.",
      "mutability" : "readOnly",
      "returned" : "always",
      "caseExact" : true,
      "required" : true
    }
  ]
}
Resource Type Schema
{
  "schemas" : [
    "urn:ietf:params:scim:schemas:core:2.0:ResourceType"
  ],
  "id" : "Account",
  "name" : "Account",
  "endpoint" : "Accounts",
  "description" : "This resource maps to users in Entra ID",
  "schema" : "urn:sath:params:scim:api:o365:1.0:Account"
}
Entitlement Schema
The Entitlement Schema configuration of the Entra ID connector Splice is as follows:
{
  "schemas" : [
    "urn:ietf:params:scim:schemas:core:2.0:Schema"
  ],
  "id" : "urn:sath:params:scim:api:o365:1.0:Entitlement"
  "name" : "Entitlement"
  "description" : "Groups(includes Teams) and Licenses"
  "attributes": [
    {
      "name" : "id"
      "description" : "LICENSE~<License Id> or GROUP~<Group Id> or TEAM~<Team Id>"
      "required" : true
      "returned" : "always",
      "multivalued" : false
    },
    {
      "name" : "externalId",
      "description" : "",
      "returned" : "always",
      "multiValued" : false,
    },
    {
      "name" : "displayName"
      "description" : "LICENSE~<License Name> or GROUP~<Group Name> or TEAM~<Team Name>. Maximum length: 256 characters"
      "required" : true
      "returned" : "always",
      "multivalued" : false
    },
    {
      "name" : "meta",
      "multiValued" : false,
      "description" : "A complex attribute containing resource metadata.",
      "mutability" : "readOnly",
      "subAttributes" : [
        {
          "name" : "resourceType",
          "multiValued" : false,
          "description" : "The name of the resource type of the resource.",
          "mutability" : "readOnly",
          "caseExact" : true
        },
        {
          "name" : "created",
          "multiValued" : false,
          "type" : "dateTime",
          "description" : "The \"DateTime\" that the resource was added to the service provider."
        },
        {
          "name" : "lastModified",
          "multiValued" : false,
          "type" : "dateTime",
          "description" : "The most recent DateTime that the details of this resource were updated at the service provider.  If this resource has never been modified since its initial creation, the value MUST be the same as the value of \"created\"."
        },
        {
          "name" : "location",
          "multiValued" : false,
          "description" : "The URI where the resource is available",
          "mutability" : "readOnly",
          "caseExact" : true
        },
        {
          "name" : "version",
          "multiValued" : false,
          "description" : "The version of the resource being returned.  This value must be the same as the entity-tag (ETag) HTTP response header (see Sections 2.1 and 2.3 of [RFC7232]).  This attribute has \"caseExact\" as \"true\".  Service provider support for this attribute is optional and subject to the service provider's support for versioning (see Section 3.14 of [RFC7644]).  If a service provider provides \"version\" (entity-tag) for a representation and the generation of that entity-tag does not satisfy all of the characteristics of a strong validator (see Section 2.1 of [RFC7232]), then the origin server MUST mark the \"version\" (entity-tag) as weak by prefixing its opaque value with \"W/\" (case sensitive).",
          "mutability" : "readOnly",
          "caseExact" : true
        }
      ]
    },
     {
      "name" : "schemas",
      "multiValued" : true,
      "description" : "The \"schemas\" attribute is a REQUIRED attribute and is an array of Strings containing URIs that are used to indicate the namespaces of the SCIM schemas that define the attributes present in the current JSON structure.  This attribute may be used by parsers to define the attributes present in the JSON structure that is the body to an HTTP request or response.  Each String value must be a unique URI.  All representations of SCIM schemas MUST include a non-empty array with value(s) of the URIs supported by that representation.  The \"schemas\" attribute for a resource MUST only contain values defined as \"schema\" and \"schemaExtensions\" for the resource's defined \"resourceType\".  Duplicate values MUST NOT be included.  Value order is not specified and MUST NOT impact behavior.",
      "mutability" : "readOnly",
      "returned" : "always",
      "caseExact" : true,
      "required" : true
    }
  ]
}
Resource Type Schema
{
  "schemas" : [
    "urn:ietf:params:scim:schemas:core:2.0:ResourceType"
  ],
  "id" : "Entitlement",
  "name" : "Entitlement",
  "endpoint" : "Entitlements",
  "description" : "This resource maps to licenses and groups",
  "schema" : "urn:sath:params:scim:api:o365:1.0:Entitlement"
}
How do you get the secrets from your Entra ID instance?
Role required for procuring Secrets
To manage the App Registrations and managing client secrets, a user generally needs to have appropriate permissions within the Entra ID instance. Here are the roles and credentials typically required:
Global Administrator : This is the highest level of administrator within Entra ID. A Global Administrator has permissions to do anything within the directory, including creating and managing all aspects of App Registrations.
Application Administrator : This role has the ability to create and manage all aspects of app registrations. They can manage the application, but not the entire Entra ID directory.
Cloud Application Administrator: Similar to the Application Administrator, but with some restrictions. They can manage applications but do not have as broad of permissions as the Application Administrator.
Minimum API Permissions Required
You need to give the following API permissions to your registered Entra ID application.
Directory.ReadWrite.All
Allows the app to read and write data in your organization's directory, such as users, and groups, without a signed-in user. Does not allow user or group deletion.
User.ManageIdentities.All
Allows the app to read, update and delete identities that are associated with a user's account, without a signed in user. This controls the identities users can sign-in with.
User.ReadWrite.All
Allows the app to read and update user profiles without a signed in user.
RoleAssignmentSchedule.Read.Directory
Allows the app to read the active role-based access control (RBAC) assignments and schedules for your company's directory, without a signed-in user. This includes reading directory role templates, and directory roles.
RoleAssignmentSchedule.ReadWrite.Directory
Allows the app to read, update, and delete policies for privileged role-based access control (RBAC) assignments of your company's directory, without a signed-in user.
Process for getting Client ID
- Sign in to Entra ID Portal: Sign in with your Entra ID account credentials.
- Access Microsoft Entra ID: Once you are in the Entra ID Portal, search for and select Microsoft Entra ID from the services list.
- Register an Application:
- Inside your Entra ID's overview page, find and click on App registrations.
- Click on New registration at the top.
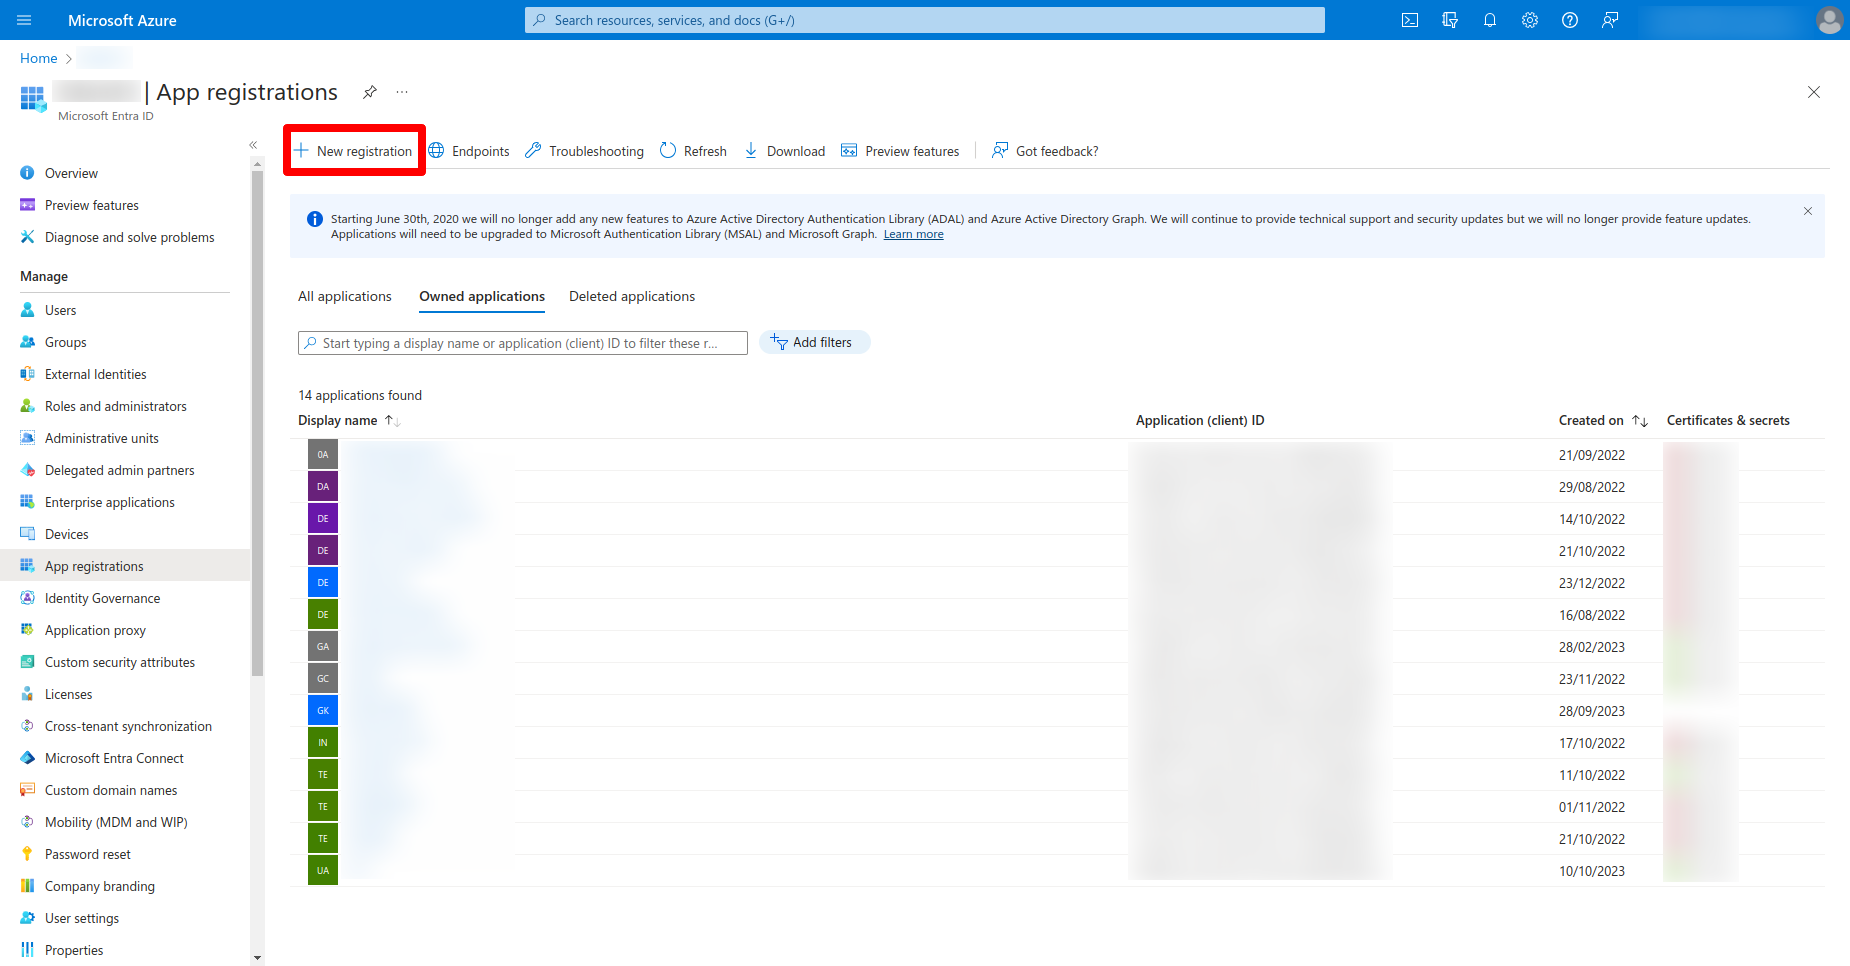
- Provide the necessary details:
- Name: Enter a descriptive name for your application.
- Supported account types: Select who can use the application.
- Redirect URI (optional): Enter the URI where Entra ID will redirect the user's browser after authentication. This field is important for web applications and can be changed later if needed.
- Create the Application:
- Once all necessary details are filled in, click on the Register button.
- Upon successful registration, you will be directed to the application's overview page.
- Find the Application (Client) ID:
- On the application's overview page, find the Application (client) ID. This is the unique identifier for your application in Entra ID.
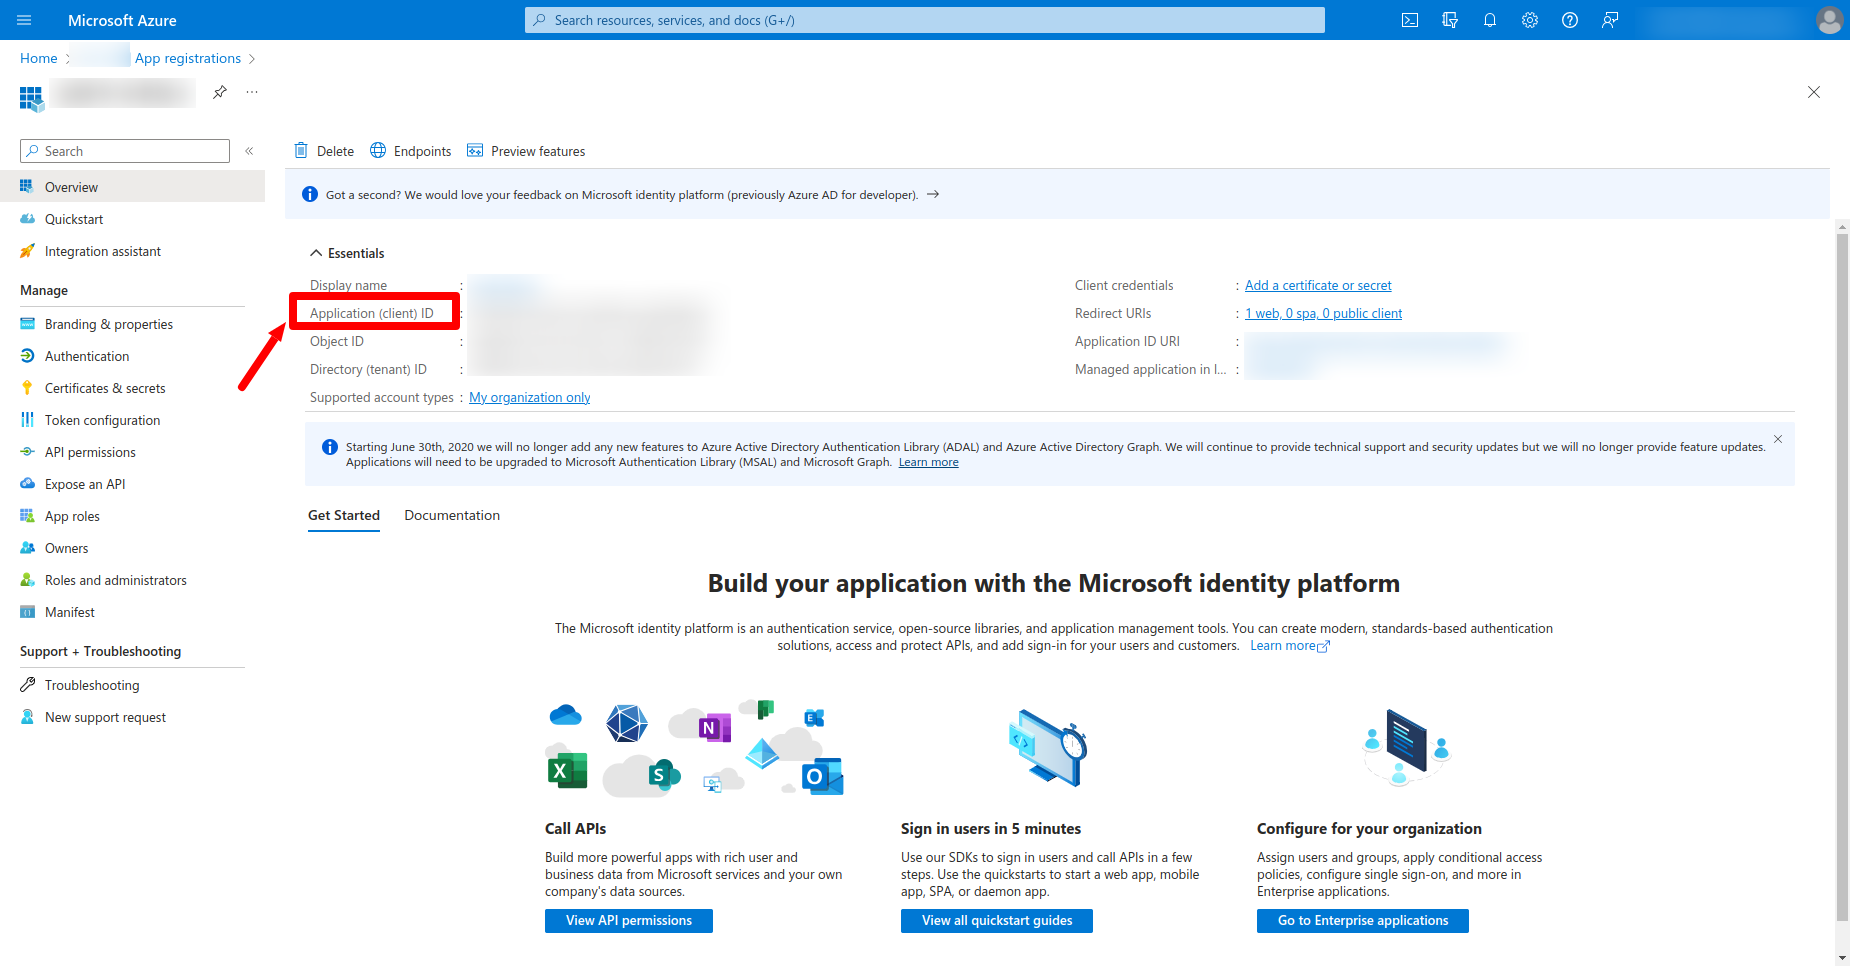
- Copy and save the Application ID
- You might also need to set up permissions in the Entra ID application settings. [Click Here](/docs/connectors/Entra ID/#minimum-api-permissions-required) to learn more
- Always follow security best practices, like not sharing your Client ID and other sensitive information publicly and restricting permissions to the minimum required.
Process for getting Client Secret
- Sign in to Entra ID Portal: Sign in with your Entra ID account credentials.
- Microsoft Entra ID> App Registrations: Navigate to the Microsoft Entra IDservice and select the "App Registrations" option.
- Select the Application: Choose the application you want to create a secret for. If it doesn't exist, you'll need to register a new application.
- Certificates & Secrets: Within the application panel, go to the "Certificates & secrets" section.
- New Client Secret: Click on "New client secret," provide the necessary information (like description and expiry), and then click "Add."
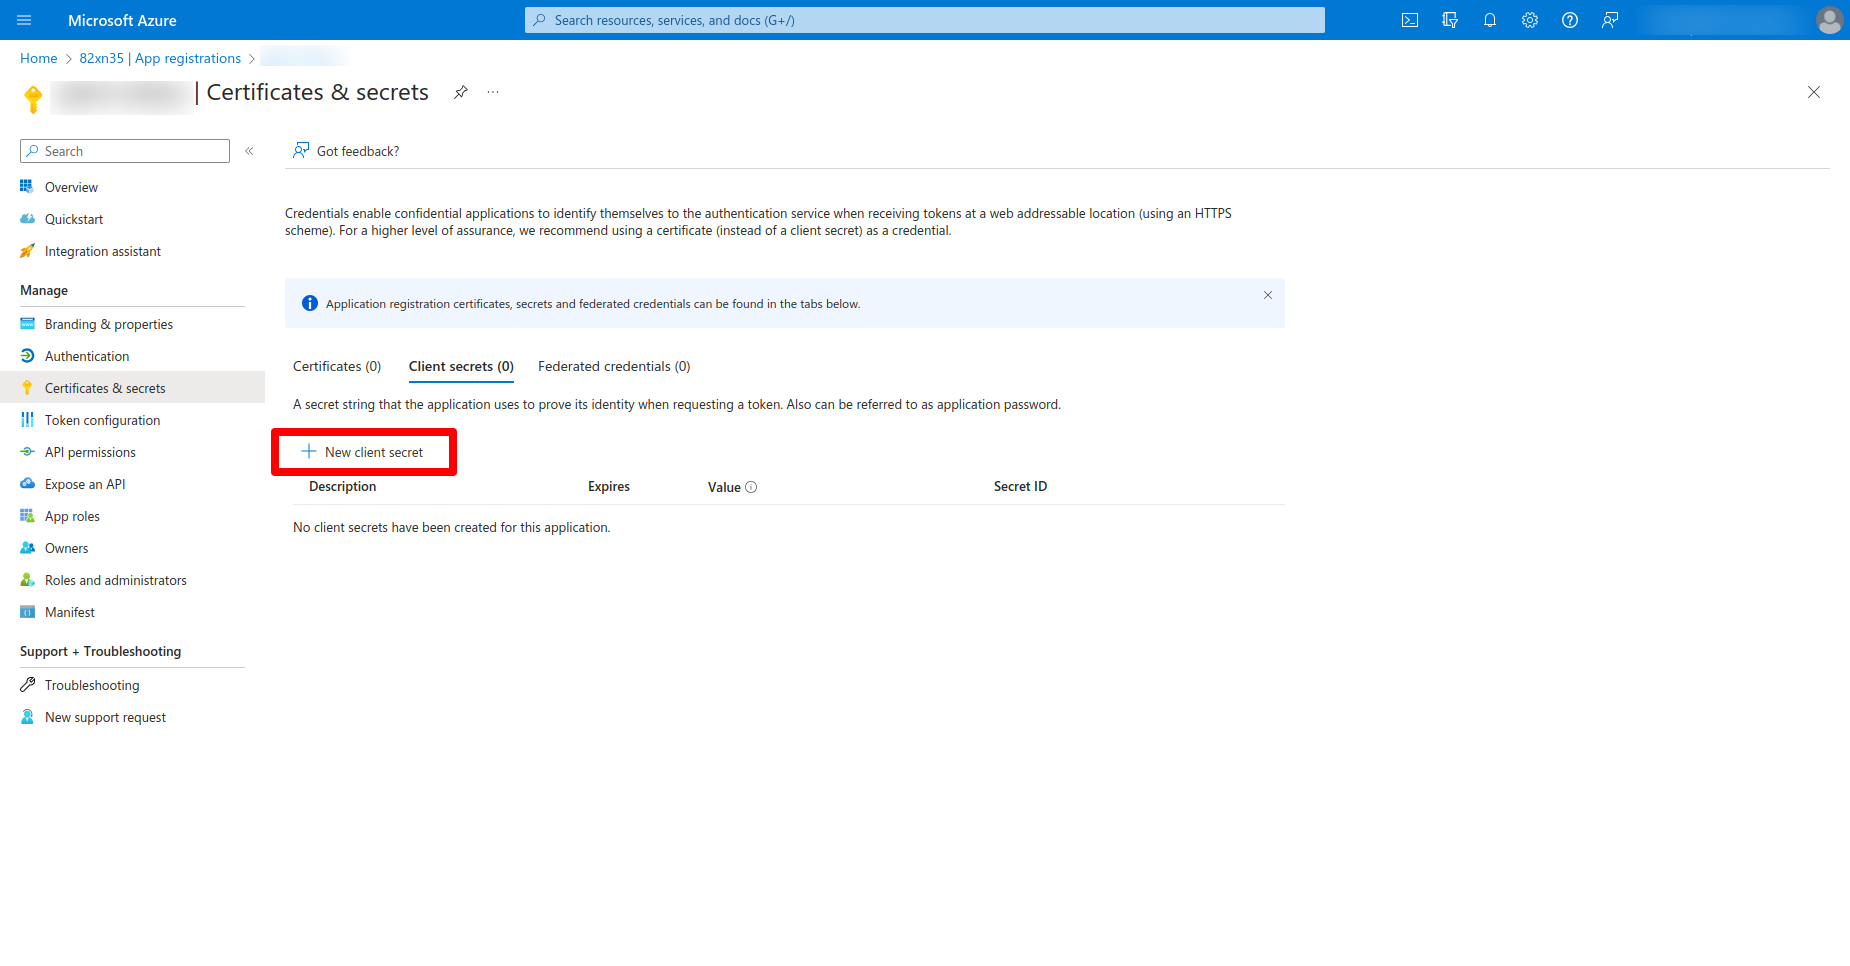
- Record the Secret: Once the client secret is created, make sure to copy and store it securely. You won't be able to retrieve it again from Entra ID.
Process for getting Tenant ID
- Sign in to Entra ID Portal:
- Sign in with your Entra ID account credentials.
- Microsoft Entra ID:
- Once you're logged in, navigate to the Microsoft Entra IDby selecting it from the left-hand side navigation pane. If you don't see it, use the search bar at the top.
- Find Tenant ID:
- Inside the Microsoft Entra IDpanel, look for a section named "Properties" or "Overview".
- On the "Properties" or "Overview" page, you will see the Tenant ID listed. It's usually a GUID (Globally Unique Identifier).
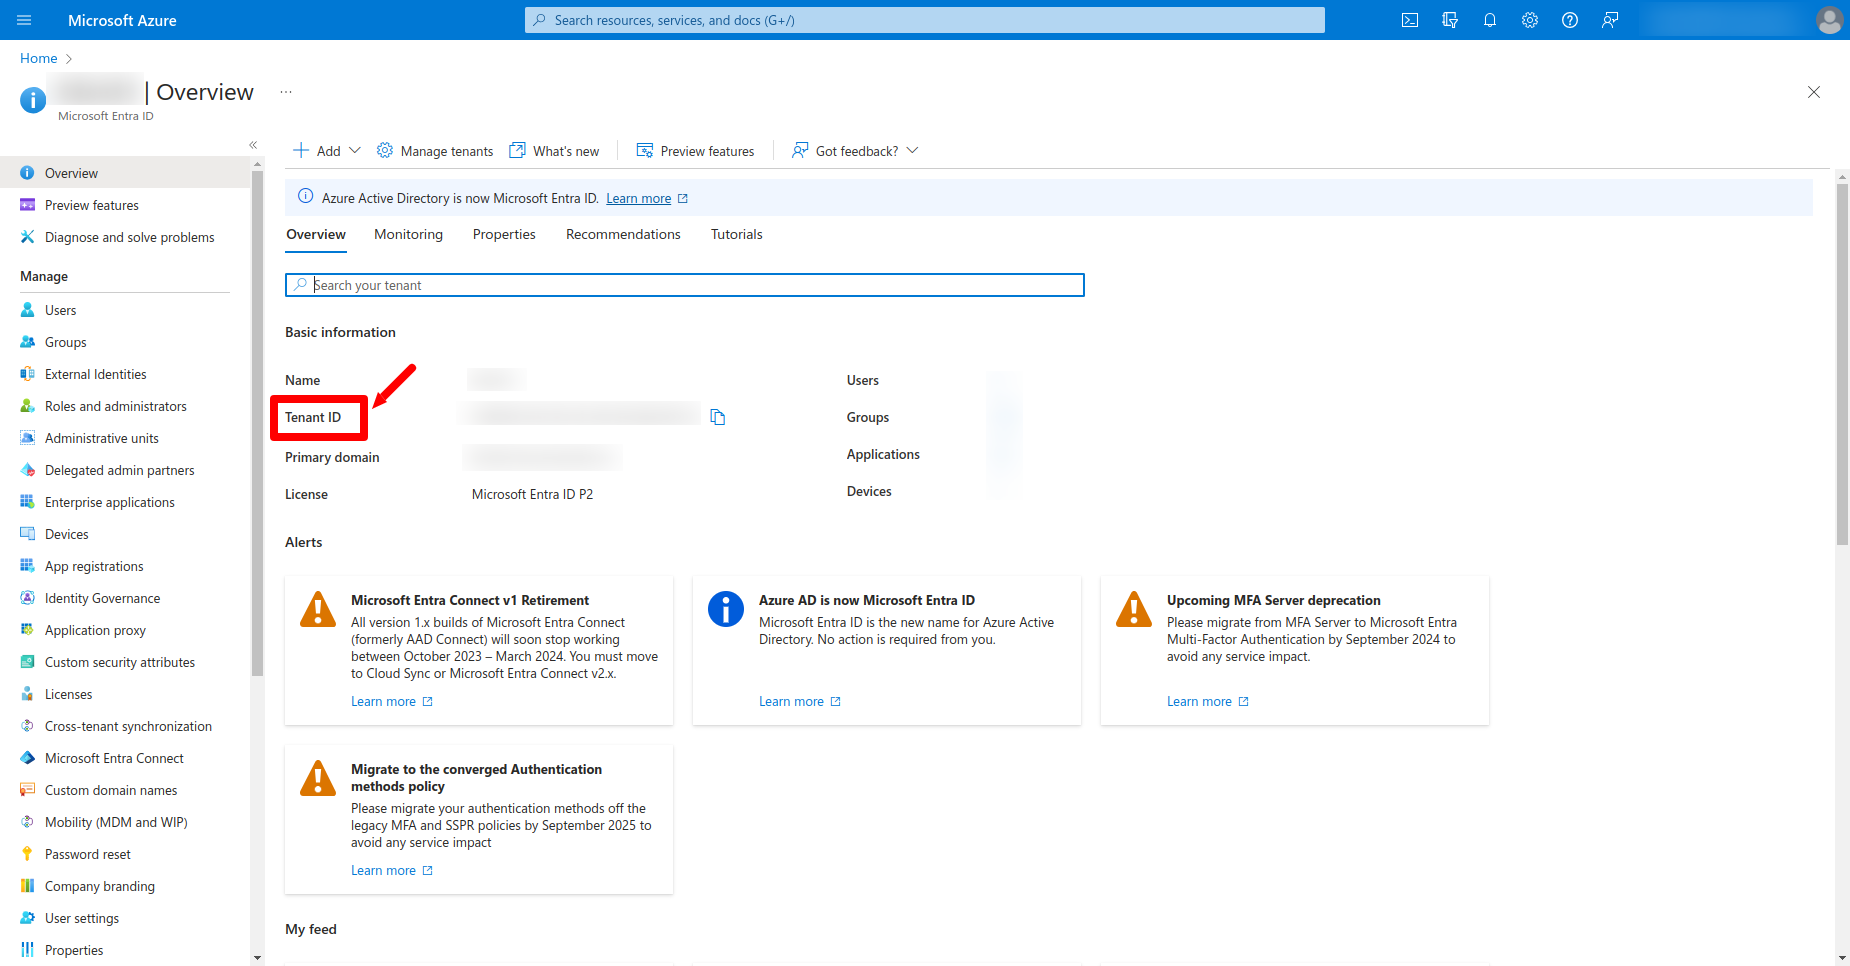
- If you're part of multiple tenants, make sure you're looking at the correct one.
- If you can't access the required information, you might not have the necessary permissions. Contact your Entra IDministrator.
- We have implemented a change stream function which automatically syncs your tenant data to idhub every 5 minutes.
Deploying the Entra ID Connector
Deploying using IDHub Connector Onboarding Wizard
Click Here to view more details about how to use IDHub's Cloud Connector Onboarding wizard to deploy the connector.
Deploy on your own
Deploy on Cloud
The documentation for deploying the connector on your own Cloud Platform is coming soon
Deploy on your Server
Prerequisite
- A running IDHub instance and its FQDN/URL
- Microsoft Entra ID account with a Tenant ID, Client ID, and Entra ID Client Secret. See Here to obtain this information.
- An Ubuntu/Debian Linux VM with Docker engine, Compose plugin, cURL, jq and unzip.
- A service URL (with valid certificates) which points to port 7002 on the above VM.
Step 1 — Creating Connector OAuth Client (ID)
Login to IDHub with your admin credentials > Admin Settings > Sign On > Keycloak Administration
Go to Clients menu.
Create client and set Client ID to ‘Entra ID-connector’ and Save.
Set Valid Redirect URIs to '*' and Save.

Step 2 — Creating Service Account User in Keycloak in Tenant Realm
In your realm, do the following.
Go to Users menu.
Add user.
Set Username to ‘Entra ID-service-account’ and Save.
Go to its Credentials menu and set a password. (Note: For this tutorial, we have used ‘sapassword1’. We highly recommend using a different one for your service account).

Keycloak configuration is now complete!
Step 3 — Get your tokens
- Open Terminal and Install cURL and jq (needs to be installed in the system if not already done).
sudo apt install -y curl jq
Run the following command in your terminal with custom variables. It will generate the KEYCLOAK_ACCESS_TOKEN and KEYCLOAK_REFRESH_TOKEN.
curl --location --request POST 'https://<IDHUB_FQDN>/auth/realms/<YOUR_REALM>/protocol/openid-connect/token' \
--header 'Content-Type: application/x-www-form-urlencoded' \
--data-urlencode 'client_id=<CLIENT_ID>' \
--data-urlencode 'username=<SERVICE_ACCOUNT_USER>' \
--data-urlencode 'password=<SERVICE_ACCOUNT_PASSWORD>' \
--data-urlencode 'scope=offline_access' \
--data-urlencode 'grant_type=password' \
--data-urlencode 'request_token_type=urn:ietf:params:oauth:token-type:access_token' \
| jq
<IDHUB_FQDN>is your IDHub FQDN/URL. e.g. example.sath.com<YOUR_REALM>is your tenant name. e.g. alpha- For
<CLIENT_ID>, see Step 1. - For
<SERVICE_ACCOUNT_USER>and<SERVICE_ACCOUNT_PASSWORD>, see Step 2.
Example:
curl --location --request POST 'https://example.iamsath.com/auth/realms/alpha/protocol/openid-connect/token' \
--header 'Content-Type: application/x-www-form-urlencoded' \
--data-urlencode 'client_id=Entra ID-connector' \
--data-urlencode 'username=Entra ID-service-account' \
--data-urlencode 'password=sapassword1' \
--data-urlencode 'scope=offline_access' \
--data-urlencode 'grant_type=password' \
--data-urlencode 'request_token_type=urn:ietf:params:oauth:token-type:access_token' \
| jq
- Copy access_token and refresh_token and keep it somewhere safe. You will need it in the next step.
We now have our tokens. Let’s deploy the connector.
Step 4 — Prepare the .env file
- Download the IDHub’s Entra ID Connector package, extract and edit the ‘.env’ file.
wget https://storage.googleapis.com/sath-public-binaries/connectors/idhub-Entra ID-ad-connector.zip
unzip idhub-Entra ID-ad-connector.zip
cd idhub-Entra ID-connector
nano .env
Entra ID_CLIENT_ID=Entra ID_CLIENT_ID
Entra ID_CLIENT_SECRET=Entra ID_CLIENT_SECRET
Entra ID_TENANT_ID=Entra ID_TENANT_ID
CONNECTOR_DEBUG_LEVEL=DEBUG
IDHUB_HOSTNAME=example.iamsath.com
KEYCLOAK_ACCESS_TOKEN=ACCESS_TOKEN
KEYCLOAK_CLIENT_ID=Entra ID-connector
KEYCLOAK_REFRESH_TOKEN=REFRESH_TOKEN
KEYCLOAK_REALM=TENANT_NAME
SPLICE_DEBUG_LEVEL=DEBUG
PORT=CONNECTOR_PORT
Replace the following:
Entra ID_CLIENT_ID: From prerequisites.Entra ID_CLIENT_SECRET: From prerequisites.Entra ID_TENANT_ID: From prerequisites.IDHUB_HOSTNAME: IDHub web hostname. From prerequisites. eg. example.sath.comKEYCLOAK_ACCESS_TOKEN: From Step 3 output. Put it WITHOUT the quotes.KEYCLOAK_CLIENT_ID: From Step 1. eg. Entra ID-connectorKEYCLOAK_REFRESH_TOKEN: From Step 3 output. Put it WITHOUT the quotes.KEYCLOAK_REALM: Tenant created in IDHub. From prerequisites. eg. alpha.PORT: From prerequisites. eg. 7002
Step 5 — Run the container
- In the connector directory, run the following command.
docker compose up -d