Amazon Web Services
The purpose of this guide is to provide detailed information regarding the AWS connector. There are a number of things you can learn about this connector here, including information about its configuration and deployment.
About AWS Connector
In IDHub, you can create and onboard AWS applications using the AWS connector.
Connector Version
AWS connector is currently at Version 1.0. More AWS operations and other capabilities will be supported in upcoming updates and releases of the AWS connector.
| Component | Version |
|---|---|
| AWS Connector | Ver 1.0 |
| Target System | AWS |
| Target API version | AWS SDK for Java API Reference - 2.13.76 |
| Connector Server | 11.1.2.1.0 or 12.2.1.3.0 |
| Connector Server JDK | JDK 1.8 and later |
Connector Operations
| Operation | Supported |
|---|---|
| User Management | |
| Create user | Yes |
| Update user | Yes |
| Enable user | Yes |
| Disable user | Yes |
| Delete user | Yes |
| Reset Password | Yes |
| Policy Management | |
| Add and Remove Policies to Users | Yes |
| Group Management | |
| Add and Remove Groups to Users | Yes |
| Tag Management | |
| Add and Remove Tags to Users | No* |
Connector Components
The components of the connector include Connector Application, Connector Application Configuration, Connector Service Provider Interface, Splice, and Splice configuration.
These connection components contain precise connectivity and setup information for your target system. The connector takes information from these files to allow you to quickly and efficiently onboard your applications using a single, streamlined UI.
Connector Architecture
The connector's architecture is constructed in accordance with the diagram below:
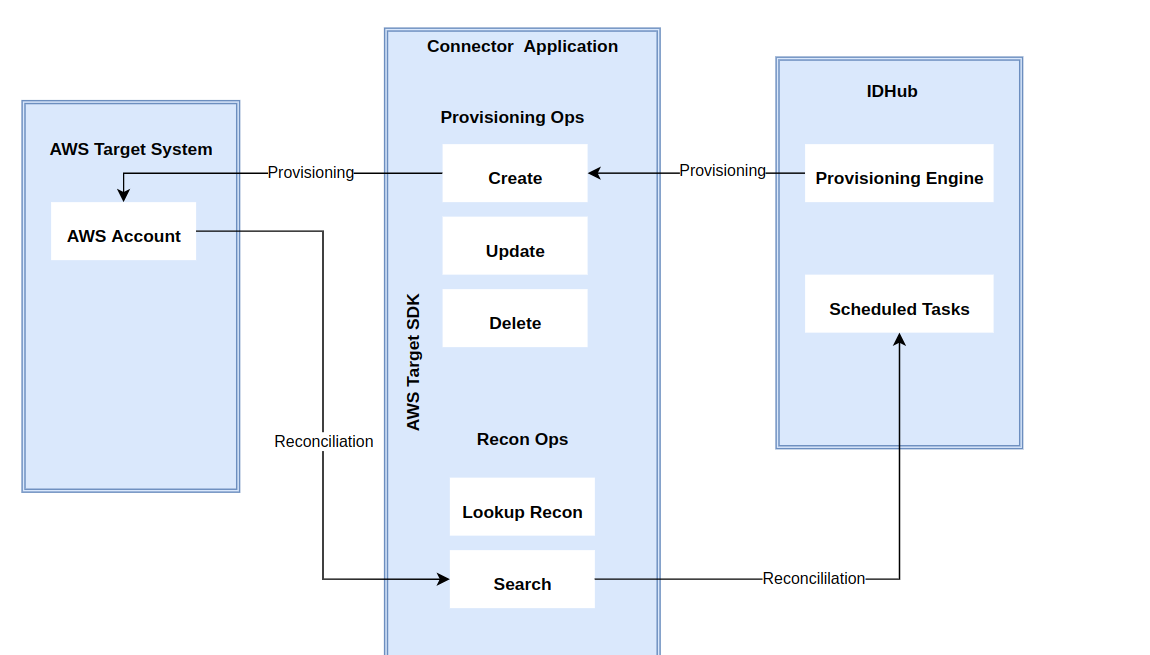
The connector architecture primarily consists of a connector application and a target system component, as seen in the screenshot up above. The native communication with the target system is handled by the target system by leveraging the SPI implementation of the AWS Specific connection. This architecture is implemented because it allows for rapid and straightforward connector deployment as well as precise versioning capabilities.
The connector is configured to run in one of the following modes:
- Target Resource reconciliation
- Users are instantly created and changed on IDHub in this situation if you rely on the AWS application as the trusted source. When user records match the reconciliation criteria, the AWS SDK retrieves them and sends them to IDHub. Each user record retrieved from the target system is cross-checked against existing IDHub Users. If there is a match between the target system record and the IDHub User, the User attributes are changed to reflect the changes made to the target system record. If no matches are identified, the target system record is utilized to generate an IDHub User.
- Account management
- This entails using IDHub to add, modify, or remove users from the target system.
- During provisioning, the connector invokes the target system's AWS SDK for provisioning tasks.
- The target system's SDK accepts provisioning data, does the necessary actions there, and then sends IDHub the result back from the target system. Applications can carry out create, read, update, and delete (CRUD) actions on the target system using the AWS SDK.
In developing the connector, we adhere to this fundamental architecture. The IDHub team will handle the connector modification section appropriately based on your unique business requirements if there are any improvements, extra specifications, or variations.
Use cases for the connector
AWS User Management
AWS is currently being used by your company, and you want to connect it to IDHub. You may want to generate and reconcile accounts from and to AWS and IDHub. In such a scenario, you would need to create an AWS connector and use the connector URL to onboard an AWS-connected application in IDHub. You will be able to provide accounts in the target system after successfully deploying the AWS connector and creating the AWS application. Similarly, you can perform further activities such as de-provisioning and updating accounts. IDHub offers a reconciliation feature that allows you to reconcile user identification information to and from AWS.
AWS Admin Policy Management
Your organization might create and set policies for your users in AWS. As the AWS policy would be an entitlement in IDHub, therefore you can easily request access to or revoke access to the AWS policies. This would enable you to manage the policies of AWS directly from IDHub.
AWS Group Management
Your company may employ AWS user groups, which enable group members/administrators to manage group membership and delete groups. You might now want to go through the list of groups that have been inactive for a time or have fully inactive members. In this particular instance, you can take advantage of the AWS connector to retrieve all the groups in IDHub. The AWS group is seen as an entitlement by IDHub. When you reconcile data from AWS to IDHub, you will be able to simply trace any operations/changes performed in the entitlements (or groups) of AWS utilizing IDHub's packed reporting tools.
Connector Features
Full Reconciliation and Incremental Reconciliation
Full reconciliation can be performed to bring all existing user data from the target system to IDHub. If the target system has an attribute that stores the timestamp at which an item is created or modified, you can configure your connector for incremental reconciliation once the first full reconciliation operation has been completed.
The connector's future release version will incorporate incremental recon, which is not supported by the present version of the connector.
Limited Reconciliation
Records from the target system can be reconciled depending on a defined filter condition. You can define the subset of newly added or updated target system records that must be reconciled in order to restrict or filter the records that are fetched into IDHub during a reconciliation process. You can specify the conditions in which the reconciliation will take place.
Reconciliation of Deleted User Records
The connector can be set up to reconcile user records that have been erased. If a user record is removed on the target system while in target resource mode, the matching User is revoked from IDHub as well.
Reconciliation of Lookup Definitions
You can configure the connector for reconciliation of groups and policies in the target system, which will come into IDHub as entitlements, to supply entitlements in the lookup definitions on IDHub.
Secure Communication to the Target System
To provide secure communication to the target system, SSL is required. The Connector Server and the target system can both have SSL configured between them as well as between IDHub and the Connector Server.
Support for Enabling and Disabling Accounts
Enabling User accounts from IDHub will make the Console and Programmatic Access active in the target system if the enableProgrammaticAccess configuration parameter is set to true. Only Console access will be active if the configuration parameter is set to false.
Disabling user accounts from IDHub makes the Console access and Programmatic Access deactivated in the target system irrespective of the enableProgrammaticAccess configuration parameter value. This disables user accounts in IDHub thereby prohibiting them from performing any operation.
Support for the Connector Server
The connector architecture enables your application to communicate with externally deployed bundles by utilizing one or more connector servers. As a result, you have the option to run the IDHub Java connector bundle on a different host for better performance if you do not wish to execute it in the same VM as the application.
How do you get the secrets from your AWS instance?
Role required for procuring Secrets
To manage or access secrets for an AWS instance, typically, the user should have a role with permissions assigned via AWS. Typically the roles are as follows
- IAM User with Policy Attachments: An IAM user can be granted permissions to access specific AWS secrets by attaching policies directly to the user. These policies should be narrowly scoped to include only the necessary permissions.
- IAM Role with Specific Permissions: IAM roles are more secure and flexible than direct user permissions. Roles can be assumed by users, applications, or services and have policies that grant permissions to access AWS Secrets Manager or other services where secrets are stored.
- Secrets Manager Access Role: If using AWS Secrets Manager, you might create a role specifically for accessing secrets. This role would have permissions like
secretsmanager:GetSecretValueand would be assigned to any user or service that needs to retrieve secrets. - Administrator Access: While having full administrative access would allow a user to access secrets, it's not recommended due to security best practices. Instead, adhere to the principle of least privilege — only grant enough permissions to perform the required tasks.
Always ensure you're following best practices for security by regularly reviewing and auditing permissions, using roles over direct user permissions where possible, and adhering to the principle of least privilege.
Signing in with Root User Credentials
To sign in to an AWS account as the root user, perform the following steps:
To sign in to an AWS account as a root user, ensure you know the email address used to create the AWS account and the password for the root user.
- Open https://console.aws.amazon.com/.
- If you have not signed in previously using this browser, select Root user, enter the email address associated with your account, click Next, enter the password and choose Sign in.
- If you have signed in as a root user previously using this browser, your browser might remember the email address for the AWS account. If so, you just need to enter password and select Sign in.
Creating an IAM user in the AWS account
To create an IAM user in the AWS account, perform the following steps:
If you are already signed in, under Services, search for IAM.
From the left navigation pane, under Access Management, select Users, and click Add user.
Create a simple user without any permissions.
Perform the following steps to add a user in the Add User page:
- In the Set user details section, enter the user name (sign-in name for AWS).
- In the Select AWS access type section, under Access type, select Programmatic access and AWS Management Console access checkboxes.
- To manually enter the user password, under Console Password, select Custom password.
- Select the Require password reset checkbox and then select Next: Permissions.
From the Add User page, select Set Permissions and click Next: Tags without making any change.
From the Add tags (optional) page, click Next: Review and review all details used for creating the user and then click on Create user. You will receive a success message on the screen after you creating the user.
Click Close.
Adding Inline Policy to an IAM User
To add inline policies to IAM users, perform the following steps:
Using the search field, select the previosly created user from the User name list.
From the Summary page, select the Permissions tab and then select Permissions policies.
Click Add inline policy. You will be redirected to the Create Policy page.
Expand Service to define Actions and Resources for IAM, Organizations, CloudTrail and STS Services.
Click Choose a service and search for IAM.
Expand Actions, and then expand Access level to assign various access levels.
From the List access level section, select the following checkboxes:
- GetLoginProfile
- ListGroupPolicies
- ListUserPolicies
- ListAccessKeys
- ListGroups
- ListUsers
- ListAttachedGroupPolicies
- ListGroupForUser
- ListUserTags
- ListAttachedUserPolicies
- ListPolicies
From the Read access level section, select the following checkboxes:
- GetAccountAuthorizationDetails
- GetGroup
- GetPolicy
- GetUser
From the Tagging access level section, select the following checkboxes:
- TagUser
- UntagUser
From the Write access level section, select the following checkboxes:
- AddUserToGroup
- DeleteLoginProfile
- UpdateAccessKey
- CreateLoginProfile
- DeleteUser
- UpdateLoginProfile
- CreateUser
- RemoveUserFromGroup
- UpdateUser
From the Permissions Management access level section, select the following checkboxes:
- AttachUserPolicy
- DeleteUserPolicy
- DetachUserPolicy
- DetachGroupPolicy
From the Resources section, select All resources, and click Review policy.
In the Review Policy page, ensure to enter a name for your policy and click the Create policy button. The policy will be added to the user in permission tab.
To define Actions and Resources for Organizations, repeat steps 1 to 5 of this section with a minor change. While choosing a service in step 5, select Organisations instead of IAM.
Expand Actions, and then expand Access level to assign various access levels. Select the following checkboxes List and Read access level sections:
- List access level section: ListPoliciesForTarget
- Read access level section: DescribeAccount checkbox
From the Resources section, select All resources, and click Review policy.
In the Review Policy page, ensure to enter a name for your policy and click the Create policy button. The policy will be added to the user in permission tab.
To define Actions and Resources for CloudTrial, repeat steps 1 to 5 of this section with a minor change. While choosing a service in step 5, select CloudTrial instead of IAM.
Expand Actions, and then expand Access level to assign the access level. From the Read access level section, select the Lookup Events chekbox.
From the Resources section, select All resources, and click Review policy.
In the Review Policy page, ensure to enter a name for your policy and click the Create policy button. The policy will be added to the user in permission tab.
To define Actions and Resources for STS, repeat steps 1 to 5 of this section with a minor change. While choosing a service in step 5, select STS instead of IAM.
Expand Actions, and then expand Access level to assign the access level. From the Read access level section, select the GetCallerIdentity chekbox.
With this, you have successfully created an IAM user with four inline policies for each service. The same IAM user can be used as a communication user in IDHub to perform all the connector operations.
Generating the AWS access key and Secret Access Key
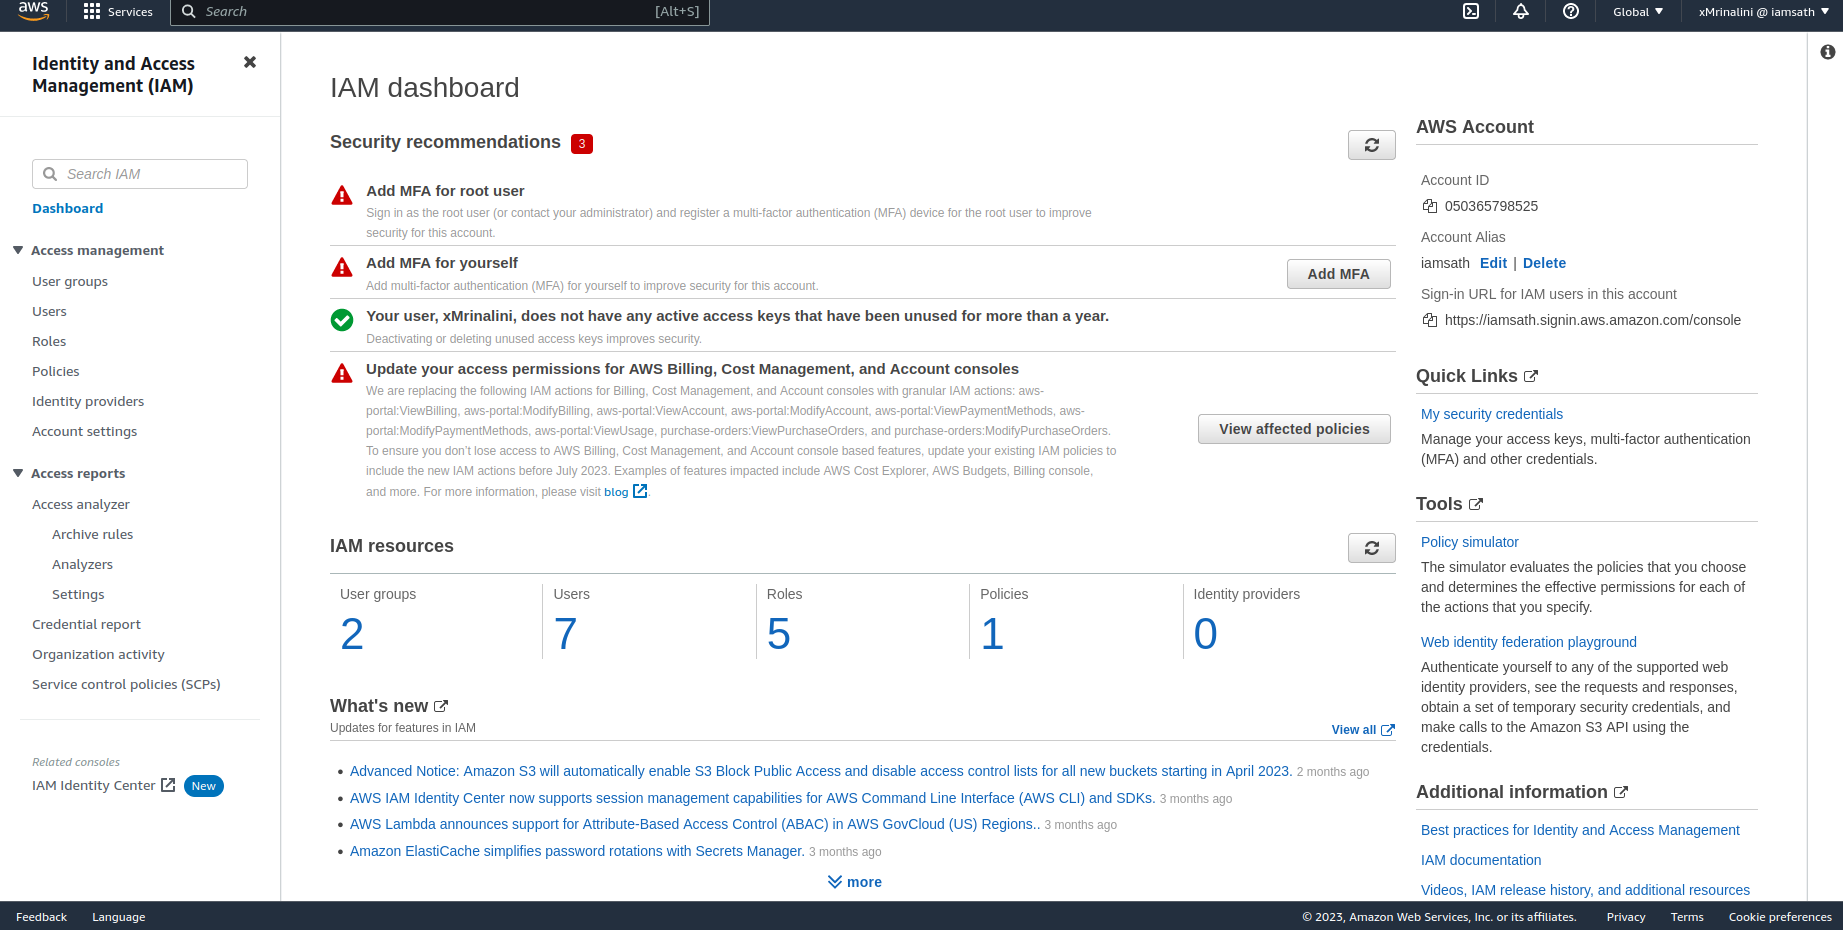
Login to your AWS console with your user credentials and navigate to IAM dashboard
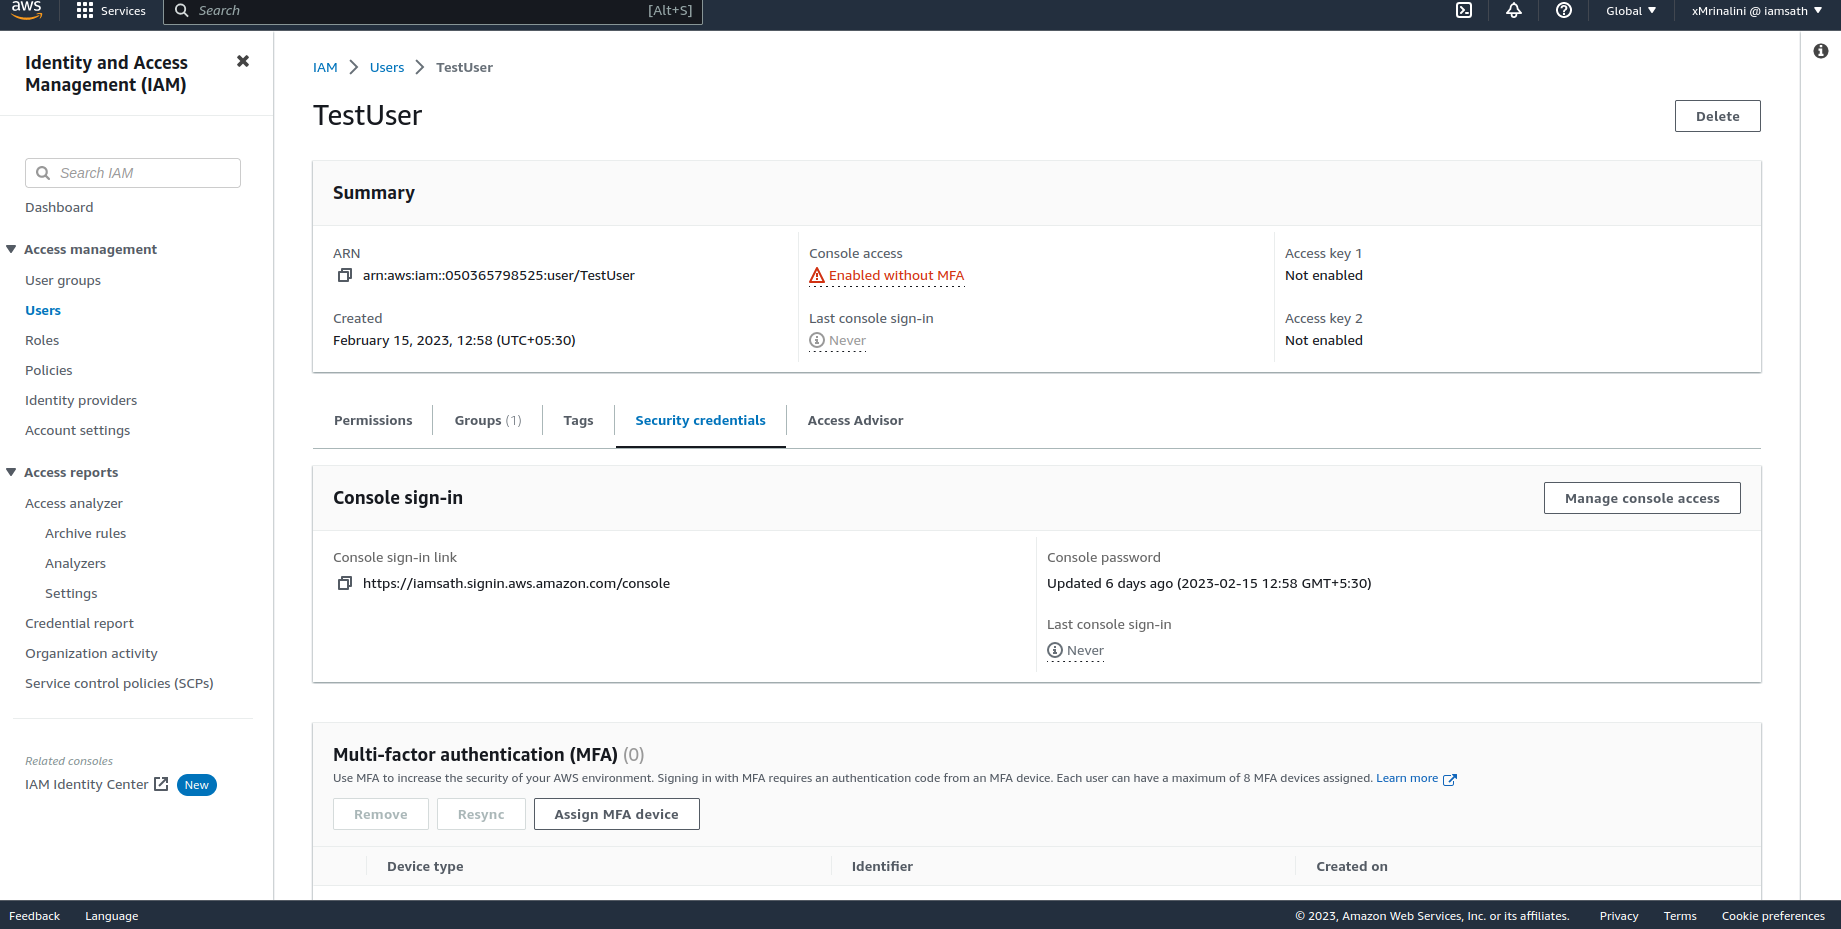
Click on Users tab on Left Side Panel and click on the user for whom the keys need to be generated. Select security credentials tab
Scroll down to Access keys and select Create access key button
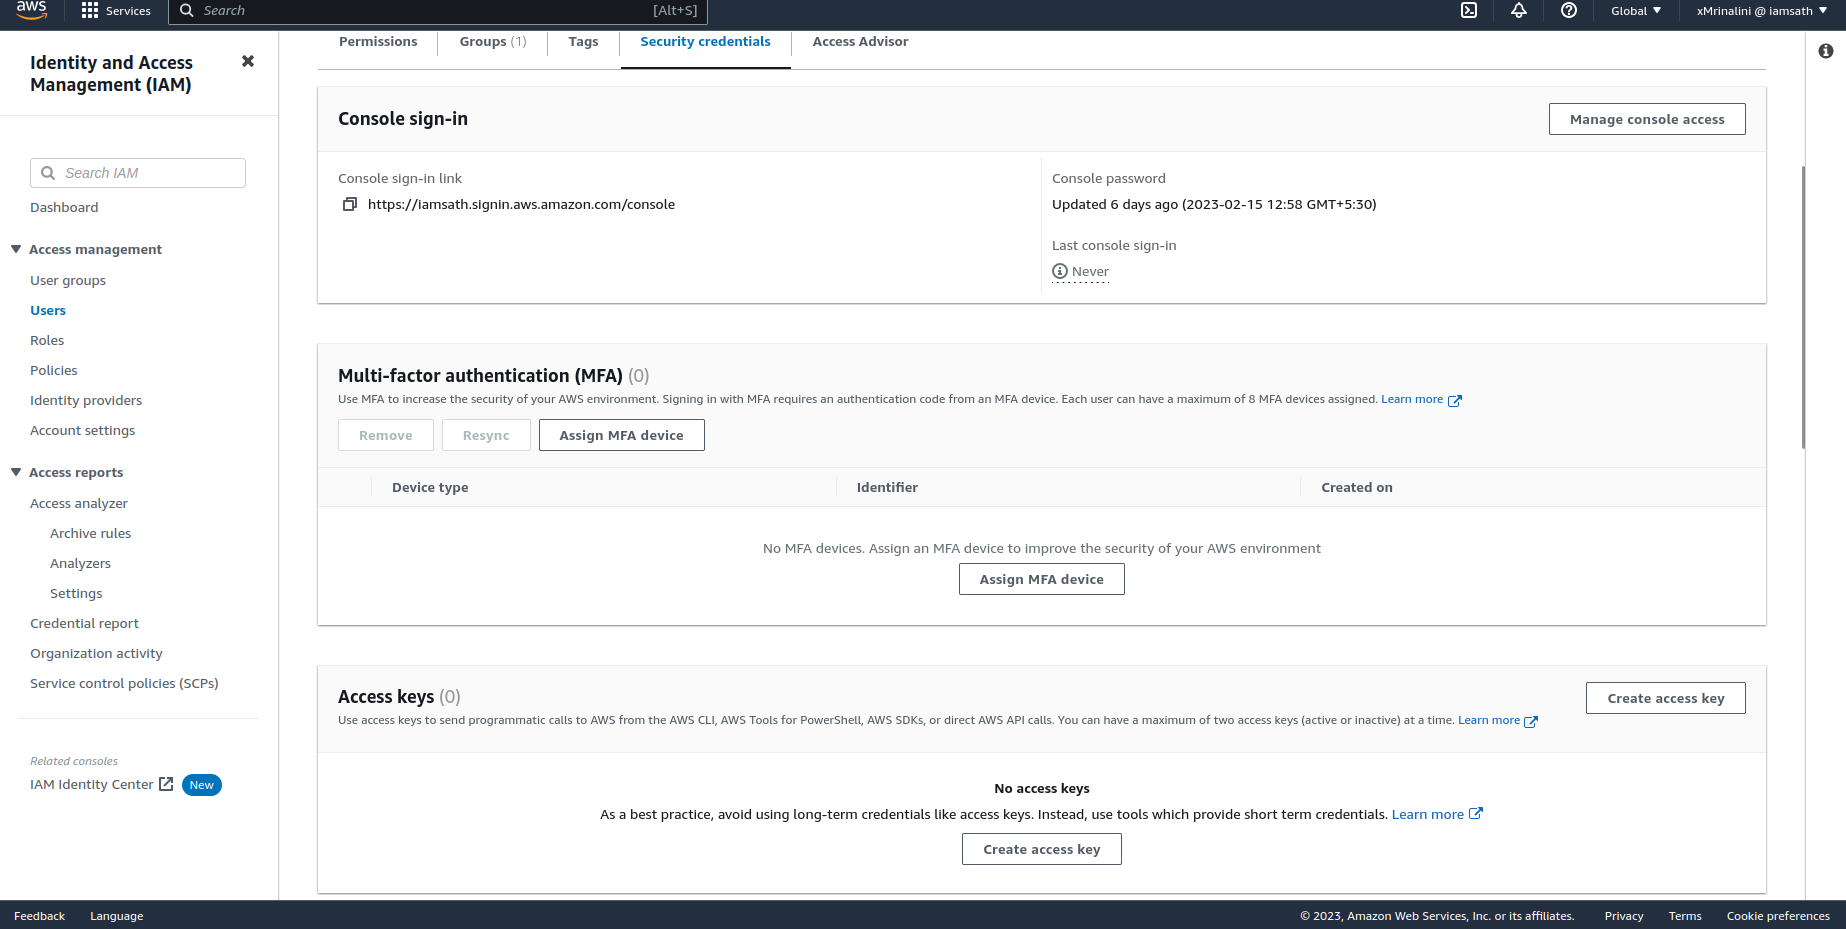
Select option Application running outside AWS and then click Next
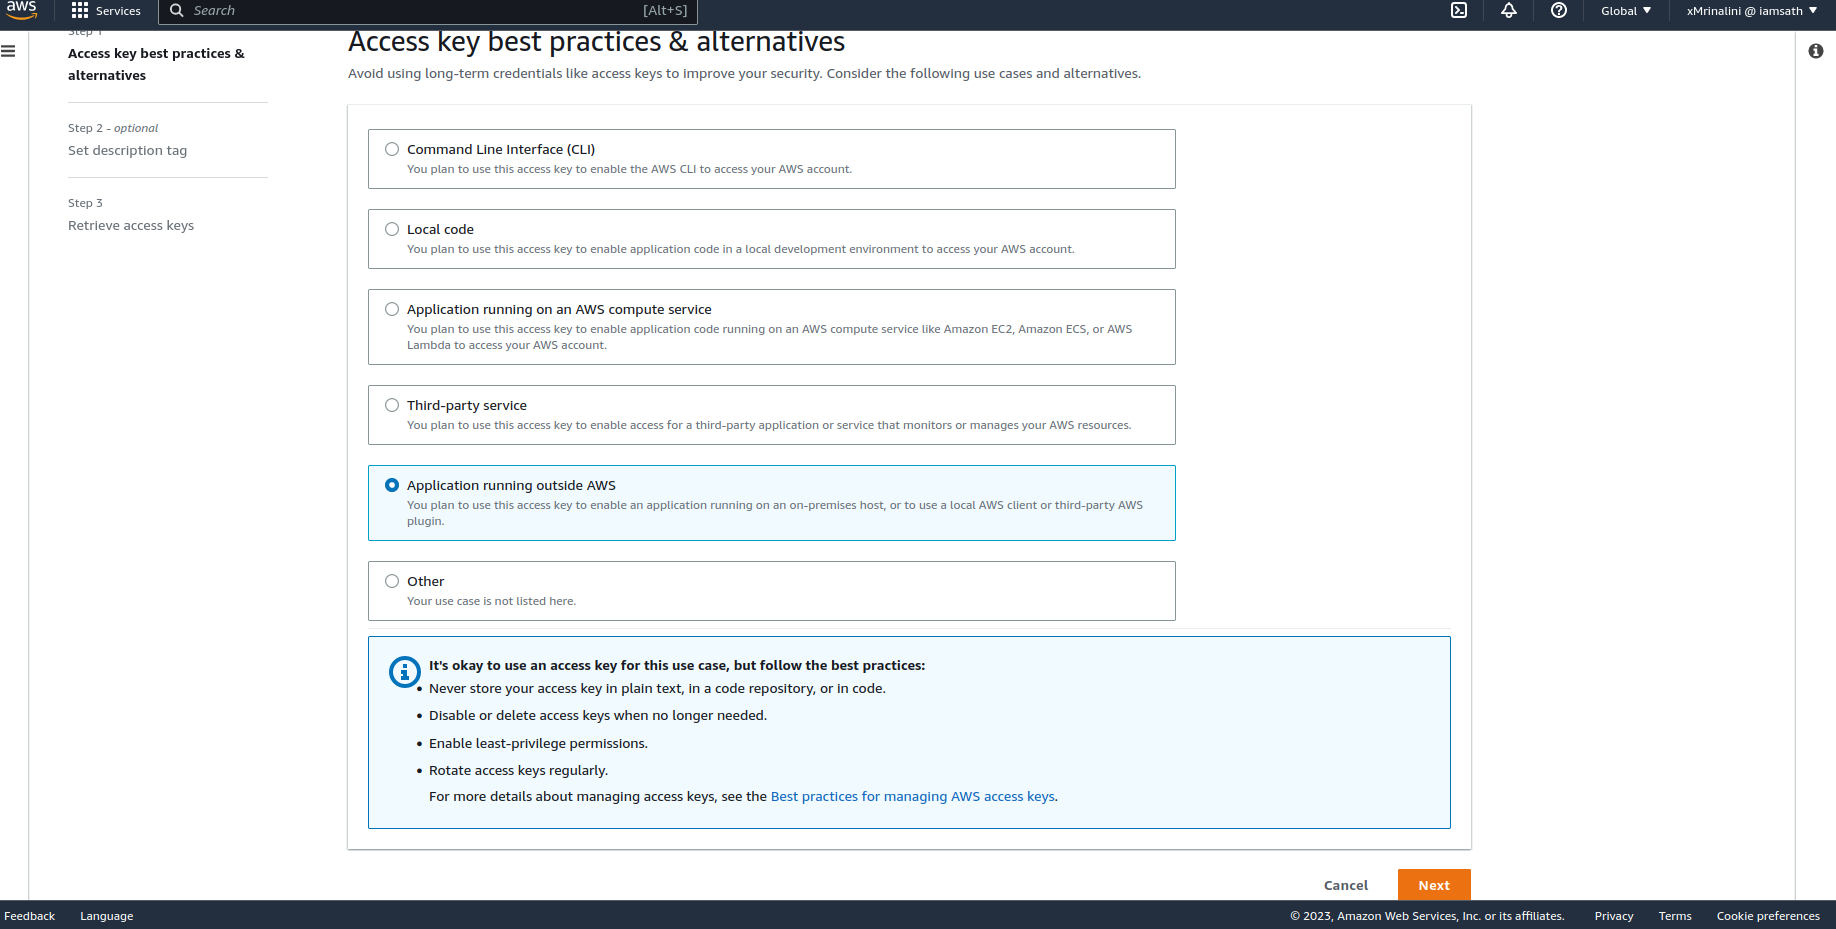
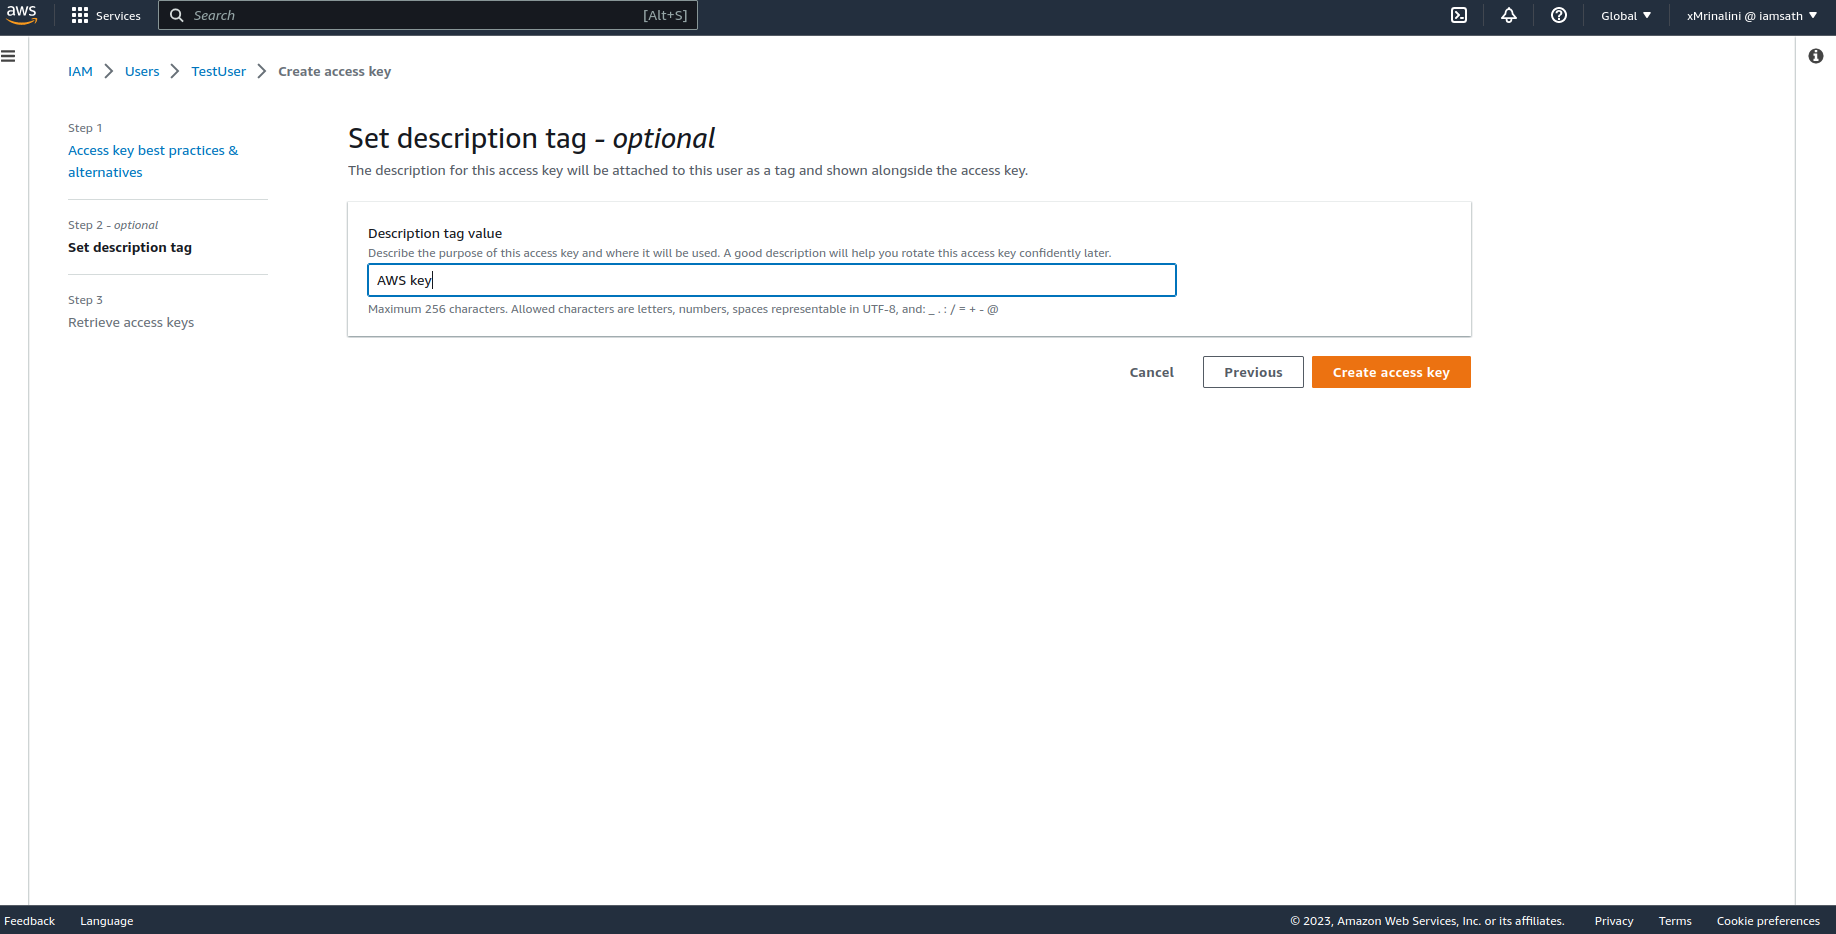
Add a description - optional then click Create access key button
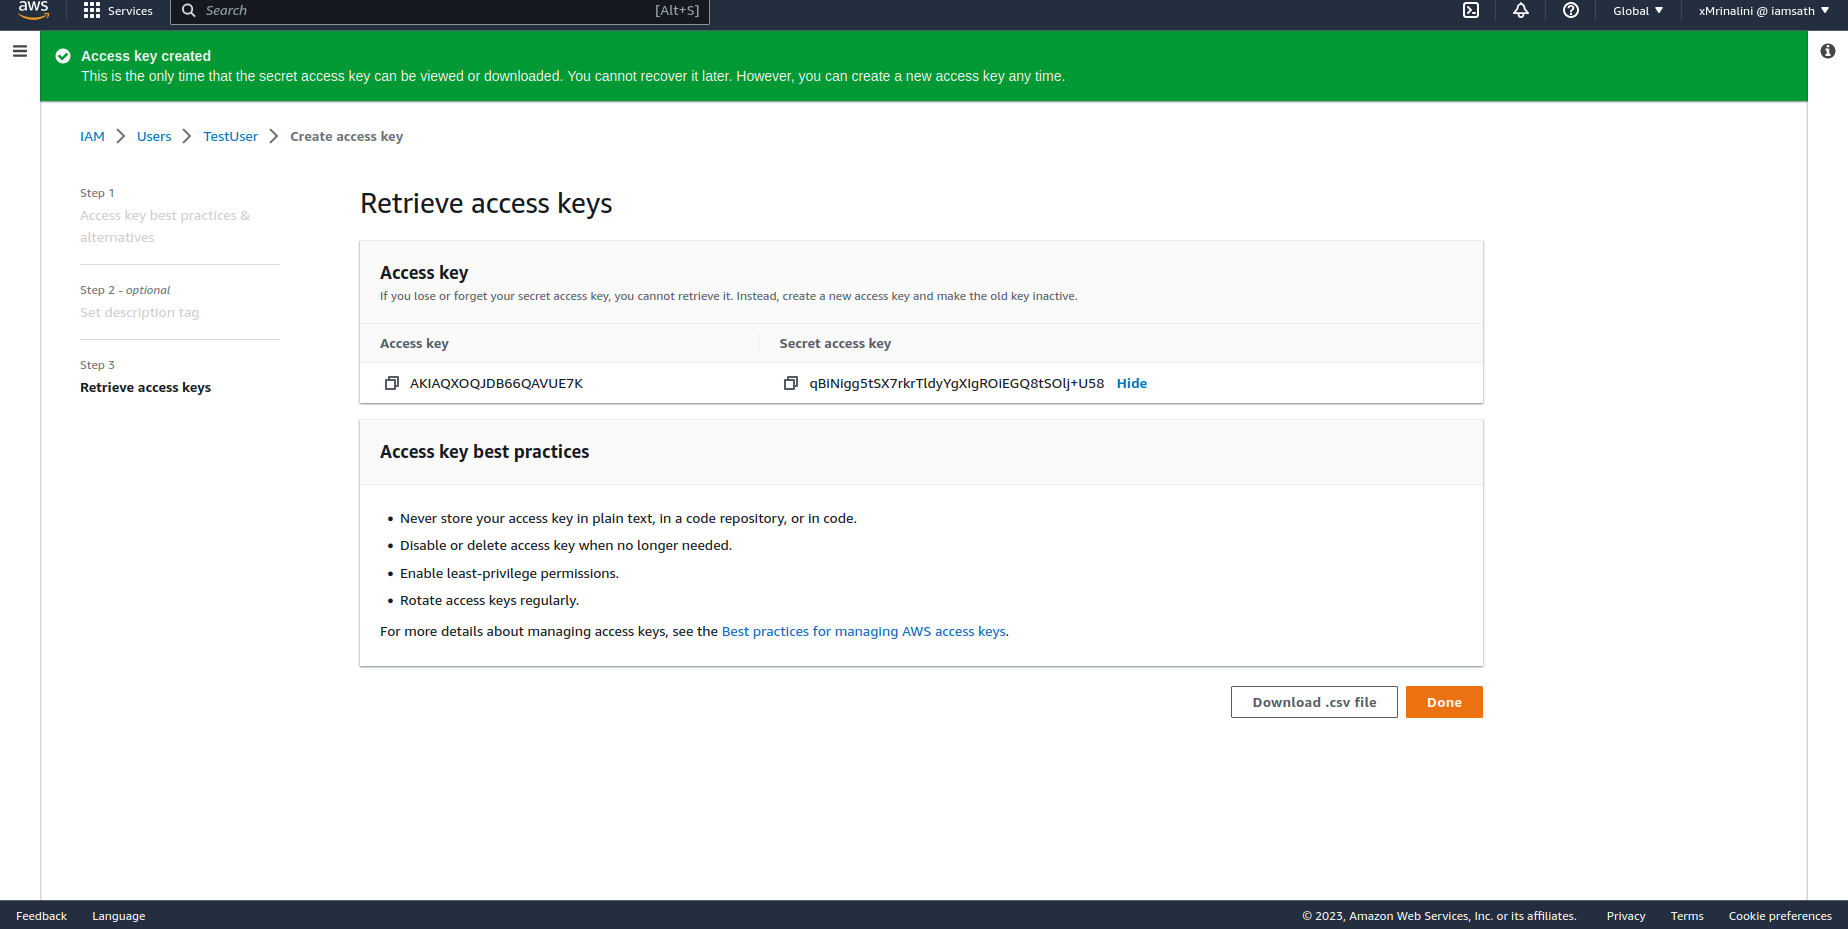
Access key and Secret access keys are generated
Creating an Application by using the Connector
Onboard the Application in IDHub
Click here for the detailed steps for onboarding the application to IDHub
Configuring the Connector
Connectors use connection-related parameters to connect to IDhub with your target system and perform connector operations when creating a connected application. IDHub requires the following connection-related parameters in order to connect to an AWS application.
Basic Configuration of the Connector
| Parameter | Mandatory ? | Description |
|---|---|---|
| userName | Yes | Enter the user name of the target system that you create for performing connector operations.Sample value: johndoe |
| accessKeyId | Yes | Enter the access key identifier (a unique string) issued by the authorization server to your client application during the registration process. You would have obtained the access key while configuring the newly registered application.Sample value: AKIA33FL36M3OIF5C7N2 |
| secretAccessKey | Yes | Enter the secret Access Key used to authenticate the identity of your client application. You obtained the secret Access Key while performing the procedure described in Configuring the Newly Added Application.Sample value: HWuvCMIptAhT5YmBx8ee0GpVVkyMBWLmqxJcf621 |
| proxyPassword | No | Enter the proxy password if you are using proxy server to access internet. |
| proxyHostPort | No | Enter the proxy host or IP and port if you are using proxy server to access internet.Sample value: http://host:port |
| proxyUsername | No | Enter the proxy username if you are using proxy server to access internet. |
Advanced Settings Parameters
There are some advanced settings that you can configure in the connector.
In the current version of the connector, these advanced settings cannot be configured; however, they will be available in future releases.
| Parameter | Description |
|---|---|
| Bundle Name | This entry holds the name of the connector bundle.Default value: org.identityconnectors.aws |
| Bundle Version | This entry holds the version of the connector bundle.Default value: 12.3.0 |
| Connector Name | This entry holds the name of the connector class.Default value: org.identityconnectors.aws.AWSConnector |
| pageSize | Specify the number of objects to return in a page from the target system in a paged search.Default value: 25 |
| passwordLastUsed | Enter true to display the Last activity attribute value in the parent form.Default value: False |
| region | Enter the Region for IAM and Organization.Default value: aws-global |
| cloudTrailRegion | Enter the region for Cloudtrail service used for incremental reconciliationDefault value: us-east-2 |
| policyGroup | Enter true to fetch inherit policiesDefault value: False |
| changePasswordNextSignIn | Enter true to force password change on next login.Default value: False |
| enableProgrammaticAccess | Enter true to enable the programmatic access.Default value: False |
| timeZone | This parameter displays the timezone.Default value: IST |
Attribute Mappings for the Connector
| AWS Schema | User Schema in IDHub | Sync Direction | IsVisible | Example | Type of Attribute |
|---|---|---|---|---|---|
| arn | Hidden | ||||
| city | officeAddressCity | Bi-Directional | Visible | London | |
| companyName | organizationName | Bi-Directional | Visible | Sath | |
| country | officeAddressCountry | Bi-Directional | Visible | UK | |
| department | department | Bi-Directional | Visible | Marketing | |
| displayName | displayName | Bi-Directional | Visible | John33 | |
| employeeId | employeeNumber | Bi-Directional | Visible | John_Garret | |
| employeeType | employeeType | Bi-Directional | Visible | Employee | |
| givenName | firstName | Bi-Directional | Visible | John | |
| jobTitle | jobTitle | Bi-Directional | Visible | Manager | |
| Bi-Directional | Visible | John@sath.com | |||
| mobilePhone | phoneNumber | Bi-Directional | Visible | 995-5994-5998 | |
| path | Hidden | ||||
| postalCode | officeAddressPostal | Bi-Directional | Visible | 9958859 | |
| state | officeAddressState | Bi-Directional | Visible | London | |
| streetAddress | officeAddressLine1 | Bi-Directional | Visible | Boulevard St. | |
| surname | lastName | Bi-Directional | Visible | Garret | |
| usageLocation | location | Bi-Directional | Visible | London | |
| userName | login | Bi-Directional | Visible | John_g33 | Recon Key & Account name Field |
- Sync Direction of the Attributes depends on whether you regard AWS as your Trusted Source.
- You should only synchronize from IDHub to AWS and not the reverse if AWS is not a trusted system in your case.
Possible Recon Keys and Values
| Possible Recon Key | Possible Recon Key Values |
|---|---|
| userName | John_g33 |
| John@sath.com | |
| EmployeeID | John_Garret |
Connector Application Configuration
Connector application is designed such that it works as the wrapper application to the different scim adapters. This majorly consists of the following:
Authentication
- Basic Authentication is required
- The encrypted values of username and password will be stored in the properties file
Resource Type
These are the two resource types available for the IDHUB connector. The "resourceName" attribute value in rest api calls will have one of these values.
- Account - user account in the target system - this will include entitlement membership
- Entitlement -available entitlements in the target system
AWS Connector Splice configuration
In order to provision, modify, and revoke two main resources, Accounts and Entitlements, the AWS Connector Splice integrates with the IDHub Connector Application. IDHub's Account translates into a User in SCIM and AWS, whereas IDHub's Entitlements translate into a Groups or policies in AWS. AWS provides SDK for Java to access data on AWS.
Account An Account in IDHub maps to a User in AWS. The following properties must be specified in order to create a User in AWS.
| Property | Description |
|---|---|
| userName | User name of the user |
Entitlement An Entitlement in IDHub maps to Groups and policies in AWS.
Connector Splice Design
Account Schema
{
"attributes": [
{
"name": "arn",
"description": "The ARN of the user.",
"multiValued": false,
"mutability": "readOnly"
}, {
"name": "city",
"description": "The city in which the user is located. Maximum length is 128 characters.",
"multiValued": false,
"canonicalValues": [
"$REGEX ^.{1,128}$"
],
"idhubFieldName": "officeAddressCity"
}, {
"name": "companyName",
"description": "The company name which the user is associated. This property can be useful for describing the company that an external user comes from. The maximum length is 64 characters.",
"multiValued": false,
"canonicalValues": [
"$REGEX ^.{1,64}$"
],
"idhubFieldName": "organizationName"
}, {
"name": "country",
"description": "The country/region in which the user is located; for example, US or UK. Maximum length is 128 characters.",
"multiValued": false,
"canonicalValues": [
"$REGEX ^.{1,128}$"
],
"idhubFieldName": "officeAddressCountry"
}, {
"name": "department",
"description": "The name for the department in which the user works. Maximum length is 64 characters.",
"multiValued": false,
"canonicalValues": [
"$REGEX ^.{1,64}$"
],
"idhubFieldName": "department"
}, {
"name": "displayName",
"description": "The name displayed in the address book for the user. This is usually the combination of the users first name, middle initial and last name. This property is required when a user is created and it cannot be cleared during updates. Maximum length is 256 characters.",
"required": true,
"multiValued": false,
"canonicalValues": [
"$REGEX ^.{1,256}$"
],
"returned": "always",
"mutability": "readOnly",
"idhubFieldName": "displayName"
}, {
"name": "employeeId",
"description": "The employee identifier assigned to the user by the organization. The maximum length is 16 characters.",
"multiValued": false,
"canonicalValues": [
"$REGEX ^.{1,16}$"
],
"caseExact": true,
"idhubFieldName": "employeeNumber"
}, {
"name": "employeeType",
"description": "Captures enterprise worker type. For example, Employee, Contractor, Consultant, or Vendor.",
"multiValued": false,
"caseExact": true,
"canonicalValues": [
"Employee", "Contractor", "Consultant", "Vendor"
],
"idhubFieldName": "employeeType"
}, {
"name": "givenName",
"description": "The given name (first name) of the user. Maximum length is 64 characters",
"multiValued": false,
"caseExact": true,
"canonicalValues": [
"$REGEX ^.{1,64}$"
],
"idhubFieldName": "firstName"
}, {
"name": "jobTitle",
"description": "The users job title. Maximum length is 128 characters.",
"multiValued": false,
"canonicalValues": [
"$REGEX ^.{1,128}$"
],
"caseExact": true,
"idhubFieldName": "jobTitle"
}, {
"name": "mail",
"description": "The SMTP address for the user.",
"multiValued": false,
"caseExact": true,
"idhubFieldName": "email"
}, {
"name": "mobilePhone",
"description": "The primary cellular telephone number for the user. Read-only for users synced from on-premises directory. Maximum length is 64 characters.",
"multiValued": false,
"canonicalValues": [
"$REGEX ^.{1,64}$"
],
"caseExact": true,
"idhubFieldName": "phoneNumber"
}, {
"name": "path",
"description": "The path of the user.",
"multiValued": false,
"caseExact": true
}, {
"name": "postalCode",
"description": "The postal code for the users postal address. The postal code is specific to the users country/region. In the United States of America, this attribute contains the ZIP code. Maximum length is 40 characters.",
"multiValued": false,
"canonicalValues": [
"$REGEX ^.{1,40}$"
],
"caseExact": true,
"idhubFieldName": "officeAddressPostal"
}, {
"name": "state",
"description": "The state or province in the users address. Maximum length is 128 characters.",
"multiValued": false,
"canonicalValues": [
"$REGEX ^.{1,128}$"
],
"caseExact": true,
"idhubFieldName": "officeAddressState"
}, {
"name": "streetAddress",
"description": "The street address of the users place of business. Maximum length is 1024 characters.",
"multiValued": false,
"caseExact": true,
"canonicalValues": [
"$REGEX ^.{1,1024}$"
],
"idhubFieldName": "officeAddressLine1"
}, {
"name": "surname",
"description": "The users surname (family name or last name). Maximum length is 64 characters.",
"multiValued": false,
"canonicalValues": [
"$REGEX ^.{1,64}$"
],
"caseExact": true,
"idhubFieldName": "lastName"
}, {
"name": "usageLocation",
"description": "Usage Location",
"multiValued": false,
"caseExact": true,
"canonicalValues": [
"$REGEX ^[a-z]{2}$"
],
"idhubFieldName": "location"
}, {
"name": "userName",
"description": "The name of the user, which can be used for signing in to the AWS Management Console. Maximum length is 64 characters.",
"multiValued": false,
"canonicalValues": [
"[\\\\w+=,.@-]+"
],
"caseExact": true,
"idhubFieldName": "login"
}
]
}
Entitlement Schema
{
"attributes": [
{
"name": "description",
"description": "Description of entitlement",
"multiValued": false,
"required": true,
"returned": "always"
}, {
"name": "displayName",
"description": "The entitlement (Group / Policy) name",
"required": true,
"multiValued": false,
"returned": "always"
}, {
"name": "entitlementArn",
"description": "The ARN of the entitlement.",
"multiValued": false,
"required": true,
"returned": "always"
}, {
"name": "type",
"description": "Indicate type of entitlement",
"multiValued": false,
"required": true,
"returned": "always"
}, {
"name": "used as",
"description": "Indicate mode of assignment of entitlement",
"multiValued": false,
"required": true,
"returned": "always"
}
]
}
Deploying the AWS Connector
Deploying using IDHub Connector Onboarding Wizard
Click Here to view more details about how to use IDHub's Cloud Connector Onboarding wizard to deploy the connector.
Deploy on your own
Deploy on Cloud
The documentation for deploying the connector on your own Cloud Platform is coming soon
Deploy on your Server
Prerequisite
- A running IDHub instance and its FQDN/URL
- Get AWS Access Key and AWS Secret Access Key. See Here to obtain this information.
- An Ubuntu/Debian Linux VM with Docker engine, Compose plugin, cURL, jq and unzip.
- A service URL (with valid certificates) which points to port 7002 on the above VM.
Step 1 — Creating Connector OAuth Client (ID)
Login to IDHub with your admin credentials > Admin Settings > Sign On > Keycloak Administration
Go to Clients menu.
Create client and set Client ID to ‘AWS-connector’ and Save.
Set Valid Redirect URIs to '*' and Save.
Step 2 — Creating Service Account User in Keycloak in Tenant Realm
In your realm, do the following.
Go to Users menu.
Add user.
Set Username to ‘AWS-service-account’ and Save.
Go to its Credentials menu and set a password. (Note: For this tutorial, we have used ‘sapassword1’. We highly recommend using a different one for your service account).

Keycloak configuration is now complete!
Step 3 — Get your tokens
- Open Terminal and Install cURL and jq (needs to be installed in the system if not already done).
sudo apt install -y curl jq
Run the following command in your terminal with custom variables. It will generate the KEYCLOAK_ACCESS_TOKEN and KEYCLOAK_REFRESH_TOKEN.
curl --location --request POST 'https://<IDHUB_FQDN>/auth/realms/<YOUR_REALM>/protocol/openid-connect/token' \
--header 'Content-Type: application/x-www-form-urlencoded' \
--data-urlencode 'client_id=<CLIENT_ID>' \
--data-urlencode 'username=<SERVICE_ACCOUNT_USER>' \
--data-urlencode 'password=<SERVICE_ACCOUNT_PASSWORD>' \
--data-urlencode 'scope=offline_access' \
--data-urlencode 'grant_type=password' \
--data-urlencode 'request_token_type=urn:ietf:params:oauth:token-type:access_token' \
| jq
<IDHUB_FQDN>is your IDHub FQDN/URL. e.g. example.sath.com<YOUR_REALM>is your tenant name. e.g. alpha- For
<CLIENT_ID>, see Step 1. - For
<SERVICE_ACCOUNT_USER>and<SERVICE_ACCOUNT_PASSWORD>, see Step 2.
Example:
curl --location --request POST 'https://example.iamsath.com/auth/realms/alpha/protocol/openid-connect/token' \
--header 'Content-Type: application/x-www-form-urlencoded' \
--data-urlencode 'client_id=AWS-connector' \
--data-urlencode 'username=AWS-service-account' \
--data-urlencode 'password=sapassword1' \
--data-urlencode 'scope=offline_access' \
--data-urlencode 'grant_type=password' \
--data-urlencode 'request_token_type=urn:ietf:params:oauth:token-type:access_token' \
| jq
- Copy access_token and refresh_token and keep it somewhere safe. You will need it in the next step.
We now have our tokens. Let’s deploy the connector.
Step 4 — Prepare the .env file
- Download the IDHub’s AWS Connector package, extract and edit the ‘.env’ file.
wget https://storage.googleapis.com/sath-public-binaries/connectors/idhub-AWS-connector.zip
unzip idhub-AWS-connector.zip
cd idhub-AWS-connector
nano .env
AWS_ACCESS_KEY: 'awsAccessKey'
AWS_SECRET_ACCESS_KEY: 'awsSecretAccessKey'
BUSINESS_OWNER: 'Jerome'
CONNECTOR_DEBUG_LEVEL: 'DEBUG'
IDHUB_HOSTNAME: 'domain'
IT_OWNER: 'Jerome'
KEYCLOAK_ACCESS_TOKEN: 'accessToken'
KEYCLOAK_CLIENT_ID: 'clientId'
KEYCLOAK_REFRESH_TOKEN: 'refreshToken'
KEYCLOAK_REALM: 'tenant'
SPLICE_DEBUG_LEVEL: 'DEBUG'
ACCOUNT_SCHEMA: 'accountSchema'
ENTITLEMENT_SCHEMA: 'entitlementSchema'
Replace the following:
AWS_ACCESS_KEY: From prerequisites.AWS_SECRET_ACCESS_KEY: From prerequisites.IDHUB_HOSTNAME: IDHub web hostname. From prerequisites. eg. example.sath.comKEYCLOAK_ACCESS_TOKEN: From Step 3 output. Put it WITHOUT the quotes.KEYCLOAK_CLIENT_ID: From Step 1. eg. AWS-connectorKEYCLOAK_REFRESH_TOKEN: From Step 3 output. Put it WITHOUT the quotes.KEYCLOAK_REALM: Tenant created in IDHub. From prerequisites. eg. alpha.PORT: From prerequisites. eg. 7002
Step 5 — Run the container
- In the connector directory, run the following command.
docker compose up -d