Atlassian Cloud
The purpose of this guide is to provide detailed information regarding the Atlassian connector. There are a number of things you can learn about this connector here, including information about its configuration and deployment.
About Atlassian Connector
In IDHub, you can create and onboard Atlassian applications using the Atlassian connector.
Connector Version
Atlassian connector is currently at Version 1.0. More Atlassian operations and other capabilities will be supported in upcoming updates and releases of the Atlassian connector.
| Component | Version |
|---|---|
| Atlassian Connector | Ver 1.0 |
| Target System | Atlassian |
| Connector Server | 11.1.2.1.0 |
| Connector Server JDK | JDK 1.8 and later |
Connector Operations
| Operation | Supported |
|---|---|
| User Management | |
| Create user in Atlassian | Yes |
| Add User to Jira Project | Yes |
| Add User to Confluence Space | Yes |
| Add User to Atlassian Group | Yes |
| Update user | Yes |
| Remove User from Atlassian | Yes |
| Remove user from Jira Project | Yes |
| Remove user from Confluence Space | Yes |
| Remove user from Atlassian Group | Yes |
| Jira Project Management | |
| Create Project | |
| Update Project | Yes |
| Delete Project | Yes |
| Confluence Space Management | |
| View Page | Yes |
| Delete Page | Yes |
| Add Page | Yes |
| Archive Page | Yes |
| Delete Page | Yes |
| Add Blog | Yes |
| Delete Blog | Yes |
| Add Comment | Yes |
| Delete Comment | Yes |
| Add Attachment | Yes |
| Delete Attachment | Yes |
| Add/Delete Restrictions | Yes |
| Delete Mail | Yes |
| Export Space | Yes |
| Admin | Yes |
| Atlassian Group Management | |
| Create Group | Yes |
| Update Group | Yes |
| Delete Group | Yes |
Connector Components
The components of the connector include Connector Application, Connector Application Configuration, Connector Service Provider Interface, Splice, and Splice configuration.
These connection components contain precise connectivity and setup information for your target system. The connector takes information from these files to allow you to quickly and efficiently onboard your applications using a single, streamlined UI.
Connector Architecture
The connector's architecture is constructed in accordance with the diagram below:
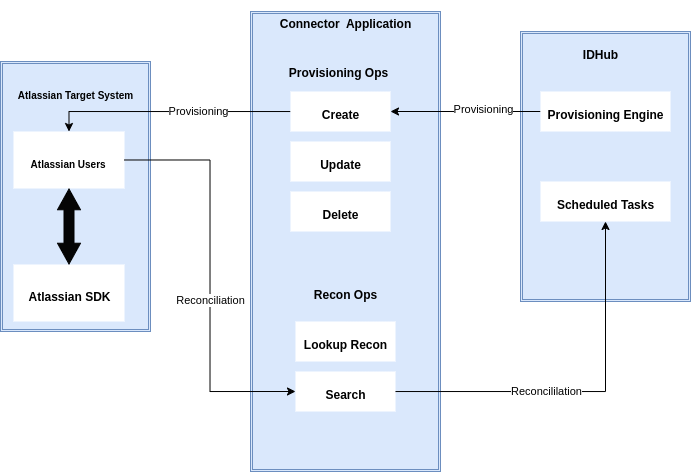
As can be seen in the screenshot above, the connector architecture is basically composed of connector application and target system splice. The target system splice takes care of the native communication with the target system using the Atlassian Specific connector SPI implementation. This architecture is followed and design as it enables for easy and rapid deployment of the connector as well as more precise versioning capabilities.
The connector is configured to run in one of the following modes:
- Target Resource reconciliation
- If you use the Atlassian application as the trusted source then in this case users are directly created and modified on IDHub. The Atlassian SDK extracts user records that match the reconciliation criteria, which brings the records to IDHub. Each user record fetched from the target system is compared with existing IDHub Users. If a match is found between the target system record and the IDHub User, then the User attributes are updated with changes made to the target system record. If no match is found, then the target system record is used to create an IDHub User.
- Account management
- This involves creating, updating, or deleting users on the target system through IDHub. During provisioning, the connector calls the target system Atlassian SDK for provisioning operations. The SDK on the target system accepts provisioning data, carries out the required operation on the target system, and returns the response from the target system to IDHub. Apps can use the Atlassian SDK to perform create, read, update, and delete (CRUD) operations on the target system.
In developing the connector, we adhere to this fundamental architecture. IDHub team will handle the connector modification section appropriately based on your unique business requirements if there are any improvements, extra specifications or variations.
Connector Features
Atlassian User Management
Atlassian is currently being used by your company, and you want to connect it to IDHub. You may want to generate and reconcile accounts from and to Atlassian and IDHub. In such a scenario, you would need to create a Atlassian connector and use the connector URL to onboard an Atlassian-connected application in IDHub. You will be able to provision accounts in the target system after successfully deploying the Atlassian connector and creating the Atlassian application. Similarly, you can perform further activities such as de-provisioning and updating accounts. IDHub offers a reconciliation feature that allows you to reconcile user identification information to and from Atlassian.
Atlassian Jira Project Management
Atlassian connector integration provides the following features:
- Connects to Jira and fetches project and role data: This includes both pre-defined roles (Administrator, Member, Viewer, etc.) and custom roles created by the project administrator.
- Allows users to request project access with specific roles: Users can choose the desired roles during the request process.
- Automatic role assignment upon approval: Once the request is approved based on the defined workflow, users are automatically granted access to the project with the requested roles.
Atlassian Confluence Space Management
An Atlassian connector integrates with Confluence to manage user access to spaces and permissions.
- It retrieves space data and predefined permission levels (View Only, Add Page, etc.).
- Users request access to spaces with specific permissions during the approval workflow.
- Upon approval, users are automatically granted access with the requested permissions.
Atlassian Group Management
The Atlassian connector retrieves all groups from the directory and grants users access to these groups upon approval.
Functionality: Fetches all groups present in the directory.
Access Granting:
- Users request access to groups through a defined approval workflow.
- Upon approval, users are automatically added to the requested group, along with all associated products, projects, and spaces in the designated role.
noteRequesting a group automatically grants access to all associated product access, as dictated by Atlassian's provisioning process.
Reconciliation Features
Full reconciliation can be performed to bring all existing user data from the target system to IDHub. The Atlassian connector does the reconciliation for the following items:
User Account
Atlassian Groups
Jira Projects
Confluence Spaces
User Assignments to Group
User Assignments to Projects
User Assignments to Spaces
Support for the Connector Server
Connector Server is one of the features provided by IDHub. By using one or more connector servers, the connector architecture permits your application to communicate with externally deployed bundles. Therefore if you do not want to execute IDHub java connector bundle in the same VM as the application, in that case you have the ability to run the connector on a different host for better performance.
Pre-requisites
- You need to have administrator email of your Atlassian or Atlassian Account
- You need to have Atlassian SCIM URL.
- You need to have Atlassian Site URL.
- You need to have the Directory API key
- You need to have the Directory ID (Organization ID)
- You need to have the account security api key (token) for Atlassian admin account.
- You need to have the admin email for your Atlassian account.
The steps for getting Directory ID and creating the API key are as follows:
- Go to admin.atlassian.com. Select your organization if you have more than one.
- Select Settings > API keys.
- Select Create API key in the top right.
- Enter a name that you’ll remember to identify the API key.
- By default, the key expires one week from today. If you’d like to change the expiration date, pick a new date under Expires on. You’re unable to select a date longer than a year from the date of creation.
- Select Create to save the API key.
- Copy the values for your Organization ID and API key. You'll need those to use the API key. Note: Make sure you store these values in a safe place, as we won't show them to you again.
- Select Done. The key will appear in your list of API keys. :::
The steps for generating the account security api key is as follows:
- Log in to https://id.atlassian.com/manage-profile/security/api-tokens.
- Click Create API token.
- From the dialog that appears, enter a memorable and concise Label for your token and click Create.
- Click Copy to clipboard and store this somewhere safe. :::
Creating an Application by using the Connector
Onboard the Application in IDHub
Click here for the detailed steps for onboarding the application to IDHub
Configuring the Connector
Connectors use connection-related parameters to connect to IDhub with your target system and perform connector operations when creating a connected application. IDHub requires the following connection-related parameters in order to connect to a Atlassian application.
Attribute Mappings for the Connector
| Atlassian Schema | User Schema in IDHub | Description | Sync Direction | Required | Is Recon? | Is Disabled? | Is Visible? |
|---|---|---|---|---|---|---|---|
| department | department | User’s Department | Bi-Directional | false | false | false | true |
| displayName | displayName | User display name | Bi-Directional | true | false | false | true |
| The primary email for the user | Bi-Directional | true | true | false | true | ||
| familyName | lastName | The family name of the User | Bi-Directional | false | false | false | true |
| givenName | firstName | The given name of the User | Bi-Directional | false | false | false | true |
| title | jobTitle | User title | Bi-Directional | false | false | false | true |
| nickName | - | User nickname | - | false | false | false | true |
| organization | organizationName | User organization | Bi-Directional | false | false | false | true |
| timezone | - | User timezone. | - | false | false | false | true |
| userName | login | Unique identifier defined by the provisioning client. Atlassian SCIM service will verify the value and guarantee its uniqueness. This field is required during user creation or modification | Bi-Directional | true | false | false | true |
| id | - | The unique ID for the user | app-to-idhub | false | false | true | false |
- Sync Direction of the Attributes depends on whether you regard Atlassian as your Trusted Source.
- You should only synchronize from IDHub to Atlassian and not the reverse if Atlassian is not a trusted system in your case
- For Atlassian connector userName is the account name field
Connector Application Configuration
Connector application is designed such that it works as the wrapper application to the different scim adapters. This majorly consists of the following:
Authentication
- Basic Authentication is required
- The encrypted values of username and password will be stored in the properties file
Resource Type
These are the two resource types available for the IDHUB connector. The "resourceName" attribute value in rest api calls will have one of these values.
- Account - user account in the target system - this will include entitlement membership
- Entitlement -available entitlements in the target system
Atlassian Connector Splice configuration
In order to provision, modify, and revoke two main resources, Accounts and Entitlements, the Atlassian Connector Splice integrates with the IDHub Connector Application. IDHub's Account translates into a User in SCIM and Atlassian, whereas IDHub's Entitlements translate into a Groups or policies in Atlassian. Atlassian provides SDK for Java to access data on Atlassian.
Connector Splice Design
Account Schema
The Account Schema configuration of the Atlassian connector Splice is as follows:
{
  "attributes": [
    {
      "name": "department",
      "description": "User department.",
      "multiValued": false,
      "idhubFieldName": "department",
      "syncDirection": "bi-directional"
    }, {
      "name": "displayName",
      "description": "User display name.",
      "required": true,
      "multiValued": false,
      "returned": "always",
      "idhubFieldName": "displayName",
      "syncDirection": "bi-directional"
    }, {
      "name": "email",
      "description": "The primary email for the user.",
      "multiValued": false,
      "mutability": "immutable",
      "required": true,
      "isRecon": true,
      "caseExact": true,
      "idhubFieldName": "email",
      "syncDirection": "bi-directional"
    }, {
      "name": "familyName",
      "description": "The family name of the User.",
      "multiValued": false,
      "caseExact": true,
      "idhubFieldName": "lastName",
      "syncDirection": "bi-directional"
    }, {
      "name": "givenName",
      "description": "The given name of the User.",
      "multiValued": false,
      "caseExact": true,
      "idhubFieldName": "firstName",
      "syncDirection": "bi-directional"
    }, {
      "name": "title",
      "description": "User title.",
      "multiValued": false,
      "caseExact": true,
      "idhubFieldName": "jobTitle",
      "syncDirection": "bi-directional"
    }, {
      "name": "nickName",
      "description": "User nickname.",
      "multiValued": false,
      "caseExact": true
    }, {
      "name": "organization",
      "description": "User organization.",
      "multiValued": false,
      "idhubFieldName": "organizationName",
      "syncDirection": "bi-directional"
    }, {
      "name": "timezone",
      "description": "User timezone. e.g. America/Los_Angeles .",
      "multiValued": false,
      "caseExact": true
    }, {
      "name": "userName",
      "description": "Unique identifier defined by the provisioning client. Atlassian SCIM service will verify the value and guarantee its uniqueness. This field is required during user creation or modification. ",
      "multiValued": false,
      "caseExact": true,
      "required": true,
      "uniqueness": "server",
      "idhubFieldName": "login",
      "syncDirection": "bi-directional"
    }, {
      "name": "id",
      "multiValued": false,
      "description": "The unique ID for the user.",
      "mutability": "readOnly",
      "returned": "always",
      "isVisible": false,
      "isDisabled": true,
      "syncDirection": "app-to-idhub"
    }
  ]
}
Entitlement Schema
The Entitlement Schema configuration of the Atlassian connector Splice is as follows:
{
  "attributes": [
    {
      "name": "description",
      "description": "Description of entitlement",
      "multiValued": false,
      "required": true,
      "returned": "always"
    }, {
      "name": "displayName",
      "description": "The entitlement (Group / Project Role / Space) name",
      "required": true,
      "multiValued": false,
      "returned": "always"
    }, {
      "name": "type",
      "description": "Indicate type of entitlement",
      "multiValued": false,
      "required": true,
      "returned": "always"
    }, {
      "name": "form",
      "description": "Entitlement Form containing Entitlement Attributes",
      "multiValued": true,
      "required": false,
      "returned": "always"
    }
  ]
}
Deploying the Atlassian Connector
Deploying using IDHub Connector Onboarding Wizard
Click Here to view more details about how to use IDHub's Cloud Connector Onboarding wizard to deploy the connector.
Deploy on your own
Deploy on Cloud
The documentation for deploying the connector on your own Cloud Platform is coming soon
Deploy on your Server
Prerequisites
- IDHub web hostname.
- An IDHub Tenant.
- An Ubuntu/Debian Linux VM with Docker engine, Compose plugin, cURL, jq and unzip.
- A service URL with valid certificate which points to port 7001 on the above VM.
Step 1 — Creating Connector OAuth Client (ID)
From IDHub Dashboard, go to Admin Settings > Sign-On > Keycloak Administration and do the following steps.
- Go to Clients menu.
- Create client and set Client ID to ‘Atlassian-connector’ and Save.
- Set Valid Redirect URIs to '*' and Save.
Step 2 — Create service account user and password in Keycloak in tenant realm
In your Keycloak realm, do the following.
- Go to Users menu.
- Add user.
- Set Username to ‘Atlassian-service-account’ and Save.
- Go to its Credentials menu and set a password. (Note: For this tutorial, we have used ‘sapassword1’. We highly recommend using a different one for your service account).
Step 3 — Generate Access token and Refresh token
curl --location --request POST 'https://IDHUB_HOSTNAME/auth/realms/TENANT_NAME/protocol/openid-connect/token' \
--header 'Content-Type: application/x-www-form-urlencoded' \
--data-urlencode 'client_id=OAUTH_CLIENT_ID' \
--data-urlencode 'username=SERVICE_ACCOUNT_USER' \
--data-urlencode 'password=SERVICE_ACCOUNT_PASSWORD' \
--data-urlencode 'scope=offline_access' \
--data-urlencode 'grant_type=password' \
--data-urlencode 'request_token_type=urn:ietf:params:oauth:token-type:access_token' \
| jq
Replace the following:
IDHUB_HOSTNAME: The IDHub web hostname. A prerequisite. eg. test.sath.comTENANT_NAME: Tenant that you created in test.sath.com. A prerequisite. eg. alphaOAUTH_CLIENT_ID: OAuth Client ID you created in Step 1.SERVICE_ACCOUNT_USER: Service account username you created in Step 2.SERVICE_ACCOUNT_PASSWORD: Service account password you created in Step 2.
We now have our tokens. Let’s deploy the connector.
Step 4 — Prepare the .env file
- Clone the IDHub’s Atlassian Connector repository and edit the .env file.
wget https://storage.googleapis.com/sath-public-binaries/connectors/idhub-Atlassian-connector.zip
unzip idhub-Atlassian-connector.zip
cd idhub-Atlassian
nano .env
ADMIN_EMAIL=ADMIN_EMAIL
BUSINESS_OWNER=BUSINESS_OWNER
CONNECTOR_DEBUG_LEVEL=CONNECTOR_DEBUG_LEVEL
DIRECTORY_API_KEY=DIRECTORY_API_KEY
DIRECTORY_ID=DIRECTORY_ID
SCIM_URL=SCIM_URL
ACCOUNT_SECURITY_API_KEY=ACCOUNT_SECURITY_API_KEY
SITE_URL=SITE_URL
IDHUB_HOSTNAME=IDHUB_HOSTNAME
IT_OWNER=IT_OWNER
KEYCLOAK_ACCESS_TOKEN=KEYCLOAK_ACCESS_TOKEN
KEYCLOAK_CLIENT_ID=KEYCLOAK_CLIENT_ID
KEYCLOAK_REALM=KEYCLOAK_REALM
KEYCLOAK_REFRESH_TOKEN=KEYCLOAK_REFRESH_TOKEN
PORT=PORT
SPLICE_DEBUG_LEVEL=SPLICE_DEBUG_LEVEL
Replace the following:
ADMIN_EMAIL: This is the administrator email of your Atlassian AccountBUSINESS_OWNER: This is the business owner name of the Atlassian applicationIT_OWNER: This is the IT owner of the Atlassian applicationIDHUB_HOSTNAME: IDHub web hostname. From prerequisites. eg. test.sath.comACCESS_TOKEN: From Step 3 output. Put it WITHOUT the quotes.REFRESH_TOKEN: From Step 3 output. Put it WITHOUT the quotes.KEYCLOAK_CLIENT_ID: From Step 1.KEYCLOAK_REALM: Tenant created in IDHub. From prerequisites. eg. alphaCONNECTOR_PORT: Atlassian connector port which you are planning to run on. The Service URL points to this port.DIRECTORY_API_KEY: This is the Atlassian directory API keyDIRECTORY_ID: This is the Atlassian directory idSCIM_URL: This is the Atlassian SCIM urlACCOUNT_SECURITY_API_KEY: This is the api key for Atlassian Admin account.SITE_URL: This is the URL for your Atlassian / atlassian products
Step 5 — Run the container
- In the connector directory, run the following command.
docker compose up -d