Microsoft AD
The purpose of this guide is to provide detailed information regarding the Microsoft AD connector. There are a number of things you can learn about this connector here, including information about its configuration and deployment.
About Microsoft AD Connector
In IDHub, you can create and onboard LDAP Microsoft AD applications using the connector.
Connector Version
In IDHub, you can create and onboard LDAP Microsoft AD applications using the connector.
| Component | Version |
|---|---|
| LDAP Microsoft AD Connector | Ver 1.0 |
| Target System | Microsoft AD |
Connector Operations
| Operation | Supported? |
|---|---|
| User Management | |
| Create user | Yes |
| Update user | Yes |
| Delete user | Yes |
| Enable user | Yes |
| Disable user | Yes |
| Group Management | |
| Create group | Yes |
| Delete group | Yes |
| Organizational Unit Management | |
| Create organizational unit | Yes |
| Delete organizational unit | Yes |
| Entitlement Grant Management | |
| Add group | Yes |
| Remove group | Yes |
Connector Components
The components of the connector include Connector Application, Connector Application Configuration, Connector Service Provider Interface, Splice, and Splice configuration.
These connection components contain precise connectivity and setup information for your target system. The connector takes information from these files to allow you to quickly and efficiently onboard your applications using a single, streamlined UI.
Connector Architecture
Microsoft Active Directory LDAP connector is based on System.DirectoryServices, a collection of classes that are managed by .NET for the purpose of facilitating the use of Microsoft Active Directory. As part of the .NET Framework, Active Directory Services Interface (ADSI) functionality is encapsulated in classes containing the System.DirectoryServices namespace.
ADSI is a built-in component of Microsoft Windows and shipped with different providers to access directories such as WinNT for local account management, NDS for accessing Novell eDirectory (formerly known as Novell Directory Services), and LDAP for accessing any directory that supports Lightweight Directory Access Protocol (LDAP) v3. This connector uses the LDAP provider to access Microsoft Active Directory.
The connector leverages the internal mechanism of ADSI and the .NET Framework, the default communication between the .NET Connector Server and Microsoft Active Directory is "secure." However, if you are using Microsoft AD LDS as the target system, then you must configure SSL between IDHub and the target system.
The connector's architecture is constructed in accordance with the diagram below:
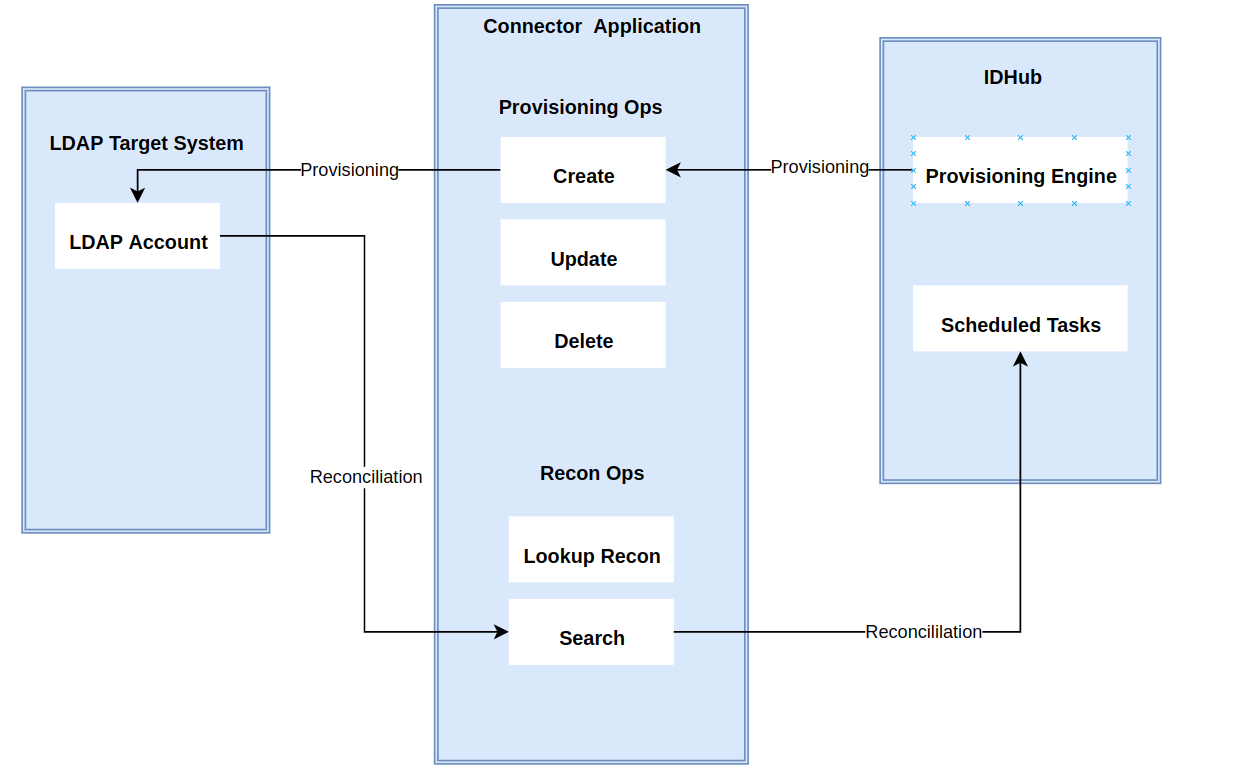 The connector architecture primarily consists of a connector application and a target system component, as seen in the screenshot up above. The native communication with the target system is handled by the target system by leveraging the SPI implementation of the Microsoft AD Specific connection. This architecture is implemented because it allows for rapid and straightforward connector deployment as well as precise versioning capabilities.
The connector is configured to run in one of the following modes:
- Target Resource reconciliation
- Users are instantly created and changed on IDHub in this situation if you rely on the Microsoft AD application as the trusted source. When user records match the reconciliation criteria, the Microsoft AD SDK retrieves them and sends them to IDHub. Each user record retrieved from the target system is cross-checked against existing IDHub Users. If there is a match between the target system record and the IDHub User, the User attributes are changed to reflect the changes made to the target system record. If no matches are identified, the target system record is utilized to generate an IDHub User.
- Account management
- This entails using IDHub to add, modify, or remove users from the target system.
- During provisioning, the connector invokes the target system's Microsoft AD SDK for provisioning tasks.
- The target system's SDK accepts provisioning data, does the necessary actions there, and then sends IDHub the result back from the target system. Applications can carry out create, read, update, and delete (CRUD) actions on the target system using the Microsoft AD SDK.
- This entails using IDHub to add, modify, or remove users from the target system.
In developing the connector, we adhere to this fundamental architecture. The IDHub team will handle the connector modification section appropriately based on your unique business requirements if there are any improvements, extra specifications, or variations.
Connector Features
Full Reconciliation and Incremental Reconciliation
Full reconciliation can be performed to bring all existing user data from the target system to IDHub. If the target system has an attribute that stores the timestamp at which an item is created or modified, you can configure your connector for incremental reconciliation once the first full reconciliation operation has been completed.
The connector's future release version will incorporate incremental & batched recon, which is not supported by the present version of the connector.
Limited Reconciliation
Records from the target system can be reconciled depending on a defined filter condition. You can define the subset of newly added or updated target system records that must be reconciled in order to restrict or filter the records that are fetched into IDHub during a reconciliation process. You can specify the conditions in which the reconciliation will take place.
Batched Reconciliation
You can break down a reconciliation run into batches by specifying the number of records that must be included in each batch.
Reconciliation of Deleted Groups
You can configure the connector for reconciling information about groups deleted in the target system. In target resource mode, if a group is deleted on the target system, then the corresponding group is revoked from IDHub.
Transformation and Validation of Account Data
You can configure transformation and validation of account data that is brought into or sent from IDHub during reconciliation and provisioning operations by writing Groovy scripts while creating your application.
Support for Connector Server
By using one or more connector servers, the connector architecture permits your application to communicate with externally deployed bundles. In other words, a connector server enables remote execution of an IDHub connector.
Connection Pooling
A connection pool is a cache of objects that represent physical connections to the target. IDHub connectors can use these connections to communicate with target systems.
At run time, the application requests a connection from the pool. If a connection is available, then the connector uses it and then returns it to the pool. A connection returned to the pool can again be requested for and used by the connector for another operation. By enabling the reuse of connections, the connection pool helps reduce connection creation overheads like network latency, memory allocation, and authentication.
One connection pool is created for each set basic configuration parameters that you provide while creating an application. For example, if you have three applications for three installations of the target system, then three connection pools will be created, one for each target system installation.
Support for Connector Operations Across Domains
The connector supports reconciliation and provisioning operations across domains. This means that, for example, you can assign a user in one domain to a group in another domain. You can also reconcile a user record even if the user and the user's manager belong to different domains.
Creating an Application by using the Connector
Pre-requisites
Creating a Target System User Account for Connector Operations
To create the Microsoft Active Directory user account for connector operations:
- Create a group (for example, OIMGroup) on the target system. While creating the group, select Security Group as the group type and Global or Universal as the group scope.
In a parent-child domain setup, create the group in the parent domain.
Make this group a member of the Account Operators group.
Assign all read permissions to this group. If there are multiple child domains in the forest, then log in to each child domain and add the above group to the Account Operators group of each child domain.
You assign read permissions on the Security tab of the Properties dialog box for the user account. This tab is displayed only in Advanced Features view. To switch to this view, select Advanced Features from the View menu on the Microsoft Active Directory console.
Create a user (for example, OIMUser) on the target system. In a parent-child domain setup, create the user in the parent domain.
Make the user a member of the group (for example, OIMGroup) created in Step 1
Assigning Permissions to Perform Delete User Reconciliation Runs
In order to enable the user account that you created for performing connector operations to retrieve information about deleted user accounts during delete reconciliation runs, you must assign permissions to the deleted objects container (CN=DeletedObjects) in the target system.
In a forest environment, if you are performing reconciliation by using the Global Catalog Server, then perform the procedure described in this section on all child domains.
To do so:
Log in to the target system as an administrator.
In a terminal window, run the following command:
dsacls DELETED_OBJ_DN /takeownership
In this command, replace DELETED_OBJ_DN with the distinguished name of the deleted directory object.
Sample value:
dsacls "CN=Deleted Objects,DC=mydomain,dc=com" /takeownership
In a terminal window, run the following command to grant a user or group permissions to perform successful runs of the delete user reconciliation scheduled job:
dsacls DELETED_OBJ_DN /G USER_OR_GROUP:PERMISSION
In this command, replace:
- DELETED_OBJ_DN with the distinguished name of the deleted directory object.
- USER_OR_GROUP with name of the user or group to which you want to assign permissions
- PERMISSION with the permissions to grant.
Sample value:
dsacls "CN=Delet ed Objects,DC=mydomain,dc=com" /G ROOT3\OIMUser:LCRP
Delegating Control for Organizational Units and Custom Object Classes
By default, user accounts that belong to the Account Operators group can manage only user and group objects. To manage organizational units or custom object classes, you must assign the necessary permissions to a user account. In other words, you must delegate complete control for an organizational unit or custom object class to a user or group object. In addition, you need these permissions to successfully perform provisioning of custom object classes.
This is achieved by using the Delegation of Control Wizard. An example for managing organizational units is creating organizational units.
To delegate control for an organizational unit or custom object class to a user account:
In a parent-child deployment environment or forest topology, perform this procedure on all the child domains.
In the Active Directory Users and Computers window, in the navigation tree, right-click the organizational unit whose control you want to delegate, and then click Delegate Control.
The Delegation of Control Wizard appears.
If you want to delegate control for all organization units under the root context, then delegate control at the root context level.
On the Welcome to the Delegation of Control Wizard page, click Next.
On the Users or Groups page, to select either a user or group to whom you want to delegate control:
- Click Add.
- In the Select Users, Computers, or Groups dialog box, enter a user or group name. For example, enter
OIMUser. - Click Check Names.
- Click OK to close the dialog box.
Click Next.
On the Tasks to Delegate page, select the Create a custom task to delegate option, and then click Next.
On the Active Directory Object Type page, select Only the following objects in the folder, and then select Organization Unit Objects. If you are delegating control for custom object classes, then select the custom object class for which you want to delegate control.
Select the Create selected objects in the folderand Delete selected objects in the folder options, and then click Next.
On the Permissions page:
- For Organizational Units, select Full Control, click Next, and then click Finish.
- For custom object classes, select the required permissions, click Next and then click Finish.
Onboard the Application in IDHub
Click here for the detailed steps for onboarding the application to IDHub
Configuring the Connector
Connectors use connection-related parameters to connect to IDHub with your target system and perform connector operations when creating a connected application. IDHub requires the following connection-related parameters in order to connect to an Microsoft AD application.
Basic Configuration of the Connector
| Parameter | Mandatory? | Description |
|---|---|---|
| Connector Server Name | Yes | If you are using this connector with a .NET Connector Server, then enter the name of Connector Server IT resource. |
| Domain Name | Yes | Enter the domain name for the domain controller in which you are creating an application by using the connector. Sample value: example.com |
| Admin User Name | Yes | Enter your admin user name Sample value: admin |
| Admin Password | Yes | Enter the password of the user account |
| Container | Yes | Enter the fully qualified domain name of the user container into or from which users must be provisioned or reconciled into IDHub. Sample value: DC=example,DC=com |
| LDAP Host Name | Yes | Enter the host name, IP address, or domain name of the target system host computer on which AD is installed. Sample values:w2khost172.20.55.120example.com |
| Domain Controller | No | Enter the name of the domain controller from which user accounts must be reconciledSample value: mynewdc |
| Port | No | Enter the number of the port at which AD is listening. Sample value: 50001 |
| UseSSL | No | Enter yes if the target system has been configured for SSL. |
| Backup Host Names | No | Enter the host name of the backup domain controller to which IDHub must switch to if the primary domain controller becomes unavailable. Sample value: mydc1;mydc2;mydc3 |
| Global Catalog Server | No | Enter the host on which the global catalog server is located. Sample value: myglobalcatalogdc |
Advanced Settings Parameters
There are some advanced settings that you can configure in the connector.
In the current version of the connector, these advanced settings cannot be configured; however, they will be available in future releases.
| Parameter | Mandatory? | Description |
|---|---|---|
| Object Class | No | This parameter holds the name of the object class to which the connector assigns newly created users on the target system. If you create a custom object class, then enter the name of that object class. For example, InetOrgPerson. Default value: User |
| Lockout Threshold | No | Enter the number of unsuccessful login attempts after which a user's account must be locked Default value: 5 |
| Always Use Object GUID? | No | This parameter specifies whether the connector must use the GUID of an object for searching records during reconciliation. Default value: yes |
| Native Guid Convention | No | This parameter specifies whether GUID is stored in its native format. This entry is used by the connector internally. Default value: true |
| Page Size | No | Enter the page size of the records fetched by the connector in each call to the target system during a reconciliation run. Paging splits the entire result set of a query into smaller subsets called, appropriately enough, pages.In general, it is recommended to set this value to the maximum page size for simple searches. By setting the page size to the maximum value, you can minimize the network roundtrips necessary to retrieve each page, which tends to be a more expensive operation for simple searches. While it is possible to specify a PageSize greater than the MaxPageSize of the target system, the Active Directory server will ignore it and use the MaxPageSize instead. No exception will be generated in this case. In some cases, you might need to specify a smaller page size to avoid timeouts or overtaxing the server. Some queries are especially expensive, so limiting the number of results in a single page can help avoid this. Default value: 1000 |
| Search Child Domains | No | This parameter determines the search scope of users, groups, or organizational units within the domain name specified as the value of the DomainName attribute. Enter no if you want the connector to search for users, groups, or organizational units only from the specified domain. The domain name is specified as the value of the DomainName attribute. Note that the connector fetches records from the domain controller that is specified as the value of the Domain Controller parameter of Basic Configuration.Enter yes if you want the connector to search for users, groups, or organizational units from the specified domain and its child domains. In this case, the global catalog server is used for fetching records. Note that you specify the global catalog server as the value of the Global Catalog Server parameter of Basic Configuration. Default value: no |
| Connector Name | Yes | This parameter holds the name of the connector class. Value: Org.IdentityConnectors.ActiveDirectory.ActiveDirectoryConnector |
| Bundle Name | Yes | This parameter holds the name of the connector bundle package. Value: ActiveDirectory.Connector |
| Bundle Version | Yes | This parameter hods the version of the connector bundle class. Value: 12.3.0.0 |
| Recon Date Format | No | This parameter holds the format in which the last reconciliation run timing must be displayed. Default value: yyyyMMddHHmmss.0Z |
| Maintain Hierarchy? | No | Enter yes to specify that you want to maintain in IDHub the same organization hierarchy that is maintained on the target system. Otherwise, enter no. Default value: no |
| Use Delete Tree For Accounts | No | This parameter specifies whether the associated leaf nodes of an ACCOUNT object to be deleted are to be removed along with the object. If the value of this entry is not set to true and the ACCOUNT object to be deleted has leaf nodes, then the operation fails and an error message is displayed. If the value of this entry is set to false, then the ACCOUNT objects are removed from the child list of its parent only. Otherwise, regardless of the object class, the whole tree is removed recursively. Default value: false |
| Create Home Directory | No | This parameter holds the information whether a home directory must be created. Enter yes if you want the connector to create a home directory for user accounts. Otherwise, enter no. Default value: yes |
| Pool Max Idle | No | Maximum number of idle objects in a pool. Default value: 10 |
| Pool Max Size | No | Maximum number of connections that the pool can create. Default value: 10 |
| Pool Max Wait | No | Maximum time, in milliseconds, the pool must wait for a free object to make itself available to be consumed for an operation. Default value: 150000 |
| Pool Min Evict Idle Time | No | Minimum time, in milliseconds, the connector must wait before evicting an idle object. Default value: 120000 |
| Pool Min Idle | No | Minimum number of idle objects in a pool. Default value: 1 |
Attribute Mappings for the Connector
| LDAP Schema | User Schema in IDHub | Sync Direction | IsVisible | Example | Type of Attribute |
|---|---|---|---|---|---|
| displayName | displayName | Bi-Directional | Visible | John33 | |
| firstName | firstName | Target system to IDHub | Visible | John | |
| Target system to IDHub | Visible | John@sath.com | Account Name Field | ||
| sn | lastName | Target system to IDHub | Visible | Garret | |
| cn | login | Target system to IDHub | Visible | John_g33 | Recon Key |
| telephoneNumber | phoneNumber | Target system to IDHub | Visible | 355-5656-6666 |
- Sync Direction of the Attributes depends on whether you regard Microsoft AD as your Trusted Source.
- You should only synchronize from IDHub to Microsoft AD and not the reverse if Microsoft AD is not a trusted system in your case.
| Possible Recon Key | Possible Recon Key Values |
|---|---|
| John@sath.com | |
| userLogin | John33 |
| employeeNumber | John8678 |
Connector Application Configuration
Connector application is designed such that it works as the wrapper application to the different scim adapters. This majorly consists of the following:
Authentication
- Basic Authentication is required
- The encrypted values of username and password will be stored in the properties file
Resource Type
These are the two resource types available for the IDHub connector. The "resourceName" attribute value in rest api calls will have one of these values.
- Account - user account in the target system - this will include entitlement membership
- Entitlement -available entitlements in the target system
Connector Splice Design
Account Schema
The Account Schema configuration of the LDAP connector Splice is as follows:
{
  "id": "urn:sath:params:scim:schemas:ldap:2.0:Account",
  "name": "Account",
  "description": "User Account",
  "schemas": [
    "urn:sath:params:scim:schemas:core:2.0:Schema"
  ],
  "meta": {
    "resourceType": "Schema",
    "location": "/v2/Schemas/Accounts"
  },
  "attributes": [
    {
      "name": "cn",
      "multiValued": false,
      "description": "The UserLogin / id of the user.  REQUIRED.",
      "returned": "always",
      "uniqueness": "global",
      "required": true
    },
    {
      "name": "givenName",
      "type": "string",
      "multiValued": false,
      "description": "The FirstName of the user.  REQUIRED.",
      "returned": "always",
      "required": true
    },
    {
      "name": "sn",
      "type": "string",
      "multiValued": false,
      "description": "The LastName of the user.  REQUIRED.",
      "returned": "always",
      "required": true
    },
    {
      "name": "displayName",
      "type": "string",
      "multiValued": false,
      "description": "The DisplayNameame of the user.  REQUIRED.",
      "returned": "always",
      "required": false
    },
    {
      "name": "telephoneNumber",
      "type": "string",
      "multiValued": false,
      "description": "The phoneNumber of the user.",
      "returned": "always",
      "required": false
    },
    {
      "name": "mail",
      "type": "string",
      "description": "The mail alias for the user.",
      "required": true,
      "returned": "always",
      "multiValued": false
    },
    {
      "name": "entityBaseDN",
      "type": "string",
      "description": "The user base DN",
      "required": false,
      "returned": "always",
      "multiValued": false
    },
    {
      "name": "password",
      "description": "Account password, Required for Creation Only",
      "required": false,
      "returned": "never",
      "multiValued": false
    },
    {
      "name": "entitlements",
      "description": "Assigned entitlement list",
      "multiValued": true,
      "required": true
    }
  ],
  "schemaConfiguration": {
    "id": "cn",
    "objectClass": [
      "top",
      "person",
      "organizationalPerson",
      "inetOrgPerson"
    ],
    "otherDefaultAttributes": {

    },
    "relationshipAttribute": "memberOf",
    "namingAttribute": "cn",
    "defaultBaseContainerDN": "ou=People,dc=iamsath,dc=com"
  }
}
Resource Type Schema
{
  "schemas": "urn:sath:params:scim:schemas:core:1.0:Account",
  "matching-attributes": [
    "uid",
    "mail"
  ],
  "attribute-map": {
    "Fname": {
      "attribute": "Fname",
      "type": ""
    },
    "Lname": {
      "attribute": "Lname",
      "type": ""
    },
    "givenName": {
      "attribute": "Fname",
      "type": ""
    },
    "sn": {
      "type": "",
      "query": ".Lname"
    },
    "displayName": {
      "attribute": "displayName"
    },
    "name": {
      "attribute": "displayName"
    },
    "id": {
      "attribute": "userName"
    },
    "userName": {
      "attribute": "userName"
    },
    "email": {
      "attribute": "email",
      "type": "",
      "query": "{mail: .emails[].value}"
    },
    "phone": {
      "attribute": "phone",
      "type": ""
    },
    "title": {
      "attribute": "title",
      "type": ""
    },
    "addresses": {
      "attribute": "addresses",
      "type": ""
    },
    "department": {
      "attribute": "department",
      "type": ""
    },
    "userType": {
      "attribute": "userType",
      "type": ""
    },
    "organization": {
      "attribute": "organization",
      "type": ""
    },
    "employeeNumber": {
      "attribute": "employeeNumber",
      "type": ""
    },
    "manager": {
      "attribute": "manager",
      "type": ""
    }
  },
  "scripts": {
  "insert": ["dn: cn=${this.uid},ou=${this.ou},dc=iamsath,dc=com\nobjectClass: top\n#person\nobjectClass: person\nsn: ${scim.name}\ncn: ${scim.Fname} ${scim.Lname}\ntelephoneNumber: ${scim.phone}\nseeAlsodescription:\n#org person\nobjectClass: organizationalPerson\ntitle: ${scim.title}\nx121Address:\nregisteredAddress:\ndestinationIndicator:\npreferredDeliveryMethod:\ntelexNumber:\nteletexTerminalIdentifier:\ninternationaliSDNNumber:\nfacsimileTelephoneNumber:\nstreet: ${scim.addresses.streetAddress}\npostOfficeBox:\npostalCode: ${scim.addresses.postalCode}\npostalAddress: ${scim.addresses.region}\nphysicalDeliveryOfficeName:\nou: People\nst: ${scim.addresses.region}\nl: ${scim.addresses.locality}\n# inet org person\nobjectClass: inetorgperson\naudio:\nbusinessCategory:\ncarLicense:\ndepartmentNumber: ${scim.department}\ndisplayName: ${scim.displayName}\nemployeeNumber: ${scim.employeeNumber}\nemployeeType: ${scim.userType}\ngivenName: ${scim.givenName}\nhomePhone: ${scim.phone}\nhomePostalAddress: ${scim.addresses.region}\ninitials:\nlabeledURI:\nmail: ${scim.email}\no: ${scim.organization}\npager:\nroomNumber:\nsecretary:\nuid: ${scim.userName}"],
  "update": ["dn: cn=${this.uid},ou=${this.ou},dc=iamsath,dc=com\nobjectClass: top\n#person\nobjectClass: person\nsn: ${scim.name}\ncn: ${scim.Fname} ${scim.Lname}\ntelephoneNumber: ${scim.phone}\nseeAlsodescription:\n#org person\nobjectClass: organizationalPerson\ntitle: ${scim.title}\nx121Address:\nregisteredAddress:\ndestinationIndicator:\npreferredDeliveryMethod:\ntelexNumber:\nteletexTerminalIdentifier:\ninternationaliSDNNumber:\nfacsimileTelephoneNumber:\nstreet: ${scim.addresses.streetAddress}\npostOfficeBox:\npostalCode: ${scim.addresses.postalCode}\npostalAddress: ${scim.addresses.region}\nphysicalDeliveryOfficeName:\nou: People\nst: ${scim.addresses.region}\nl: ${scim.addresses.locality}\n# inet org person\nobjectClass: inetorgperson\naudio:\nbusinessCategory:\ncarLicense:\ndepartmentNumber: ${scim.department}\ndisplayName: ${scim.displayName}\nemployeeNumber: ${scim.employeeNumber}\nemployeeType: ${scim.userType}\ngivenName: ${scim.givenName}\nhomePhone: ${scim.phone}\nhomePostalAddress: ${scim.addresses.region}\ninitials:\nlabeledURI:\nmail: ${scim.email}\no: ${scim.organization}\npager:\nroomNumber:\nsecretary:\nuid: ${scim.userName}"],
    "delete": [],
  "select": [],
  "mappingToExistingToResponse": [
    {
      "id": "cn=${ldif.cn}, ou=${ldif.ou}, dc=iamsath, dc=com",
      "externalId": "${ldif.dn}",
      "userName": "${ldif.uid}",
      "givenName": "${ldif.givenName}",
      "displayName": "${ldif.displayName}",
      "name": "${ldif.displayName}",
      "emails": "${ldif.mail}",
      "userType": "${ldif.employeeType}",
      "title": "${ldif.title}",
      "department": "${ldif.departmentNumber}",
      "organization": "${ldif.o}",
      "phone": "${ldif.telephoneNumber}",
      "employeeNumber": "${ldif.employeeNumber}",
      "manager": "${ldif.manager}",
      "addresses": {
        "region": "${ldif.postalAddress}",
        "locality": "${ldif.l}",
        "postalCode": "${ldif.postalCode}",
        "streetAddress": "${ldif.street}"
      }
    }

  ]
},
  "configs": {
    "OBJECT_CLASS_PRESENT": "(objectClass=person)"
  }
}
Entitlement Schema
{
"schemas"``: ``"urn:sath:params:scim:schemas:core:1.0:Account"``,
"meta"``:{
"resourceType"``: ``"User"``,
"created"``:``"2011-08-01T18:29:49.793Z"``,
"lastModified"``:``"2011-08-01T18:29:49.793Z"``,
"location"``:``"https://example.com/v2/Users/2819c223..."``,
"version"``:``"W\/\"f250dd84f0671c3\""
},
"Fname"``:``"Aman"``,
"Lname"``: ``"Singh"``,
"userName"``:``"asingh"``,
"displayName"``:``"Amar Singh"``,
"phone"``: ``"+1 5555551111"``,
"email"``: ``"amansingh@sath.com"``,
"title"``:``"System Engineer"``,
"addresses"``:{
"region"``:``"Kolkata"``,
"locality"``:``"west-bengal"``,
"postalCode"``:``"700064"``,
"countryCode"``:``"IN"``,
"country"``:``"India"``,
"streetAddress"``:``"Street 31"
},
"department"``:``"Research"``,
"userType"``:``"EMP"``,
"organization"``:``"Exelon"``,
"employeeNumber"``:``"132356456"``,
"manager"``:``"Alexa"
}
Deploying the LDAP Microsoft AD Connector
Deploying using IDHub Connector Onboarding Wizard
Click Here to view more details about how to use IDHub's Cloud Connector Onboarding wizard to deploy the connector.
Deploy on your own
Deploy on Cloud
The documentation for deploying the connector on your own Cloud Platform is coming soon
Deploy on your Server
Prerequisites
- IDHub web hostname.
- An IDHub Tenant.
- An MS Active Directory server and its IP address and Port.
- An MS Active Directory user account with password which has Read and Write permissions on all user objects of the required OU(s).
- MS Active Directory base DN.
- An Ubuntu/Debian Linux VM with Docker engine, Compose plugin, cURL, jq and unzip.
- A service URL with valid certificate which points to port 7001 on the above VM.
Run the following command to get your AD Domain BASE_DN
dsquery user -name Users Name*
- Replace users name with the name of the user
Step 1 — Creating Connector OAuth Client (ID)
From IDHub Dashboard, go to Admin Settings > Sign-On > Keycloak Administration and do the following steps.
- Go to Clients menu.
- Create client and set Client ID to ‘ldap-connector’ and Save.
- Set Valid Redirect URIs to '*' and Save.
Step 2 — Create service account user and password in Keycloak in tenant realm
In your Keycloak realm, do the following.
- Go to Users menu.
- Add user.
- Set Username to ‘ldap-service-account’ and Save.
- Go to its Credentials menu and set a password. (Note: For this tutorial, we have used ‘sapassword1’. We highly recommend using a different one for your service account).

Step 3 — Generate Access token and Refresh token
curl --location --request POST 'https://IDHUB_HOSTNAME/auth/realms/TENANT_NAME/protocol/openid-connect/token' \
--header 'Content-Type: application/x-www-form-urlencoded' \
--data-urlencode 'client_id=OAUTH_CLIENT_ID' \
--data-urlencode 'username=SERVICE_ACCOUNT_USER' \
--data-urlencode 'password=SERVICE_ACCOUNT_PASSWORD' \
--data-urlencode 'scope=offline_access' \
--data-urlencode 'grant_type=password' \
--data-urlencode 'request_token_type=urn:ietf:params:oauth:token-type:access_token' \
| jq
Replace the following:
IDHUB_HOSTNAME: The IDHub web hostname. A prerequisite. eg. test.sath.comTENANT_NAME: Tenant that you created in test.sath.com. A prerequisite. eg. alphaOAUTH_CLIENT_ID: OAuth Client ID you created in Step 1.SERVICE_ACCOUNT_USER: Service account username you created in Step 2.SERVICE_ACCOUNT_PASSWORD: Service account password you created in Step 2.
We now have our tokens. Let’s deploy the connector.
Step 4 — Prepare the .env file
- Clone the IDHub’s AD Connector repository and edit the .env file.
wget https://storage.googleapis.com/sath-public-binaries/connectors/idhub-ad-connector.zip
unzip idhub-ad-connector.zip
cd ad-connector
nano .env
IDHUB_HOSTNAME=IDHUB_HOSTNAME
KEYCLOAK_ACCESS_TOKEN=ACCESS_TOKEN
KEYCLOAK_REFRESH_TOKEN=REFRESH_TOKEN
KEYCLOAK_CLIENT_ID=OAUTH_CLIENT_ID
KEYCLOAK_REALM=TENANT_NAME
LDAP_BASE_DN=AD_DOMAIN_BASE_DN
LDAP_SEARCH_BASE=AD_DOMAIN_BASE_DN
LDAP_USERNAME=AD_ADMIN_USERNAME
LDAP_PASSWORD=AD_ADMIN_PASSWORD
LDAP_HOST_IP=AD_SERVER_IP_ADDRESS
LDAP_HOST_PORT=AD_SERVER_PORT
PORT=CONNECTOR_PORT
Replace the following:
IDHUB_HOSTNAME: IDHub web hostname. From prerequisites. eg. test.sath.comACCESS_TOKEN: From Step 3 output. Put it WITHOUT the quotes.REFRESH_TOKEN: From Step 3 output. Put it WITHOUT the quotes.OAUTH_CLIENT_ID: From Step 1. eg. ldap-connectorTENANT_NAME: Tenant created in IDHub. From prerequisites. eg. alphaAD_DOMAIN_BASE_DN: From prerequisites. eg. DC=idhub,DC=comAD_ADMIN_USERNAME: From prerequisites. eg. Administrator@idhub.comAD_ADMIN_PASSWORD: From prerequisites. eg. P@ssword1AD_SERVER_IP_ADDRESS: From prerequisites. eg. 10.128.6.87AD_SERVER_PORT: From prerequisites. eg. 389 or 636CONNECTOR_PORT: AD connector port which you are planning to run on. The Service URL points to this port.
Step 5 — Set schema configuration
- Edit Account.json file.
nano Account.json
...
},
"relationshipAttribute": "memberOf",
"namingAttribute": "cn",
"defaultBaseContainerDN": "DISTINGUISHED_NAME"
}
}
Replace the following:
DISTINGUISHED_NAME: DN of target OU where you want to sync the users from. eg. OU=Users,OU=IDHub,DC=sath,DC=com
- Edit Entitlement.json file.
nano Entitlement.json
...
},
"relationshipAttribute": "member",
"namingAttribute": "cn",
"defaultBaseContainerDN": "DISTINGUISHED_NAME_ZERO",
"searchDNs": [
{
"dn": "DISTINGUISHED_NAME_ONE",
"searchScope": "sub"
},
{
"dn": "DISTINGUISHED_NAME_TWO",
"searchScope": "sub"
}
]
}
}
- Use defaultBaseContainerDN if you have only one OU to pull AD groups from. Works only if searchDNs are not provided.
- searchDNs key can be used in scenarios where you need to pull AD groups from different OUs. Takes precedence over defaultBaseContainerDN. Remove array if not required
Step 6 — Run the container
- In the connector directory, run the following command.
docker compose up -d
- Confirm if the (JVM) service is running by running the following command.
docker logs -f ldap-idhub-connector