Salesforce
The purpose of this guide is to provide detailed information regarding the Salesforce connector. There are a number of things you can learn about this connector here, including information about its configuration and deployment.
Salesforce connector is not available currently and is coming soon
About Salesforce Connector
In IDHub, you can create and onboard Salesforce applications using the Salesforce connector.
Connector Operations
| Operation | Supported |
|---|---|
| User Management | |
| Create user | Yes |
| Update user | Yes |
| Delete user | Yes |
| Group Management | |
| Create group | Yes |
| Remove group | Yes |
| Group Grant Management | |
| Add, Remove | Yes |
| Territory Grant Management | |
| Add, Remove | Yes |
| Permission set Grant Management | |
| Add, Remove | Yes |
Connector Components
The components of the connector include Connector Application, Connector Application Configuration, Connector Service Provider Interface, Splice, and Splice configuration.
These connection components contain precise connectivity and setup information for your target system. The connector takes information from these files to allow you to quickly and efficiently onboard your applications using a single, streamlined UI.
Connector Architecture
The connector's architecture is constructed in accordance with the diagram below:

The connector architecture primarily consists of a connector application and a target system component, as seen in the screenshot up above. The native communication with the target system is handled by the target system by leveraging the SPI implementation of the Salesforce Specific connection. This architecture is implemented because it allows for rapid and straightforward connector deployment as well as precise versioning capabilities.
The connector is configured to run in one of the following modes:
- Target Resource reconciliation
- Users are instantly created and changed on IDHub in this situation if you rely on the Salesforce application as the trusted source. When user records match the reconciliation criteria, the Salesforce SDK retrieves them and sends them to IDHub. Each user record retrieved from the target system is cross-checked against existing IDHub Users. If there is a match between the target system record and the IDHub User, the User attributes are changed to reflect the changes made to the target system record. If no matches are identified, the target system record is utilized to generate an IDHub User.
- Account management
- This entails using IDHub to add, modify, or remove users from the target system. During provisioning, the connector invokes the target system's Salesforce SDK for provisioning tasks. The target system's SDK accepts provisioning data, does the necessary actions there, and then sends IDHub the result back from the target system. Applications can carry out create, read, update, and delete (CRUD) actions on the target system using the Salesforce SDK.
In developing the connector, we adhere to this fundamental architecture. The IDHub team will handle the connector modification section appropriately based on your unique business requirements if there are any improvements, extra specifications, or variations.
Use cases for the connector
Salesforce License Management On Salesforce, Profiles are used to manage licences which are in turn associated with user types. So for a particular user type, there is a fixed set of profiles. Using the Salesforce connector, you can reconcile all the profiles from Salesforce and assign them to users without worrying about the user types. Thus, switching the user from one license type to another is accomplished easily with the use of the Salesforce connector.
Salesforce User Management Salesforce is currently being used by your company, and you want to connect it to IDHub. You may want to generate and reconcile accounts from and to Salesforce and IDHub. In such a scenario, you would need to create an Salesforce connector and use the connector URL to onboard an Salesforce-connected application in IDHub. You will be able to provide accounts in the target system after successfully deploying the Salesforce connector and creating the Salesforce application. Similarly, you can perform further activities such as de-provisioning and updating accounts. IDHub offers a reconciliation feature that allows you to reconcile user identification information to and from Salesforce.
Connector Features
Full Reconciliation and Incremental Reconciliation
Full reconciliation can be performed to bring all existing user data from the target system to IDHub. If the target system has an attribute that stores the timestamp at which an item is created or modified, you can configure your connector for incremental reconciliation once the first full reconciliation operation has been completed.
The connector's future release version will incorporate incremental recon, which is not supported by the present version of the connector.
Limited Reconciliation
Records from the target system can be reconciled depending on a defined filter condition. You can define the subset of newly added or updated target system records that must be reconciled in order to restrict or filter the records that are fetched into IDHub during a reconciliation process. You can specify the conditions in which the reconciliation will take place.
Transformation and Validation of Account Data
You can configure transformation and validation of account data that is brought into or sent from IDHub during reconciliation and provisioning operations by writing Groovy scripts while creating your application.
Secure Communication to the Target System
To provide secure communication to the target system, SSL is required. You can configure SSL between IDHub and the Connector Server and between the Connector Server and the target system. If you do not configure SSL, passwords can be transmitted over the network in clear text. For example, this problem can occur when you are creating a user or modifying a user's password
Support for the Connector Server
The connector architecture enables your application to communicate with externally deployed bundles by utilizing one or more connector servers. As a result, you have the option to run the IDHub Java connector bundle on a different host for better performance if you do not wish to execute it in the same VM as the application.
Pre-requisites
Create a Connected App in Salesforce
From Setup, enter Apps in the Quick Find box, and select App Manager.
Click New Connected App.
Enter the connected app’s name, which displays in the App Manager and on its App Launcher tile.
The connected app name must be unique within your org. If the connected app was created in the Spring ‘14 release or later, you can reuse the name of a deleted connected app.
Enter the API name used when referring to your app from a program. It defaults to a version of the name without spaces. Only letters, numbers, and underscores are allowed, so if the original app name contains any other characters, edit the default name.
Enter the contact email for Salesforce to use in case we want to contact you or your support team. This address isn’t given to Salesforce admins who install the app.
Enter the contact phone for Salesforce to use in case we want to contact you or your support team. This number isn’t given to Salesforce admins who install the app.
To display your logo with the connected app on the App Launcher tile, enter a logo image URL. Your logo also displays on the consent page that users see when approving the app.
The logo URL must use HTTPS. The logo image must be a GIF, JPG, or PNG file with a file size that’s preferably under 20 KB and no more than 100 KB. We resize the image to 128 pixels by 128 pixels, so be sure that you like how it looks. If you don’t supply a logo, Salesforce generates one for you using the app’s initials.
- To upload your logo image, click Upload logo image. Select an image from your local file system that meets the size requirements. When your upload is successful, the URL to the logo appears in the Logo Image URL field.
- To upload a Salesforce sample logo, click Choose one of our sample logos. The sample logos include Salesforce apps, third-party apps, and standards bodies. Click the logo you want, and then copy and paste the appropriate URLs into the Logo Image URL field and Icon URL field.
- To use a logo hosted publicly on Salesforce servers, upload an image as a document from the Documents tab. To get the URL, view the image, copy the URL, and paste the URL in the Logo Image URL field.
If you have a web page with more information about your app, provide an info URL.
To display a description on the connected app’s App Launcher tile, enter up to 256 characters. If you don’t supply a description, only the connected app’s name displays on the tile.
Give Integration Users API Only Access
Following the principle of least privilege, we recommend creating and configuring one Salesforce user for every integration. By assigning a different user to each calling system, use case, domain, or API resource, you restrict each of those users to a unique subset of data and functionality. Setting up dedicated integration users gives you more control over operations and traceability of transactions. And it minimizes the impact if a user or integration is compromised.
Set up profile
The first thing you need to do is to create the API Only profile that will be set as the profile type of the integration user account.
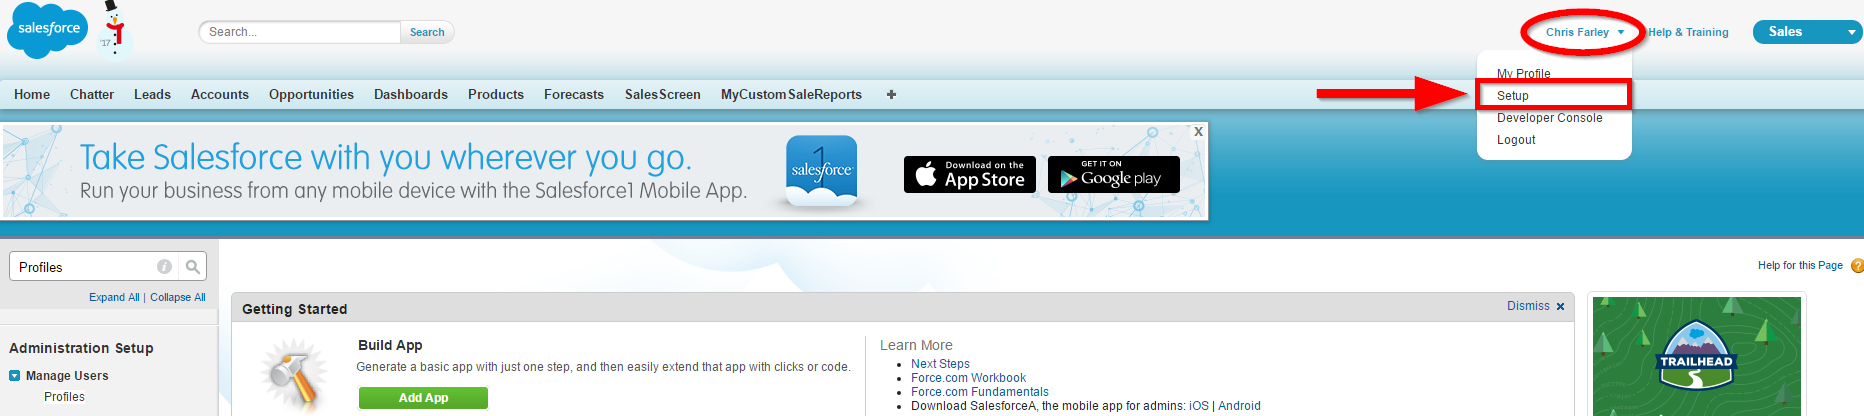
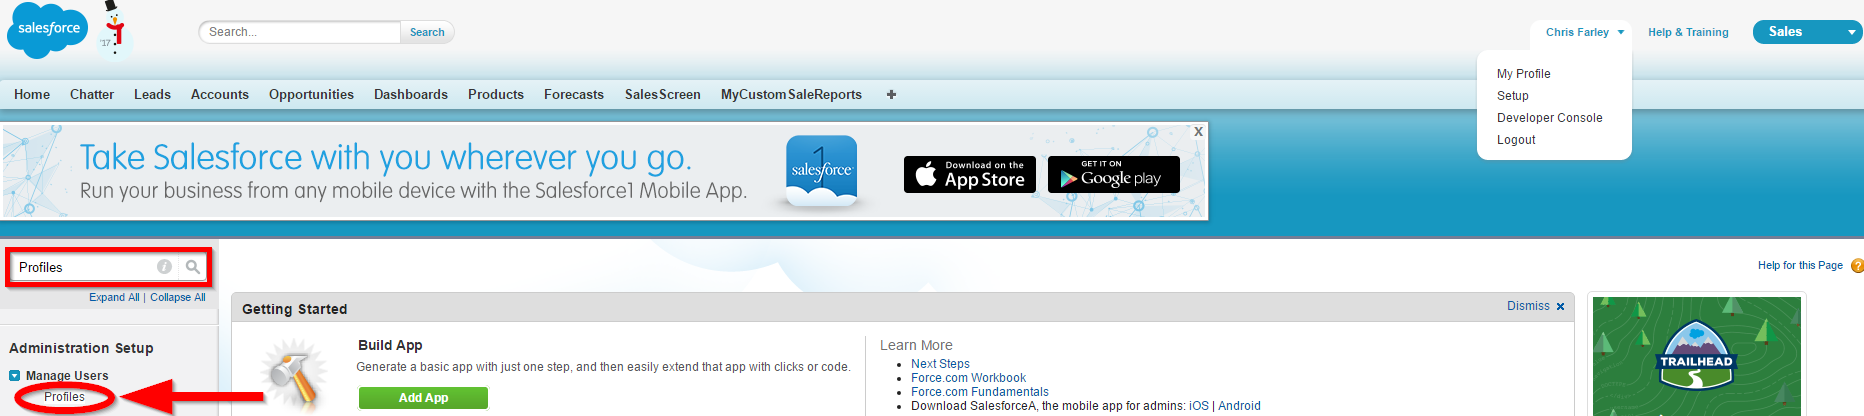
Step 1
From Setup, input "Profiles" in the search field and select Profiles under Manage Users.
Step 2
In the User Profiles list, click New.

Step 3
The existing profile to be cloned from must have a full Salesforce license. In the example below, we've chosen System Administrator - which indeed has a full Salesforce license.
Set the Profile Name to be "API Only" and finally, click Save.

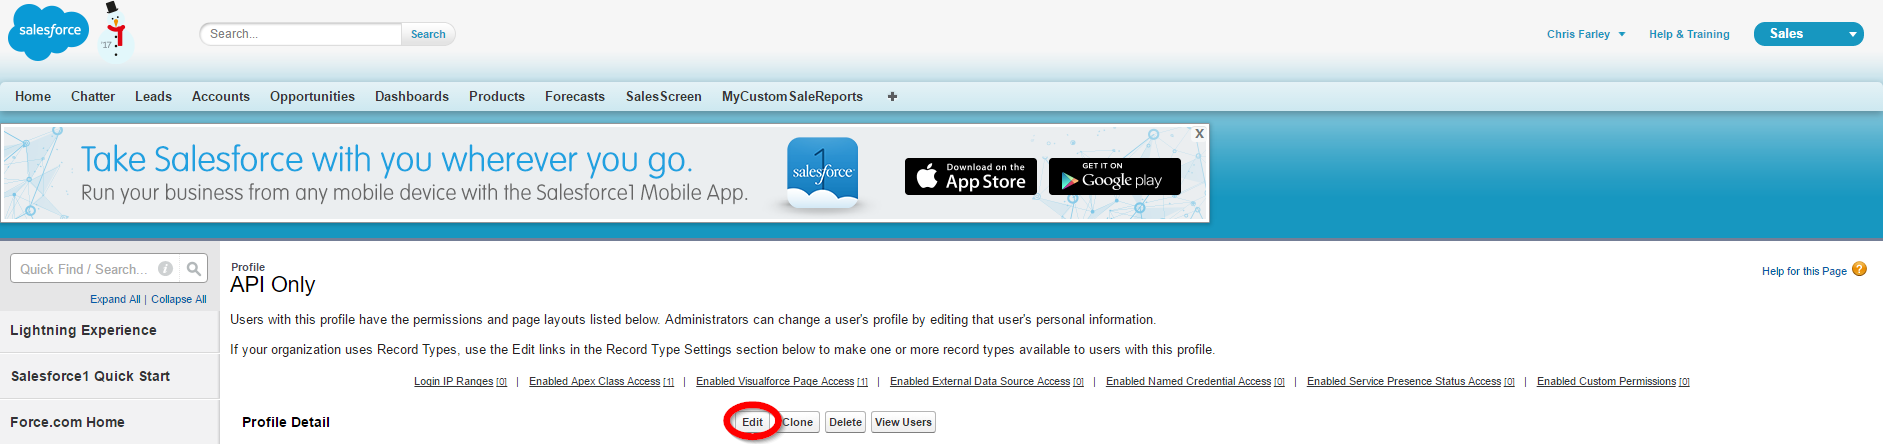
Step 4
After having saved the new profile in Step 3, you'll be presented with an overview of the profile, as seen in the image below.
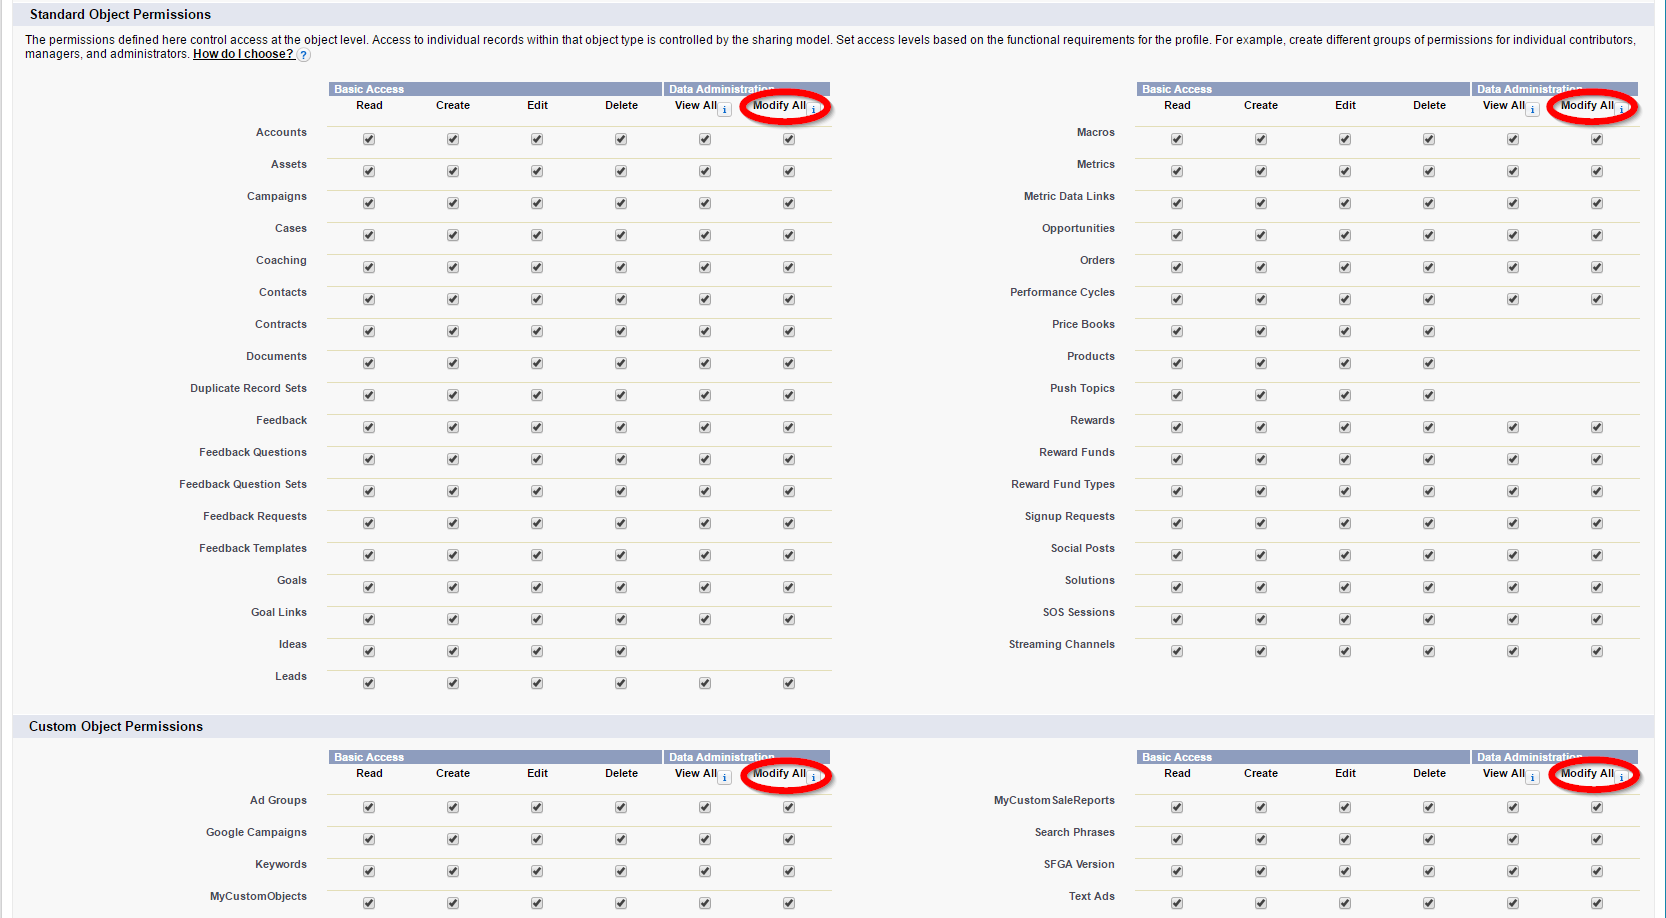
Proceed to click Edit and make sure that both the Standard Object Permissions and Custom Object Permissions allow Modify All as shown for the three standard objects in the image below.
Step 5 (Optional)
If you don't want the API Only user account to be allowed access to the Salesforce website dashboards, like typical Salesforce users, you can make sure the API Only User option is checked, like in the image below. Finally, scroll all the way up or down and click Save.

Create user with 'API Only' profile
Now that the API Only profile has been set up, it's time to create a user with this profile.
Step 1
At the API Only profile overview, click View Users.

Step 2
Click New User and proceed to set the User License to Salesforce and the Profile to be API Only, as shown in the image below.

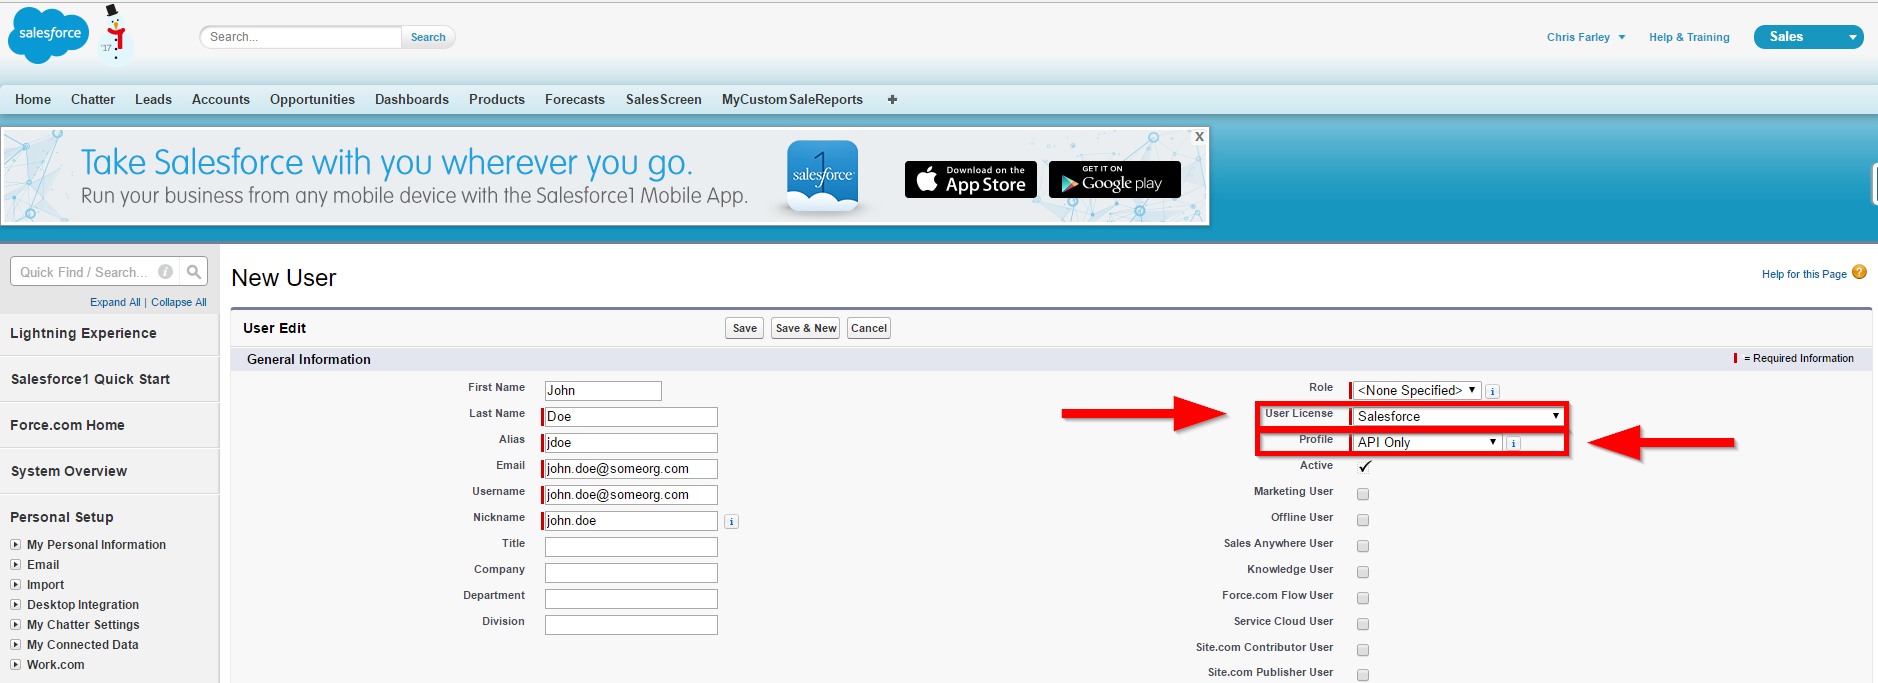
Finally, click Save and use this newly created user account - under the API Only profile
Creating an Application by using the Connector
Onboard the Application in IDHub
Click here for the detailed steps for onboarding the application to IDHub
Configuring the Connector
Connectors use connection-related parameters to connect to IDhub with your target system and perform connector operations when creating a connected application. IDHub requires the following connection-related parameters in order to connect to an Salesforce application.
Basic Configuration of the Connector
| Parameter | Mandatory | Description |
|---|---|---|
| authenticationServerUrl | No | URL of the authentication server that validates the client ID and client secret. |
| clientId | No | The client identifier (a unique string) issued by the authorization server to your domain |
| clientSecret | No | Value used to authenticate the identity of your domain. |
| ConnectorServer Name | No | If you are using Salesforce Connector together with the Java Connector Server, then provide the name of Connector Server IT Resource here. |
| authenticationType | Yes | This entry holds the authentication type expected by the target system in the header. Default Value: password |
| Host | Yes | Enter the host name or IP address of the computer hosting the target system. Sample Value: www.example.com |
| Password | No | Enter the password of the target system user account that you create for connector operations. |
| sslEnabled | No | If the target system requires SSL connectivity, set the value of this parameter to true. Otherwise set the value to false. |
| proxyHost | No | Enter the name of the proxy host used to connect to an external target. Sample Value: www.example.com. |
| proxyPassword | No | Enter the password of the proxy user ID of the target system user account |
| proxyPort | No | Enter the proxy port number.Sample Value: 80 |
| proxyUser | No | Enter the proxy user name of the target system user account that IDHub uses to connect to the target system. |
| Username | No | Enter the user name of the target system that you create for performing connector operations. |
Advanced Settings Parameters
There are some advanced settings that you can configure in the connector.
In the current version of the connector, these advanced settings cannot be configured; however, they will be available in future releases.
| Parameter | Mandatory | Description |
|---|---|---|
| Bundle Name | No | This entry holds the name of the connector bundle package. Sample Value:org.identityconnectors.genericrest |
| Bundle Version | No | This entry holds the version of the connector bundle package. Sample Value: 12.3.0 |
| Connector Name | No | This entry holds the name of the connector class. Sample Value: org.identityconnectors.genericrest.GenericRESTConnector |
| customPayload | No | This entry holds the payloads for all operations that are not in the standard format. |
| jsonResourcesTag | No | This entry holds the name of the JSON tag that holds user details in the response payload. |
| pageSize | No | This entry holds the value of the number of records that can be retrieved from the target system in one go. Sample Value: 200 |
| httpHeaderContentType | No | This entry holds The content type of request body Sample value: application/json |
| httpHeaderAccept | No | This entry holds the accept request-header field can be used to specify certain media types which are acceptable for the response Sample Value: application/json |
| nameAttributes | Yes | This is the NAME attribute mapping of Oracle Identity Governance to the relevant attribute on target system. "` |
| opTypes | No | This entry holds Target supported HTTP operations for each attribute in each object class |
| passwordAttributes | No | This entry holds the name of the target system attribute that is mapped to the PASSWORD attribute of the connector in OIG. Sample Value: NewPassword |
| relURIs | Yes | This entry holds the list of relative URI’s |
| specialAttributeHandling | No | This entry holds Value that will represent how to send values of the corresponding special attribute to the target, Ex: SINGLE, if no value is given it means it will consider default, i.e it will send all values to the target |
| specialAttributeTargetFormat | No | This entry holds format of special attribute in target |
| statusAttributes | No | This is the ENABLE attribute mapping of Oracle Identity Governance to the Status attribute on target system. Sample Value: "__ACCOUNT__.IsActive" |
| uidAttributes | Yes | This is the UID attribute mapping of Oracle Identity Governance to the GUID attribute on target system. |
Attribute Mappings for the Connector
| SalesForce Schema | User Schema in IDHub | Sync Direction | IsVisible | Example | Type of Attribute |
|---|---|---|---|---|---|
| country | country | Bi-Directional | Visible | UK | |
| displayName | displayName | Bi-Directional | Visible | John_Depp | |
| familyName | lastName | Bi-Directional | Visible | Depp | |
| givenName | firstName | Bi-Directional | Visible | John | |
| id | login | Bi-Directional | Hidden | ||
| locality | city | Bi-Directional | Visible | London | |
| meta | SalesForceMeta | Bi-Directional | Visible | ||
| phoneNumber | phoneNumber | Bi-Directional | Visible | 8847-487-8874 | |
| postalCode | postalCode | Bi-Directional | Visible | 99478757 | |
| primaryEmail | Bi-Directional | Visible | John@sath.com | Reconciliation Key | |
| streetAddress | officeAddressLine | Bi-Directional | Visible | Boulevard St. | |
| department | department | Bi-Directional | Visible | IT | |
| title | jobTitle | Bi-Directional | Visible | Manager | |
| manager | managerLogin | Bi-Directional | Visible | Mang234 | |
| managerDisplayName | managerDisplayName | Bi-Directional | Visible | Depp | |
| homeAddressLine | homeAddressLine | Bi-Directional | Visible | Bl. St. | |
| organization | organizationName | Bi-Directional | Visible | Sath | |
| employeeNumber | employeeNumber | Bi-Directional | Visible | John8678 | |
| alias | alias | Bi-Directional | Visible | ||
| division | division | Bi-Directional | Visible | ||
| externalId | Hidden | ||||
| middleName | middleName | Bi-Directional | Visible | Garret | |
| nickName | nickName | Bi-Directional | Visible | Johny | |
| profileType | profileType | Bi-Directional | Visible | Sales | |
| region | state | Bi-Directional | Visible | London | |
| role | role | Bi-Directional | Visible | Manager | |
| schemas | Hidden | ||||
| timezone | Hidden | GMT | |||
| userName | login | Bi-Directional | Visible | Jhn33 | Account Name Field |
- SalesForceMeta is a custom IDHub field
- In order to create this field, click on the
Add New Fieldfrom the IDHub Field schema and then enter the name of the custom field in the dropdown and click onsave. Make sure that you select the Multi-Value toggle for the field.
- In order to create this field, click on the
- Sync Direction of the Attributes depends on whether you regard SalesForce as your Trusted Source.
- You should only synchronize from IDHub to Salesforce and not the reverse if Salesforce is not a trusted system in your case.
Possible Recon Keys and Values
| Possible Recon Key | Possible Recon Key Values |
|---|---|
| primaryEmail | John@sath.com |
| userName | John33 |
| manager | Mang234 |
| employeeNumber | John8678 |
Connector Application Configuration
Connector application is designed such that it works as the wrapper application to the different scim adapters. This majorly consists of the following:
Authentication
- Basic Authentication is required
- The encrypted values of username and password will be stored in the properties file
Resource Type
These are the two resource types available for the IDHub connector. The "resourceName" attribute value in rest api calls will have one of these values.
- Account - user account in the target system - this will include entitlement membership
- Entitlement -available entitlements in the target system
Salesforce Connector Splice configuration
In order to provision, modify, and revoke two main resources, Accounts and Entitlements, the Salesforce Connector Splice integrates with the IDHub Connector Application. IDHub's Account translates into a User in SCIM and Salesforce, whereas IDHub's Entitlements translate into a Groups or policies in Salesforce. Salesforce provides SDK for Java to access data on Salesforce.
Connector Splice Design
Account Schema
The Account Schema configuration of the Salesforce connector Splice is as follows:
{
  "schemas" : [ "urn:ietf:params:scim:schemas:core:2.0:Schema" ],
  "id" : "urn:sath:params:scim:api:salesforce:1.0:Account",
  "name" : "Account",
  "description" : "To create / update Salesforce accounts",
  "attributes" : [ {
    "name" : "alias",
    "multiValued" : false,
    "description" : "8 character nickanme",
    "idhubFieldName" : "alias"
  }, {
    "name" : "country",
    "multiValued" : false,
    "description" : "The country",
    "idhubFieldName" : "country"
  }, {
    "name" : "department",
    "multiValued" : false,
    "description" : "The department of the user",
    "idhubFieldName" : "department"
  }, {
    "name" : "displayName",
    "multiValued" : false,
    "description" : "The name of the User, suitable for display",
    "mutability" : "readOnly",
    "required" : true,
    "idhubFieldName" : "displayName"
  }, {
    "name" : "division",
    "multiValued" : false,
    "description" : "The division of the user",
    "idhubFieldName" : "division"
  }, {
    "name" : "employeeNumber",
    "multiValued" : false,
    "description" : "The employee number of the user",
    "idhubFieldName" : "employeeNumber"
  }, {
    "name" : "externalId",
    "multiValued" : false,
    "description" : "Unique identifier for the Resource as defined by the Service Consumer",
    "caseExact" : true
  }, {
    "name" : "familyName",
    "multiValued" : false,
    "description" : "The family name (lastName) of the User",
    "required" : true,
    "idhubFieldName" : "lastName"
  }, {
    "name" : "givenName",
    "multiValued" : false,
    "description" : "The givenName of the user",
    "required" : true,
    "idhubFieldName" : "firstName"
  }, {
    "name" : "id",
    "multiValued" : false,
    "description" : "Unique identifier for the SCIM resource as defined by the Service Provider.",
    "mutability" : "readOnly"
  }, {
    "name" : "locality",
    "multiValued" : false,
    "description" : "The city or locality",
    "idhubFieldName" : "city"
  }, {
    "name" : "manager",
    "multiValued" : false,
    "description" : "The manager of the user",
    "idhubFieldName" : "managerLogin"
  }, {
    "name" : "managerDisplayName",
    "multiValued" : false,
    "description" : "The manager displayName of the user",
    "idhubFieldName" : "managerDisplayName"
  }, {
    "name" : "meta",
    "multiValued" : false,
    "description" : "A complex attribute containing resource metadata.",
    "mutability" : "readOnly",
    "subAttributes" : [ {
      "name" : "resourceType",
      "multiValued" : false,
      "description" : "The name of the resource type of the resource.",
      "mutability" : "readOnly",
      "caseExact" : true
    }, {
      "name" : "created",
      "multiValued" : false,
      "type" : "dateTime",
      "description" : "The DateTime that the resource was added to the service provider."
    }, {
      "name" : "lastModified",
      "multiValued" : false,
      "type" : "dateTime",
      "description" : "The most recent DateTime that the details of this resource were updated at the service provider."
    }, {
      "name" : "location",
      "multiValued" : false,
      "description" : "The name of the resource type of the resource.",
      "mutability" : "readOnly",
      "caseExact" : true
    }, {
      "name" : "version",
      "multiValued" : false,
      "description" : "The version of the resource being returned.",
      "mutability" : "readOnly",
      "caseExact" : true
    } ]
  }, {
    "name" : "middleName",
    "multiValued" : false,
    "description" : "The middleName of the User",
    "idhubFieldName" : "middleName"
  }, {
    "name" : "nickName",
    "multiValued" : false,
    "description" : "The casual way to address the user in real life",
    "idhubFieldName" : "nickName"
  }, {
    "name" : "organization",
    "multiValued" : false,
    "description" : "The organization the user belongs to",
    "mutability" : "readOnly",
    "idhubFieldName" : "organizationName"
  }, {
    "name" : "phoneNumber",
    "multiValued" : false,
    "type" : "complex",
    "description" : "Phone numbers for the User",
    "idhubFieldName" : "phoneNumber"
  }, {
    "name" : "postalCode",
    "multiValued" : false,
    "description" : "The zip or postalCode",
    "idhubFieldName" : "postalCode"
  }, {
    "name" : "primaryEmail",
    "multiValued" : false,
    "description" : "Primary email address of user.",
    "returned" : "always",
    "uniqueness" : "global",
    "required" : true,
    "idhubFieldName" : "email"
  }, {
    "name" : "profileType",
    "multiValued" : false,
    "type" : "dropdown",
    "description" : "Licence of user",
    "required" : true,
    "idhubFieldName" : "profileType",
    "options" : [ {
      "id" : "00e5i000000ub1EAAQ",
      "displayName" : "Salesforce API Only System Integrations"
    }, {
      "id" : "00e5i000004lwsBAAQ",
      "displayName" : "System Administrator"
    }, {
      "id" : "00e5i000004lwsCAAQ",
      "displayName" : "Chatter Free User"
    }, {
      "id" : "00e5i000004lwsDAAQ",
      "displayName" : "Analytics Cloud Integration User"
    }, {
      "id" : "00e5i000004lwsEAAQ",
      "displayName" : "Analytics Cloud Security User"
    }, {
      "id" : "00e5i000004lwsGAAQ",
      "displayName" : "External Apps Login User"
    }, {
      "id" : "00e5i000004lwsHAAQ",
      "displayName" : "Minimum Access - Salesforce"
    }, {
      "id" : "00e5i000004lwsIAAQ",
      "displayName" : "Standard Platform User"
    }, {
      "id" : "00e5i000004lwsJAAQ",
      "displayName" : "Customer Community Login User"
    }, {
      "id" : "00e5i000004lwsKAAQ",
      "displayName" : "Cross Org Data Proxy User"
    }, {
      "id" : "00e5i000004lwsLAAQ",
      "displayName" : "Authenticated Website"
    }, {
      "id" : "00e5i000004lwsMAAQ",
      "displayName" : "Work.com Only User"
    }, {
      "id" : "00e5i000004lwsNAAQ",
      "displayName" : "Customer Portal Manager Custom"
    }, {
      "id" : "00e5i000004lwsOAAQ",
      "displayName" : "Identity User"
    }, {
      "id" : "00e5i000004lwsPAAQ",
      "displayName" : "Customer Community Plus User"
    }, {
      "id" : "00e5i000004lwsQAAQ",
      "displayName" : "Silver Partner User"
    }, {
      "id" : "00e5i000004lwsRAAQ",
      "displayName" : "High Volume Customer Portal"
    }, {
      "id" : "00e5i000004lwsSAAQ",
      "displayName" : "Gold Partner User"
    }, {
      "id" : "00e5i000004lwsTAAQ",
      "displayName" : "Customer Portal Manager Standard"
    }, {
      "id" : "00e5i000004lwsUAAQ",
      "displayName" : "Force.com - App Subscription User"
    }, {
      "id" : "00e5i000004lwsVAAQ",
      "displayName" : "Customer Community Plus Login User"
    }, {
      "id" : "00e5i000004lwsWAAQ",
      "displayName" : "Partner App Subscription User"
    }, {
      "id" : "00e5i000004lwsXAAQ",
      "displayName" : "External Identity User"
    }, {
      "id" : "00e5i000004lwsYAAQ",
      "displayName" : "Partner Community User"
    }, {
      "id" : "00e5i000004lwsZAAQ",
      "displayName" : "Partner Community Login User"
    }, {
      "id" : "00e5i000004lwsaAAA",
      "displayName" : "Customer Community User"
    }, {
      "id" : "00e5i000004lwsbAAA",
      "displayName" : "Force.com - Free User"
    }, {
      "id" : "00e5i000004lwscAAA",
      "displayName" : "Chatter Moderator User"
    }, {
      "id" : "00e5i000004lwsdAAA",
      "displayName" : "Chatter External User"
    }, {
      "id" : "00e5i000004lwseAAA",
      "displayName" : "High Volume Customer Portal User"
    }, {
      "id" : "00e5i000004lwsfAAA",
      "displayName" : "Authenticated Website"
    }, {
      "id" : "00e5i000004lwsgAAA",
      "displayName" : "Solution Manager"
    }, {
      "id" : "00e5i000004lwshAAA",
      "displayName" : "Read Only"
    }, {
      "id" : "00e5i000004lwsiAAA",
      "displayName" : "Custom: Sales Profile"
    }, {
      "id" : "00e5i000004lwsjAAA",
      "displayName" : "Custom: Marketing Profile"
    }, {
      "id" : "00e5i000004lwskAAA",
      "displayName" : "Custom: Support Profile"
    }, {
      "id" : "00e5i000004lwslAAA",
      "displayName" : "Marketing User"
    }, {
      "id" : "00e5i000004lwsmAAA",
      "displayName" : "Contract Manager"
    }, {
      "id" : "00e5i000004lwsnAAA",
      "displayName" : "Standard User"
    } ]
  }, {
    "name" : "region",
    "multiValued" : false,
    "description" : "The state or region",
    "idhubFieldName" : "state"
  }, {
    "name" : "role",
    "multiValued" : false,
    "type" : "dropdown",
    "description" : "Role of user",
    "idhubFieldName" : "role",
    "options" : [ {
      "id" : "00E5i000000lRuVEAU",
      "displayName" : "Test Role1"
    }, {
      "id" : "00E5i000000lRuaEAE",
      "displayName" : "test role2"
    }, {
      "id" : "00E5i000000lZtGEAU",
      "displayName" : "test role3"
    }, {
      "id" : "00E5i000002ih7sEAA",
      "displayName" : "CEO"
    }, {
      "id" : "00E5i000002ih7tEAA",
      "displayName" : "SVP, Sales & Marketing"
    }, {
      "id" : "00E5i000002ih7uEAA",
      "displayName" : "VP, North American Sales"
    }, {
      "id" : "00E5i000002ih7vEAA",
      "displayName" : "Director, Direct Sales"
    }, {
      "id" : "00E5i000002ih7wEAA",
      "displayName" : "VP, Marketing"
    }, {
      "id" : "00E5i000002ih7xEAA",
      "displayName" : "SVP, Customer Service & Support"
    }, {
      "id" : "00E5i000002ih7yEAA",
      "displayName" : "Director, Channel Sales"
    }, {
      "id" : "00E5i000002ih7zEAA",
      "displayName" : "CFO"
    }, {
      "id" : "00E5i000002ih80EAA",
      "displayName" : "Western Sales Team"
    }, {
      "id" : "00E5i000002ih81EAA",
      "displayName" : "Customer Support, North America"
    }, {
      "id" : "00E5i000002ih82EAA",
      "displayName" : "Channel Sales Team"
    }, {
      "id" : "00E5i000002ih83EAA",
      "displayName" : "Marketing Team"
    }, {
      "id" : "00E5i000002ih84EAA",
      "displayName" : "Installation & Repair Services"
    }, {
      "id" : "00E5i000002ih85EAA",
      "displayName" : "Eastern Sales Team"
    }, {
      "id" : "00E5i000002ih86EAA",
      "displayName" : "Customer Support, International"
    }, {
      "id" : "00E5i000002ih87EAA",
      "displayName" : "VP, International Sales"
    }, {
      "id" : "00E5i000002ih88EAA",
      "displayName" : "SVP, Human Resources"
    }, {
      "id" : "00E5i000002ih89EAA",
      "displayName" : "COO"
    } ]
  }, {
    "name" : "schemas",
    "multiValued" : true,
    "description" : "The schemas attribute is a REQUIRED attribute and is an array of Strings containing URIs that are used to indicate the namespaces of the SCIM schemas that define the attributes present in the current JSON structure.",
    "mutability" : "readOnly",
    "returned" : "always",
    "caseExact" : true,
    "required" : true
  }, {
    "name" : "streetAddress",
    "multiValued" : false,
    "description" : "The full street address component",
    "idhubFieldName" : "officeAddressLine1"
  }, {
    "name" : "timezone",
    "multiValued" : false,
    "description" : "The Users time zone in the Olson timezone database format;  e.g., America/Los_Angeles"
  }, {
    "name" : "title",
    "multiValued" : false,
    "description" : "The Users title, such as Vice President",
    "idhubFieldName" : "jonTitle"
  }, {
    "name" : "userName",
    "multiValued" : false,
    "description" : "Unique identifier for the User",
    "required" : true,
    "idhubFieldName" : "login"
  } ]
}
Entitlement Schema
The Entitlement Schema configuration of the Salesforce connector Splice is as follows:
{
  "attributes": [
    {
      "name": "displayName",
      "multiValued": false,
      "description": "The displayName of the Entitlement.",
      "required": true
    }, {
      "name": "type",
      "multiValued": false,
      "description": "The type of the Entitlement.",
      "required": true
    }, {
      "name": "id",
      "multiValued": false,
      "description": "The complex id of the Entitlement.",
      "returned": "always",
      "caseExact": true,
      "required": true
    }, {
      "name": "meta",
      "multiValued": false,
      "description": "A complex attribute containing resource metadata.",
      "mutability": "readOnly",
      "subAttributes": [
        {
          "name": "resourceType",
          "multiValued": false,
          "description": "The name of the resource type of the resource.",
          "mutability": "readOnly",
          "caseExact": true
        }, {
          "name": "created",
          "multiValued": false,
          "type": "dateTime",
          "description": "The DateTime that the resource was added to the service provider."
        }, {
          "name": "lastModified",
          "multiValued": false,
          "type": "dateTime",
          "description": "The most recent DateTime that the details of this resource were updated at the service provider.  If this resource has never been modified since its initial creation, the value MUST be the same as the value of created."
        }, {
          "name": "location",
          "multiValued": false,
          "description": "The name of the resource type of the resource.",
          "mutability": "readOnly",
          "caseExact": true
        }, {
          "name": "version",
          "multiValued": false,
          "description": "The version of the resource being returned.",
          "mutability": "readOnly",
          "caseExact": true
        }
      ]
    }, {
      "name": "schemas",
      "multiValued": true,
      "description": "The schemas attribute is a REQUIRED attribute and is an array of Strings containing URIs that are used to indicate the namespaces of the SCIM schemas that define the attributes present in the current JSON structure.",
      "mutability": "readOnly",
      "returned": "always",
      "caseExact": true,
      "required": true
    }
  ]
}
Deploying the Salesforce Connector
The documentation for deploying the connector is coming soon